SSH-based tunnels and proxies for FIS network access
Prerequisites
- A FIS network host (gateway with external SSH access
enabled) running your favorite GNU/Linux flavor
- i.e. taurus......pl (149......109.1)
or newton.....pl (149......110.2). - The SSH service running on FIS network host (gateway), with the
forwarding option enabled (it is enabled by
default). If it is disabled, look for the parameter
AllowTcpForwarding noin your server's
/etc/ssh/sshd_config file, and change it to yes before restarting the service. - The ability to remotely access your server using SSH (by its host name or IP address).
- SSH client software on the computer you will use for connecting: an Open-SSH based client for Linux
or Mac OS X, MobaXterm or PuTTY for Windows.
I. Setting Up tunnelled RDP connection to a Windows desktop inside FIS network
MobaXterm on Windows
It works by launching a RDP remote session to your Windows desktop computer using SSH as a tunnel.
Create a new RDP Session
Launch MobaXterm on local Windows system and press Session button. Select RDP button.
-
Fill Remote host field (type IP address of a Windows desktop inside FIS network you are going to connect to) in Basic Rdp settings tab. Select Advanced Rdp settings tab.
Select Connect through SSH gateway (jump host) checkbox and fill Gateway SSH server field with IP address or DNS name of given FIS gateway host and User field thereof.
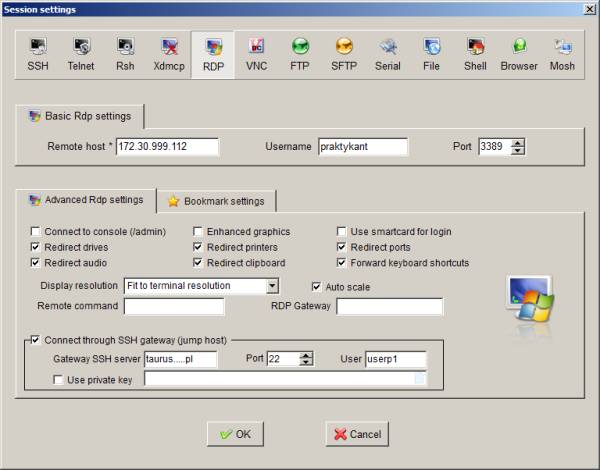
Select Bookmark settings tab and fill session name of your choosing. You may also change the way remote session window is initially displayed.
-
After creating the session the first connection attempt will be performed.
In the first pop-up window, type the password for given account on SSH FIS gateway host.
Next, in the second pop-up window, type the password for the account on Windows desktop you are connecting to.
-
In the session options or after connecting to the Windows desktop you may customize the way a desktop is displayed by MobaXterm. For example, detach tab into separate window, fit to window size, etc.
-
To disconnect remote desktop session, first select Log out from it's Start menu, than close MobaXterm application.
II. Setting Up tunnelled SSH connection to a Linux host inside FIS network
Linux and MobaXterm on Windows
As of OpenSSH 5.4 [*], a 'netcat mode' can connect stdio on the client to a single port forwarded on the server. This can also be used to connect using ssh(1), but it needs the ProxyCommand option either as a run time parameter or as part of ~/.ssh/config. However, it no longer needs netcat to be installed on the intermediary machine(s). Here is an example of using it in a run time parameter.
$ ssh -Y -o ProxyCommand="ssh -Y -W %h:%p user1@gateway.fis........pl" user2@internal_SSH_host_IPor, simply (if possible): $ ssh -Y -tt user1@gateway.fis........pl ssh -Y -tt user2@internal_SSH_host_IP |
user2@internal_SSH_host_IP -- is your login on final host inside FIS network (without direct SSH access).
In that example, authentication will happen twice, first on the gateway host and then on the final host where it will bring up a shell.
"PuTTY over PuTTY" on Windows
It works by launching a SOCKS proxy server on your computer using SSH. It will listen on a local port and your browser will connect to the web using that service.
a) Launching PuTTY as a SOCKS Server
The first step is to launch the SOCKS server and establish a connection to FIS network host (gateway, with external SSH access). To establish a tunnel in Windows, you can use the free SSH client PuTTY. It can be downloaded from this link.
-
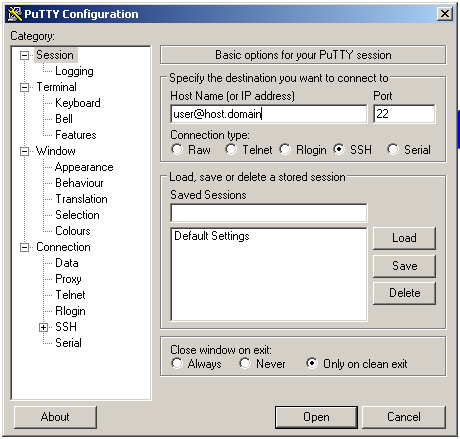
Launch PuTTY. On the first screen you will need to type your login information (on given FIS gateway host) in the Host Name (or IP address) box. The SSH protocol and Port are checked by default.
-
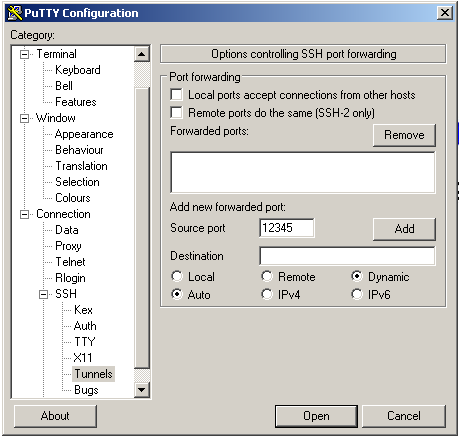
Under the Connection menu, under SSH select Tunnels. There you must enter the port you want (12345, for example) in Source Port, and check Dynamic.
-
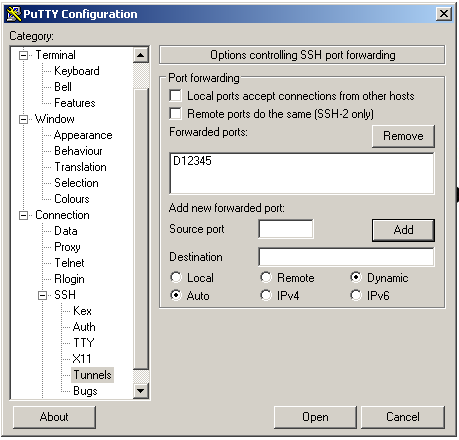
Then press the Add button. In the Forwarded ports text area, you will now see D12345.
-
Click the Open button. A new window asking for your password will appear. After you type your password you will be logged in to FIS network host (gateway) and the tunnel will be launched. Now you can minimize this window and go to the browser.
b) Launching PuTTY as a SOCKS Client
The second step is to launch the PuTTY session to the final host inside FIS network (without direct SSH access).
- Launch PuTTY again. On the first screen you will
need to type your login information in the Host
Name (or IP address) box, this time for
the final host inside FIS network.
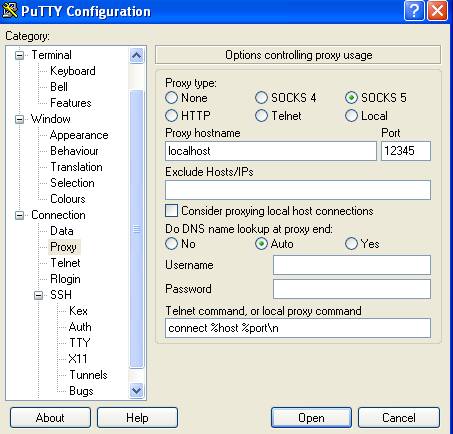
- Under the Connection menu, select Proxy.
There you must select SOCKS 5 radio
button, enter localhost in proxy hostname
box, and port number you have selected during
tunnel setup in step (a) (12345,
for example) in Port.
- Click the Open button. A new window asking for your password will appear. After you type your password you will be logged in to the final host inside FIS network.
III. Setting up a SSH Tunnel with FIS network host for web browsing
This guide will show you how to establish a secure connection for browsing the web through a tunnel between your computer and FIS network host. With this method, you will set up a tunnel between your computer and FIS network host. All your web traffic will be encrypted and forwarded from FIS network host on to its final destination.
It works by launching a SOCKS proxy server on your computer using SSH. It will listen on a local port and your browser will connect to the web using that service.
a) Launching the SOCKS Server
The first step is to launch the SOCKS server and establish a connection to FIS network host.
Linux and MobaXterm on Windows
-
From a command line run (first, replace host.domain with a real domain name or IP address of given FIS gateway host):
$ ssh -D 12345 user@host.domain
-D 12345 -- tells SSH to run the SOCKS server on port 12345.
user -- is your login on given FIS gateway host with external SSH access enabled.
You may choose any port number greater than 1024. The default for SOCKS gateway is 1080.
Lower numbers could be used but you will need to log in as root, and make sure the port is not in use by another service. You should select an unused port number - otherwise the tunnel will fail.
-
You will be prompted for your password. After entering it, you will be logged in to FIS network host. Minimize the terminal because you will not need it until you are finished with your browsing session.
PuTTY on Windows
To establish a tunnel in Windows, you can use the free SSH client PuTTY. It can be downloaded from this link.
-
Launch PuTTY. On the first screen you will need to type your login information in the Host Name (or IP address) box. First, replace host.domain with a real domain name or IP address of given FIS gateway host with external SSH access enabled; user is your login on gateway host.
The SSH protocol and Port are checked by default. -
Under the Connection menu, under SSH select Tunnels. There you must enter the port you want to use (12345, for example) in Source Port, and check Dynamic.
-
Then press the Add button. In the Forwarded ports text area, you will now see D12345.
-
Click Open button. A new terminal window will appear. You will be prompted for your password. After entering it, you will be logged in to FIS network host (gateway). Minimize the terminal because you will not need it until you are finished with your browsing session.
-
To disconnect after the session type
logoutinside the terminal window (at the gateway host's prompt) and press Enter key. The terminal window will close.
b) Setting Up Your Browser
The last to configure is your preferred browser to use the SOCKS server you just created. Here, the example is for Firefox, but it is similar for all the major browsers.
Before any changes, a good idea is to take note of the current IP address you are using to connect to the web. Use a website like WhatsMyIp.org, and write down the IP that is shown.
To set up the browser:
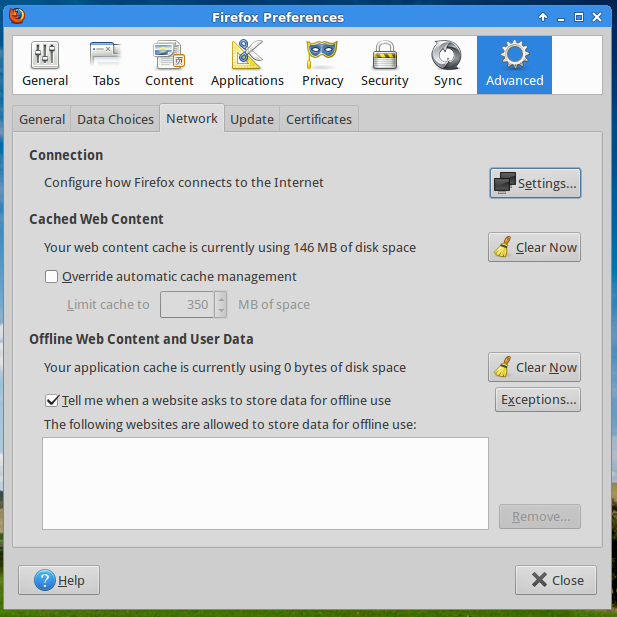
- In Firefox, go to the Edit menu and select Preferences.
- Go to Advanced and from there to the Network tab.
- In the Connection area click on Settings.
-
The window Connection Settings
will open. Check Manual Proxy
Configuration, and in SOCKS
Host write your local host address
(127.0.0.1) and the port you choose when you
created the tunnel (12345, in
this example). Make sure SOCKS v5
is selected (it will be by default). Also, newer browser releases have
additional checkbox Remote DNS - select it, if available.
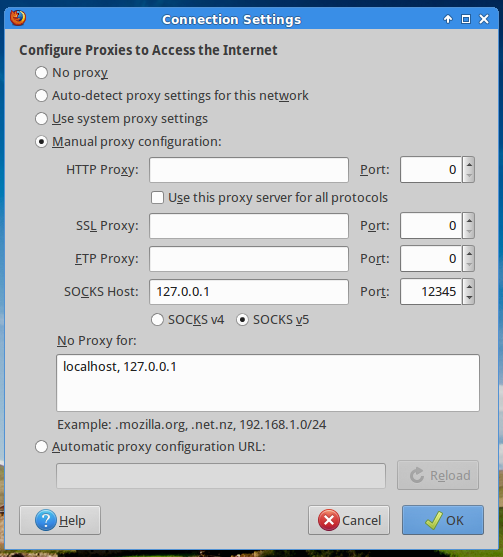
- Click OK to accept the changes.
Now you can check your IP address again. If all is working correctly, you will see that the website will report a new IP address, the one of FIS network host.
From this point you can browse the web using your tunnel. When
you finish, turn off the tunnel by logging off from
your remote server (the Linux or Mac OS X console or
PuTTY session you opened before). Note that you will
need to set Firefox back to the No proxy
setting as well. There are several plugins that can
perform this task quickly for you, including
this one.
Some Considerations
Keep these considerations in mind when you use SSH tunneling.
-
Although your web traffic will be encrypted and forwarded, your DNS requests will not. The DNS queries will be done on the public network, and then the web request will be forwarded to the secure tunnel. You can fix that in Firefox, and make it send the DNS traffic to your tunnel as well.
- Open Firefox - only older versions! Newer ones have this option available as a Remote DNS checkbox on Connection Settings window.
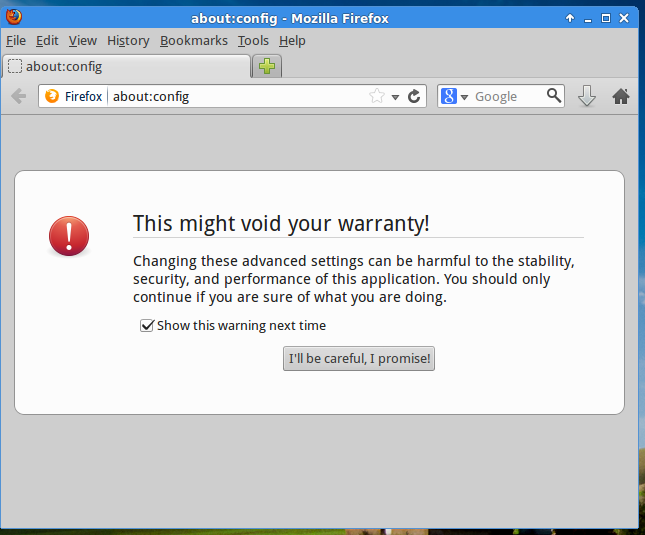
- Type
about:configin the Location Bar to display the browser's preferences. -
To be able to edit these settings, click the
button I'll be careful, I promise.
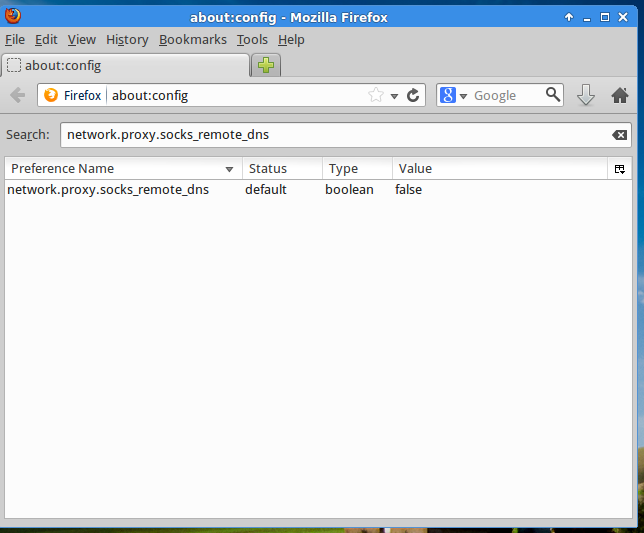
- In the Search bar type network.proxy.socks_remote_dns
and press
Return. -
You will see that the default value for that
preference is false.
-
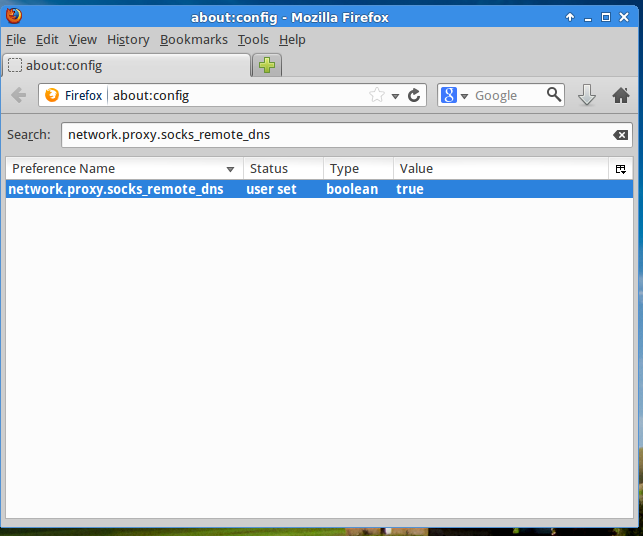
Double click network.proxy.socks_remote_dns
to change its value to true.
The whole line will change to bold text, and
the status column to user select,
indicating you modified its default value.
- Leave the
about:config windowby typing any URL in the location bar or closing Firefox.
- If the access to SSH is blocked in the public network you
are using, it will not be possible to establish
the tunnel.
- Sometimes, the traffic through the tunnel could be a bit slower than browsing the web without it; due to so called TCP-over-TCP effect.
- This is a simple and quick way to establish a secure connection for web browsing, a kind of "poor man's VPN" solution.
More Information
You may wish to consult the following resources for additional information on this topic. While these are provided in the hope that they will be useful, please note that we cannot vouch for the accuracy or timeliness of externally hosted materials.
This is guide is based on a Linode Community
guide.