|
|

This chapter describes how to make adjustments to--or how to fine tune--the router interfaces, and how to enable loopback tests. The tasks in this chapter include:
To adjust or test an interface, you must be in the configuration command collection mode. To enter this mode, type the EXEC command configure at the EXEC prompt; the configure command will place the system into the configuration command collection mode. Once in the command collection mode, start configuring the interface by entering the interface command.
A summary of the interface subcommands described in this chapter is included at the end of the chapter.
The following sections describe adjustments that can be made to serial interfaces.
Since the MCI and SCI interface cards can send back-to-back data packets over serial interfaces faster than some hosts can receive them, you can specify a minimum dead-time after transmitting a datagram using the following subcommand which is especially useful for serial interfaces. Use the transmitter-delay interface subcommands to do this. The full syntax of the command follows.
transmitter-delay microsecondsThe argument microseconds specifies the approximate number of microseconds of minimum delay after transmitting a datagram. The default value is zero; the no transmitter-delay command restores this default.
This command specifies a delay of 300 microseconds on interface serial 0.
interface serial 0
transmitter-delay 300
For the serial interface on the IGS router and the High Speed Serial Interface (HSSI) on the AGS+, the command is specified as follows:
transmitter-delay hdlc-flagsThe argument hdlc-flags causes a minimum of HDLC flags to be sent between each packet. The maximum number of flags between packets that can be transmitted on the IGS is 62; the minimum is 2.
The pulse-time interface subcommand enables pulsing DTR signals on the Cisco MCI and SCI serial interfaces. The full syntax of the command follows.
pulse-time secondsThe argument seconds specifies the interval.When the serial line protocol goes down (for example, because of loss of synchronization) the interface hardware is reset and the DTR signal is held inactive for at least the specified interval. This function is useful for handling encrypting or other similar devices that use the toggling of the DTR signal to resynchronize.
The default interval is zero seconds, which is restored by the no pulse-time command.
This command enables DTR pulse signals for three seconds on interface serial 2.
interface serial 2
pulse-time 3
You may configure the clock rate on the serial interface of the SCI and MCI cards to an acceptable bit rate using the clockrate interface subcommand. The full syntax is as follows:
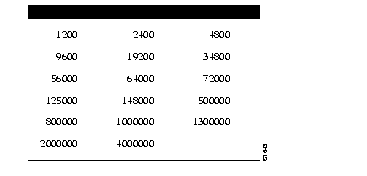
clockrate speedThe argument speed is the desired clock rate, and may be one of any of the rates in Table 1-1.
Be aware that the fastest speeds may not work if your cable is too long, and that speeds faster than 148,000 bits per second are too fast for RS-232 signaling. Cisco recommends you only use the synchronous serial RS-232 signal at speeds up to 64,000 bits per second. To permit a faster speed, use an RS-449 or V.35 applique.
Use the no clockrate command to remove the clock rate if you change the interface from a DCE to a DTE device.
These sample commands set the clock rate on the first serial interface to 64,000 bits per second.
interface serial 0
clockrate 64000
The following sections describe adjustments that apply to all interface types.
The normal operation of the network server allows the switching operations to use as much of the central processor as is required. In the event that the network is running unusually heavy loads that do not allow the processor the time to handle the routing protocols, more priority can be given to the system process scheduler using the scheduler-interval global configuration command. The full command syntax follows.
scheduler-interval millisecondsThe scheduler-interval command controls the maximum amount of time that may elapse without running the lowest priority system processes. The minimum interval that may be specified is 500 milliseconds; there is no maximum value. The default is to allow high-priority operations to use as much of the central processor as needed. The no scheduler-interval command restores that default.
This command changes the low-priority process schedule to an interval of 750 milliseconds.
scheduler-interval 750
Priority output queuing is a fine tuning mechanism allowing the administrator to set priorities on the type of traffic passing through the network. It is a mechanism for prioritizing datagrams transmitted on an interface. Datagrams are classified according to various criteria, including protocol and subprotocol type, and then queued on one of four output queues.
When the network server is ready to transmit a datagram, it scans the priority queues in order, from highest to lowest, to find the highest priority datagram. After that datagram is completely transmitted, the network server scans the priority queues again. If a priority output queue fills up, datagrams will be dropped and, for protocols such as IP and CLNS, quench indications will be sent to the original transmitter.
Although priority queuing may be enabled for any interface, the intended application was for low bandwidth, congested serial interfaces.
Cisco's priority output queuing mechanism allows traffic control based on protocol or interface type. Commands are also offered to set the size of the queue, and defaults for what happens to packets that are not defined by priority output queue rules.
The priority output queuing mechanism can be used to manage traffic from all networking protocols and from bridges. Additional fine tuning capability is available for IP, and for setting boundaries on the packet size.
There are four priority queues--high, medium, normal, low--listed in order from highest to lowest priority.
Management traffic sourced by the network server is always assigned to the high priority queue to ensure the correct operation of the network. Datagrams that are not classified by the priority list mechanism are assigned to the normal queue.
A priority list is a set of rules that describes how datagrams should be assigned to priority queues. A priority list may also describe a default priority or the queue size limits of the various priority queues.
Use the priority-list command to establish queuing priorities based upon the protocol type. The full syntax of this command follows:
priority-list list protocol protocol-name queue-keyword [args]The argument list is an arbitrary integer between 1 and 10 that identifies the priority list selected by the user.
The keyword protocol is used with the argument protocol-name to specify the protocol you are using, and is one of the following: ip, pup, chaos, xns, decnet, appletalk, clns, novell, apollo, vines, stun (for Serial Tunneling), bridge (for transparent bridging traffic), or rsrb (for remote source-route bridged traffic).
The argument queue-keyword is a priority queue name, one of high, medium, normal, or low.
Optional arguments (args) may be specified, depending on the protocol-name keyword, as follows.
Service Port
Telnet 23
SMTP 25
FTP 20, 21
Service Port
TFTP 69
NFS 2049
SNMP 161
RPC 111
DNS 53
Use the no priority-list global configuration command followed by the appropriate list argument and the protocol keyword to remove a priority list entry assigned by protocol type.
This command assigns one as the arbitrary priority list number, specifies DECnet as the protocol type, and assigns a high priority to the datagrams transmitted on this interface:
priority-list 1 protocol decnet high
When classifying a datagram, the system searches the list of rules specified by priority-list commands for a matching protocol type. When a match is found, the datagram is assigned to the appropriate queue. The list is searched in the order it is specified and the first matching rule terminates the search.
This command assigns a medium priority level to every DECnet packet with a size greater than 200 bytes.
priority-list 2 protocol decnet medium gt 200
This command assigns a medium priority level to every DECnet packet with a size less than 200 bytes.
priority-list 4 protocol decnet medium lt 200
This command assigns a high priority to traffic that matches IP access list 10:
priority-list 1 protocol ip high list 10
This command assigns a medium priority level to Telnet packets:
priority-list 4 protocol ip medium tcp 23
This command assigns a medium priority level to UDP Domain Name service packets:
priority-list 4 protocol ip medium udp 53
This command assigns a high priority to traffic that matches Ethernet type code access list 201.
priority-list 1 protocol bridge high list 201
When using multiple rules for a single protocol, remember that the order of the rules matters.
Use this variation of the priority-list command to establish queuing priorities on packets entering from a given interface (full syntax follows):
priority-list list interface interface-name queue-keywordThe argument list is an arbitrary integer between one and ten that identifies the priority list selected by the user.
The keyword interface applies to the priority queuing mechanism to packets arriving from an interface. The argument interface-name specifies the name of the interface.
The argument queue-keyword is a priority queue name, one of high, medium, normal, or low.
Use the no priority-list command with the appropriate arguments to remove an entry from the list.
The following sample command sets any packet type entering on interface Ethernet 2 to a medium priority:
priority-list 3 interface ethernet 2 medium
Use the following command to assign a priority queue for those datagrams that did not match any other rule in the priority list:
priority-list list default queue-keywordIf no default is specified, or the no form of the command is specified, the normal queue is assumed.
Use this variation of the priority-list command to specify the maximum number of packets that may be waiting in each of the priority queues (full syntax shown):
priority-list list queue-limit high-limit medium-limit normal-limit low-limitIf a priority queue overflows, excess datagrams are discarded and quench messages may be sent, if appropriate, for the protocol. The default queue-limit arguments are 20 datagrams for the high priority queue, 40 for medium, 60 for normal, and 80 for low.
The no priority-list command with the appropriate keywords and arguments restores these defaults.
The following is a sample of a priority list, including the access list referenced by one of the priority list rules.
priority-list 1 protocol bridge high list 201
priority-list 1 protocol ip medium
priority-list 1 protocol decnet medium
priority-list 1 default low
priority-list 1 queue-limit 20 20 20 10
!
access-list 201 permit  0x6004  0x0000
Bridged traffic that matches access list 201 is given high priority. Since type code 6004 is the Local Area Transport (LAT), this rule has the effect of making LAT traffic have high priority. IP and DECnet traffic are given medium priority, and everything else is given low priority. In this instance, the network administrator has assigned queue limits of 20 packets for every queue except the low priority queue, which is limited to 10 untransmitted packets.
Use the priority-group interface subcommand to assign the specified priority group to an interface.
priority-group listThe argument list is the priority list number assigned to the interface.
This example causes packets exiting interface serial 0 to be classified by priority list 1.
interface serial 0
priority-group 1
When priority queuing is enabled on an interface, the EXEC command show interfaces displays information about the input and output queues. This information is a triplet of numbers: the first is the number of packets currently in the queue, the second is the maximum number of packets permitted in the queue, and the third is the number of packets discarded because the queue is full.
 Input queue: 0/75/4 (size/max/drops); Total output drops: 0
  Output queue: high 0/20/0, medium 0/40/00, normal 0/60/0, low 0/80/0
The total output drops number is the sum of the discarded numbers from the output queues, plus the count of packets discarded before being prioritized, or because of fast-switching activity.
The show priority-lists command gives a brief summary of the rules in the priority lists. Enter this command at the EXEC prompt:
show priority-listsA sample display follows:
Group  Protocol   Priority         List
    1  ip         medium
    1  decnet     medium
    1  bridge     high             201
The interface subcommand tx-queue-limit controls the size of the transmit queue available to a specified interface on the MCI and SCI cards themselves. The command syntax follows:
tx-queue-limit numberThis command should be used only under the guidance of a technical support representative. Number is the number of packets that can be queued for transmission on the card for the specified interface.
The following command sets the queue limit to five packets:
tx-queue-limit 5
Each network interface in a network server has a hold-queue limit. This limit is the number of data packets that the interface can store in its hold queue before rejecting new packets. When the interface empties the hold queue by one or more packets, the interface can accept new packets again.
To specify the hold-queue limit of an interface, use the hold-queue interface subcommand. Its full syntax is as follows:
hold-queue length {in|out}The argument length is the maximum number of packets in the queue. The in keyword specifies the input queue; the out keyword specifies the output queue.
The no hold-queue command with the appropriate keyword restores the default values for an interface. There is no fixed upper limit to a queue size.
The input hold queue prevents a single interface from flooding the network server with too many input packets. Further input packets are discarded if the interface has too many input packets outstanding in the system. The default input hold queue is 75 packets. The default output hold-queue limit is 100 packets. This limit prevents a malfunctioning interface from consuming an excessive amount of memory.
If priority output queueing is being used, the length of the four output queues is set using the priority-list configuration command. The hold-queue command cannot be used to set an output hold queue length in this situation.
For slow links, use a small output hold-queue limit. This approach prevents storing packets at a rate that exceeds the transmission capability of the link. For fast links, use a large output hold-queue limit. A fast link may be busy for a short time (and thus require the hold queue), but can empty the output hold queue quickly when capacity returns.
To display the current hold queue setting and the number of packets discarded because of hold queue overflows, use the EXEC command show interfaces.
Higher-level protocols may use bandwidth information to make operating decisions. For example, IGRP uses the minimum path bandwidth to determine a routing metric. The TCP protocol adjusts initial retransmission parameters based on the apparent bandwidth of the outgoing interface.
To set a bandwidth value for an interface, use the bandwidth interface subcommand. Its full syntax follows:
bandwidth kilobitsThe argument kilobits specifies the intended bandwidth in kilobits per second. For a full bandwidth DS3, enter the value 45045. Default bandwidth values are set during start up and can be displayed with the EXEC command show interfaces.
The bandwidth subcommand sets an informational parameter only; you cannot adjust the actual bandwidth of an interface with this subcommand. For some media, such as Ethernet, the bandwidth is fixed; for other media, such as serial lines, you can change the actual bandwidth by adjusting hardware. For both classes of media, you can use the bandwidth subcommand to communicate the current bandwidth to the higher-level protocols.
Use the no bandwidth command to restore the default values.
Higher-level protocols may use delay information to make operating decisions. For example, IGRP can use delay information to differentiate between a satellite link and a land link.
To set a delay value for an interface, use the delay interface subcommand. The full syntax of this command follows.
delay tens-of-microsecondsThe argument tens-of-microseconds specifies the delay for an interface or network segment in tens of microseconds. Default delay values may be displayed with the EXEC command show interfaces. The no delay command restores the default.
The Cisco interface software provides a mechanism for protection against packet overload and resultant recount errors on the MCI interface cards. This mechanism is set using the error-threshold interface subcommand, as follows:
error-threshold millisecondsThe argument milliseconds is the frequency at which the error recount will be set. The default value is 1000 milliseconds.
These commands set the error recount threshold on Ethernet interface 2 to 10,000 milliseconds.
interface ethernet 2
error-threshold 10000
Each interface has a default maximum packet size or maximum transmission unit (MTU) size. This number generally defaults to the largest size possible for that type interface. For example, the Ethernet MTU size defaults to 1500 bytes. On serial interfaces, the MTU size varies, but cannot be set smaller than 64 bytes. You can adjust the MTU using the mtu interface subcommand. Its full syntax is:
mtu bytesThe arguments bytes is the desired size in bytes. The no mtu command restores this value to its original, default value.
The Cisco software provides a loopback test to detect and distinguish equipment malfunctions between line and modem or CSU/DSU (Channel Service Unit/Digital Service Unit) problems on the network server. If correct data transmission is not possible when an interface is in loopback mode, the interface is the source of the problem. The DSU may have similar loopback functions you can use to isolate the problem, if the interface loopback tests passes. If the device does not support local loopback, then this function will have no effect.
You can specify hardware loopback tests on the Cisco Ethernet and serial interfaces, and all Token Ring interfaces except the CSC-R 4 megabit card that are attached to CSU/DSUs, and that support the local loopback signal. The CSU/DSU acts as a DCE device; the Cisco router as a DTE device. The local loopback test generates a CSU loop--a signal that goes through the CSU/DSU to the line, then back through the CSU/DSU to the router.
The ping command can also be useful during loopback operation; it is described in the section on "Testing Connectivity with the Ping Command" in the chapter "Managing the System."
The following sections describe the various loopback tests available for the supported interfaces.
The HSSI supports the loopback test from the router to any of the following:
These concepts are illustrated in Figure 1-1.

The commands to enable these tests are described next. In the following commands, the loopback command with no argument defaults to the loopback applique command.
To start loopback operation, use the loopback interface subcommand with the appropriate keyword. To restore an interface in loopback mode to normal operation, use the no loopback interface subcommand with the appropriate keyword. Each keyword variation of the loopback command is described in the following sections.
Use the following command to configure an internal loop on the HSSI applique. The full syntax of this command follows:
loopback appliqueOnce enabled, the command loops the packets on the applique, thereby establishing a loopback inside the Cisco router. This command is useful for "sending pings to yourself" to check functionality of the applique. The HSSI applique (HSA card) uses an internal 44.736 MHz crystal clock during the applique loopback to drive its internal circuits. See the document HSSI Specification, available from Cisco Systems, for more information.
This command is functionally equivalent to entering the loopback command with no arguments; however, when the HSCI card is installed, the configuration displayed after the write terminal command is entered will show loopback applique set.
Use the loopback dte command to loop packets to DTE within the CSU/DSU at the DTE interface, when the device supports this function. The full syntax of this command is:
loopback dteThis command is useful for testing the DTE to DCE cable.
Use the loopback line subcommand to loop the packets completely through the CSU/DSU to configure a CSU loop, when the device supports this feature. The full syntax of this command follows:
loopback lineThis command is used for testing the DCE device (CSU/DSU) itself.
If you want to loop the packets through the CSU/DSU, over the DS3 link and to the remote CSU/DSU and back, use the loopback remote subcommand. Its full syntax follows:
loopback remoteThis is applicable only when the device supports the remote function and it is used for testing the data communications channels. The loopback is usually performed at the line port, as opposed to the DTE port, of the remote CSU/DSU.
To show interfaces currently in loopback operation, use the EXEC command show interfaces.
The HSA applique (on the HSSI), contains an LED that indicates the LA, LB, and LC signals transiting through the devices. The CSU/DSU uses the LC signal to request a loopback from the router. The CSU/DSU may want to do this so that its own network management diagnostics can independently check the integrity of the connection between the CSU/DSU and the Cisco router.
By default, this feature is enabled on the Cisco router, to support those CSU/DSUs that support this function. To enable and disable an external loopback request on HSSI from the CSU/DSU, use these commands:
hssi external-loop-requestWhen the CSU/DSU asserts the LC signal and the Cisco router enables the external loopback, the connection is blocked by the loopback, and the router no longer has access to the data communication channel. Figure 1-2 illustrates the extent of the signal during an external loopback request.

If your CSU/DSU does not support this feature, it should be disabled in the Cisco router. This prevents spurious line noise from accidentally tripping the external loopback request line, which would interrupt the normal data flow.
Cisco provides a useful diagnostic that allows fault isolation of possible defects on the HSCI card. This diagnostic is not part of the normal system diagnostics, but is offered to help technicians test for controller defects at installation or when the system is upgraded. The diagnostic involves recabling of the HSCI card and then entering a diagnostic script. The procedures to perform this diagnostic are described in the Cisco publication Modular Products Hardware Installation and Reference.
For users with UltraNet connections, the loopback function is enabled with the loopback command (full syntax follows):
loopbackEnabling the function places an internal and external loopback on the ULA applique, as seen in the following illustration.
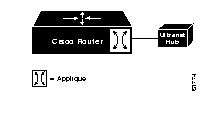
Data being transmitted from the router is returned to the router, and incoming data from outside is transmitted back outside.
The MCI and SCI serial interface cards support the loopback function when a CSU/DSU or equivalent device is attached to the router. Use the loopback command to enable loopback on the interface. The full syntax of this command follows:
loopbackThe loopback interface subcommand loops the packets through the CSU/DSU to configure a CSU loop, when the device supports this feature. The no loopback command disables the function.
Cisco-designed Ethernet interfaces may also be placed into loopback mode. During loopback operation, the interface receives back every packet it sends. Loopback operation has the additional effect of disconnecting network server functionality from the network. Use these commands to enable or disable the loopback test:
loopbackThe Cisco network server provides an Ethernet loopback server that supports Xerox, Intel, and DEC systems specified by the "blue book," a joint specification written by Xerox, Digital Equipment Corporation, and Intel that defines the Ethernet protocol. The loopback server responds to forward data loopback messages sent either to the server's MAC address, or to the broadcast address. Currently, the Ethernet loopback server does not respond to the loopback assistance multicast address.
Use the Ethernet loopback server to test communications between Cisco internetworking products and DEC systems that do not support the IP ping command, such as DECnet-only VMS systems.
To originate a loop test on your VMS system with a Cisco server, use the DEC Network Control Program (NCP) command Loop Circuit. For more information about the Loop Circuit command, consult the DECnet VAX documentation. Cisco network servers support all options that can be specified by the VMS hosts.
The Cisco FDDI (CSC-FCI) may also be placed into loopback mode. During loopback operation, the interface receives back every packet it sends. Loopback operation has the additional effect of disconnecting network server functionality from the network. Use these commands to enable or disable the loopback test:
loopbackAll of Cisco's Token Ring interface cards (except the 4 megabit CSC-R card) may also be placed into loopback mode. During loopback operation, the interface receives back every packet it sends. Loopback operation has the additional effect of "disconnecting" network server functionality from the network. Use this command to enable the loopback test: Use these commands to enable or disable loopback on the interface:
loopbackThis section provides an alphabetical list of all the interface commands described in this chapter.
[no] bandwidth kilobits
Sets a bandwidth value for an interface. The argument kilobits specifies the intended bandwidth in kilobits per second. Default bandwidth values are set during start up and can be displayed with the EXEC command show interfaces. The no form of the command restores the default.
[no] clockrate speed
Configures the clock rate on the serial interface of the SCI and MCI cards to an acceptable bit rate. The argument speed is the desired clock rate in bits per second. The no form removes the command from the configuration.
[no] delay tens-of-microseconds
Sets a delay value for an interface. The argument tens-of-microseconds specifies the delay for an interface or network segment in tens of microseconds. Default delay values may be displayed with the EXEC command show interfaces. The no form of the command restores the default.
hold-queue length {in|out}
no hold-queue {in|out}
Specifies the hold-queue limit of an interface. The argument length is the maximum number of packets in the queue. The in keyword specifies the input queue; the out keyword specifies the output queue. The no keyword restores the default values for an interface. There is no fixed upper limit to a queue size.
[no] hssi external-loopback-request
Enables and disables an external loopback request on HSSI from the CSU/DSU. When the CSU/DSU asserts the LC signal and the Cisco router enables the external loopback, the connection is blocked by the loopback, and the router no longer has access to the data communication channel.
[no] loopback
On HSSI--Configures an internal loopback loop on the specified interface. This makes the interface loop the packets to the applique, thereby establishing loopback inside the Cisco router. This is the same as the loopback applique command.
On UltraNet--Configures a two-way, internal and external loopback on the ULA applique.
On MCI and SCI serial cards--Loops the packets through the CSU/DSU to configure a "CSU loop," when the device supports this feature. This is similar to the loopback line command on the HSSI.
On MCI and MEC Ethernet cards--Loops the packets at the interface within the router.
On the CSC-R16 card--Loops the packets at the interface within the router.
The no form of the command disables the loopback test.
[no] loopback applique
Configures an internal loop on the HSSI. This makes the interface loop the packets to the applique, thereby establishing loopback inside the Cisco router. This command is useful for sending pings to yourself to check functionality of the applique. For use with HSSI connections only.
[no] loopback dte
Loops packets from the router out to the CSU/DSU and back. For use with HSSI connections only to check connectivity between the router and the CSU/DSU.
[no] loopback line
Loops the packets through the CSU/DSU to configure a CSU loop. Loopback occurs on the line side of the CSU/DSU to test functionality of the CSU/DSU. For use with HSSI connections only.
[no] loopback remote
Loops the packets through the CSU/DSU, over the DS3 link and to the remote CSU/DSU. This is applicable only when the device supports the remote function. For use with HSSI connections only.
[no] priority-list list default queue-keyword
Assigns a priority queue for those datagrams that did not match any other rule in the priority list. If no default or the no form of the command is specified, the normal queue is assumed.
[no] priority-list list interface interface-name queue-keyword
Sets up priority queuing on the specified interface. The keyword interface applies to the priority queuing mechanism to an interface. The argument interface-name specifies the name of the interface. The arguments list and queue-keyword are described in the section "Assigning Priority by Interface Type." The no form of the command removes the item from the list.
[no] priority-list list protocol protocol-name queue-keyword [args]
Sets up priority queuing on the specified interface. The keyword protocol applies to the priority queuing mechanism to a protocol. The argument protocol-name specifies the name of the protocol. The arguments list, queue-keyword, and the optional args are described in the section "Assigning Priority by Protocol Type." The no form of the command removes the item from the list.
[no] priority-list list queue-limit high-limit medium-limit normal-limit low-limit
Specifies the maximum number of packets that may be waiting in each of the priority queues. If a priority queue overflows, excess datagrams are discarded and quench messages may be sent, if appropriate, for the protocol. The no form of the command resets all four queue sizes to their default values as follows: high-limit = 20; medium-limit = 40; normal-limit = 60; low-limit = 80.
[no] pulse-time seconds
Enables pulsing DTR signals on the Cisco MCI and SCI serial interfaces for a minimum interval of seconds.
[no] scheduler-interval milliseconds
Controls the maximum amount of time that may elapse without running the lowest priority system processes. The minimum interval that may be specified is 500 milliseconds; there is no maximum value. The default is to allow high priority operations to use as much of the central processor as needed. The no scheduler-interval command restores that default.
[no] transmitter-delay microseconds
Specifies a minimum dead-time after transmitting a datagram. The argument microseconds specifies the approximate number of microseconds of minimum delay after transmitting a datagram. For MCI and SCI serial cards only. The no form of the command restores the default value of zero microseconds.
[no] transmitter-delay hdlc-flags
Specify this command syntax for the IGS router and the High Speed Serial Interface (HSSI) connector. The argument hdlc-flags causes a minimum of HDLC flags to be sent between each packet. The no form of the command restores the default value of zero microseconds.
|
|