|
|

Cisco Part Number SP
This publication contains instructions for replacing the switch processor (SP) in the Cisco 7000 Series routers: the Cisco 7000 and the Cisco 7010.
The sections in this document include the following:
Before beginning installation, read this entire publication to ensure that you have all the necessary tools and equipment, and that you have the correct modules for your system configuration.
If the troubleshooting procedures indicate a new problem with the power subsystem or one of the IPs, refer to the Cisco 7000 Hardware Installation and Maintenance or Cisco 7010 Hardware Installation and Maintenance publications for complete system startup troubleshooting procedures.
The SP is the high-performance packet switch for the Cisco 7000 series routers. An overview of the Cisco 7000 series and a detailed description of the SP switch processor follow.
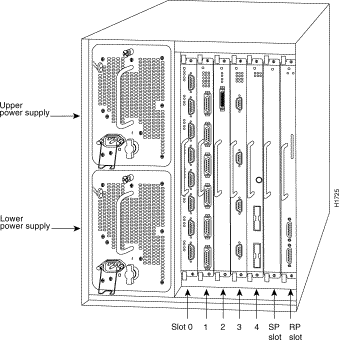
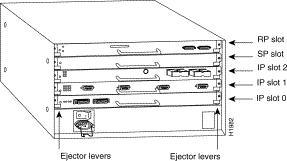
The Cisco 7000 Series comprises the seven-slot Cisco 7000 and the five-slot Cisco 7010. Both models use the same route processor (RP), switch processor (SP), CxBus interface processors (IPs), and arbiter (MAS-7KARB). The Cisco 7000 provides five interface slots and offers a second modular power supply for redundant power. The Cisco 7010 provides three interface slots that support fewer interfaces, but which offer the same performance as the Cisco 7000 at a lower cost. Figure 1 and Figure 2 show the IP end of both models.
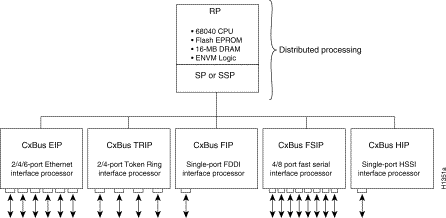
The high-speed Cisco Extended Bus (CxBus) transfers information at 533 Mbps. Figure 3 shows the basic system architecture. The RP, which contains the system processor, and the SP provide distributed processing and control for the IPs. The SP controls communication between high-speed CxBus IPs (IP-to-IP) and the system processor (IP-to-processor).
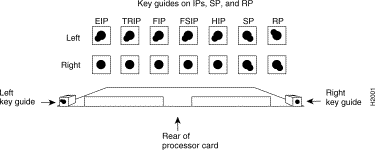
The backplane slots are keyed so that the RP, SP, and IPs can be installed only in the slots designated for them. Keys on the backplane fit into two key guides on each processor module. (See Figure 4.) Although the RP and SP each use unique keys, all three IP slots use the same key, so you can install an IP in any IP slot, but not in the RP or SP slots.
 | Caution When installing an RP, SP, or IP, ensure that you are installing it in the appropriate slot to avoid damaging the key guides or the backplane. |
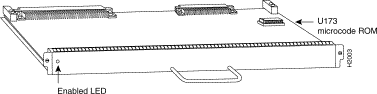
The switch processor (SP), shown in Figure 5, communicates with and controls the IPs on the high-speed CxBus. Its function is to decide the destination of a packet and switch it based on that decision. The SP uses a 16-million-instructions-per-second (mips) processor to provide high-speed, autonomous switching and routing. The SP firmware (microcode), which contains board-specific software instructions, resides in a ROM in socket U173. The system supports downloadable microcode, so you will rarely, if ever, need to replace the microcode ROM. (If replacement is necessary, instructions will be provided with the replacement component in an upgrade kit.) The SP is always installed in the backplane SP slot next to the RP. (See Figure 1 and Figure 2.) The single Enabled LED lights to indicate that the SP is enabled for operation.
One SP is required in each Cisco 7000 series router.
Before you begin this installation, review the safety and ESD-prevention guidelines in this section to avoid injuring yourself or damaging the equipment. This section also provides lists of parts and tools you will need to perform the installation.
Follow these basic guidelines when working with any electrical equipment:
In addition, use the guidelines that follow when working with any equipment that is connected to telephone wiring or other network cabling.
Electrostatic discharge (ESD) damage, which can occur when electronic cards or components are improperly handled, results in complete or intermittent failures. The SP comprises a printed circuit board that is fixed in a metal carrier. Electromagnetic interference (EMI) shielding, connectors, and a handle are integral components of the carrier. Although the metal carrier helps to protect the board from ESD, use a preventive antistatic strap whenever handling the SP. Handle the carriers by the handles and the carrier edges only; never touch the boards or connector pins.
| Caution Always tighten the captive installation screws on the SP. (See Figure 5.) These screws prevent accidental removal, provide proper grounding for the system, and help to ensure that the bus connectors are properly seated in the backplane. |
Following are guidelines for preventing ESD damage:
You need some or all of the following tools and parts to perform the following procedures. Before you begin, read through the procedure to determine which tools you need for the installation or upgrade you will perform.
The SP does not support online insertion and removal (OIR), so you must turn all system power off before removing the SP from the chassis. When handling the SP, always wear an ESD-prevention strap and place the removed SP on an antistatic mat or antistatic foam.
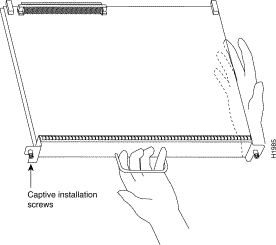
If you are replacing an existing SP, remove the existing module first, then replace the new SP in the same slot. Figure 6 shows proper handling of an SP during installation.
Turn all system power OFF before removing the SP from the chassis. If you are removing the SP, always wear an ESD-prevention strap and place the removed SP on an antistatic mat or antistatic foam.
Always use the ejector levers to remove or install the SP. The ejectors help to ensure that backplane connectors on the card are fully seated in, or fully ejected from, the backplane. (Refer to the description on page 5.) Failure to use the ejector levers could result in a partial backplane connection and subsequent system crash.
Follow these steps to remove and replace the SP:
Step 2 Slip on a grounding wrist strap and attach it to one of the captive installation screws on the rear of the chassis.
Step 3 Loosen the captive installation screws at both ends of the SP. (See Figure 6.)
| Caution Always use the ejector levers to remove or install the EIP. Failure to do so can cause erroneous system error messages indicating a board failure. |
Step 4 Place your thumbs on the ejector levers and simultaneously pull both of the ejectors outward (in the opposite direction from that shown in Figure 7c) to release the module from the backplane connector.
Step 5 Use the handle to carefully pull the module straight out of the slot, keeping your other hand under the carrier to guide it. (See Figure 6.) Keep the SP at a 90-degree orientation to the backplane.
Step 6 Place the removed SP module on an antistatic mat or foam pad, or place it in an antistatic bag if you will return it to the factory.
Step 7 Proceed to "Removing and Replacing the SP."
Ensure that all power supplies are turned OFF (O) before installing the SP in the chassis. The RP, SP, and IPs are all keyed for installation only in the correct slot. (See "Cisco 7000 Series Overview,".) Install the SP in the SP slot (which is next to the RP slot as shown in Figure 1 and Figure 2) as follows:
| Caution Handle the SP by the handle and carrier edges only to prevent ESD damage. |
| Caution You must install the SP in the slot labeled SP, which is seen on the rear of the chassis. (See Figure 1 and Figure 2.) The slots are keyed for correct installation. Forcing the SP into a different slot can damage the backplane and the SP carrier. |
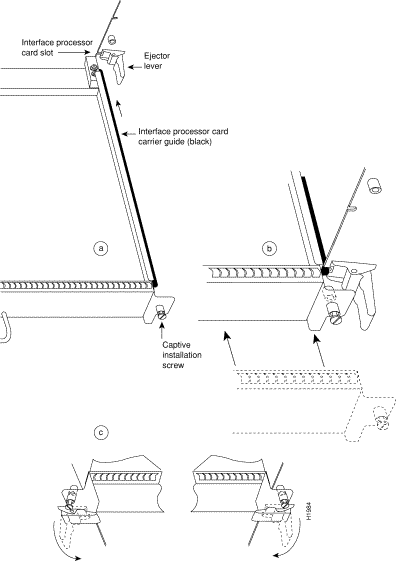
Step 2 Place the back of the SP in the slot and align the notches on the ends of the carrier with the grooves in the chassis slot. (See Figure 7.)
Step 3 While keeping the SP at a 90-degree orientation to the backplane, carefully slide the carrier into the slot until the SP faceplate makes contact with the ejector levers. (See Figure 7.)
Step 4 Using the thumb and forefinger of each hand, simultaneously push the top lever (which is not shown in Figure 7) down and the bottom lever up 90 degrees to fully seat the SP in the backplane connector.
| Caution Always use the ejector levers when installing or removing processor modules. A module that is partially seated in the backplane will cause the system to hang and subsequently crash. |
Step 5 Tighten the captive installation screws on the ends of the SP.
Step 6 Proceed to the next section to restart the system and check the installation.
Perform a final installation check then restart the system as follows:
Step 2 Check the power supplies for the following:
Step 3 Check the console terminal and make sure it is turned ON.
Step 4 When you have checked all of the connection points above, turn the lower power supply ON by turning the power supply switch clockwise one-quarter turn. The AC Power LED on the power supply and the Lower Power LED on the front of the chassis will light.
Step 5 After the lower power supply is ON, turn the upper power supply (if one is present) ON for redundant power. The AC Power LED on the power supply and the Upper Power LED on the front of the chassis will light.
Step 6 Observe the RP LEDs. While the system initializes, the yellow Boot Error LED on the RP lights for about five seconds or less, then goes out when the boot is complete. The IP LEDs also light in irregular sequence as the RP initializes each one.
Step 7 After the system boots the software and initializes the IPs (approximately 30 seconds), verify that the RP LEDs are in the following states:
Step 8 Verify that the Enabled LED on the SP lights.
Step 9 Verify that all of the Enabled LEDs on the IPs light.
Step 10 Verify that the console terminal displays a script and system banner similar to the following:
GS Software (GS7), Version 9.17(1)
Copyright (c) 1986-1993 by Cisco Systems, Inc.
Compiled Wed 5-Sept-92 11:06
When you have verified all of the conditions in steps 7 through 10, the installation is complete. You can now resume normal operation.
An error condition exists if any of the Enabled LEDs fail to light after initialization or if the Boot Error or CPU Halt LEDs light and remain lit. If this happens, proceed to "Troubleshooting the Installation" to try to isolate the problem.
This section contains the procedures to use if the system does not restart and boot as expected. Review the descriptions that follow, so you can anticipate the expected system startup sequence. Then restart the system and try to isolate the problem by observing the LEDs on the power supplies and on the RP as the system attempts to boot the software and initialize the SP and each IP.
The following describes the functions of the LEDs on the power supplies, chassis front panel, and the RP. These are the states you should observe when you restart the system.
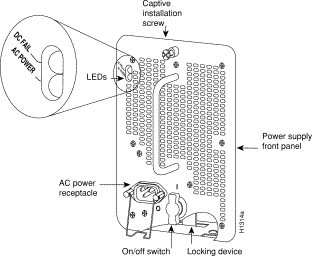
Each power supply contains AC Power and DC Fail LEDs and a power switch as shown in Figure 8. The green AC Power LED indicates that the power supply is turned on and is receiving input AC power. The yellow DC Fail LED is normally off, but lights if the power supply shuts down.
| Caution Always ensure that each power supply is fully seated in the bay and that the captive installation screw is tightened before restarting the system. |
When you turn the power supply ON to power up the system, the green AC Power LED on the power supply should light and remain lit, and the DC Fail LED should remain off. The AC Power LED will not light if the power supply switch is not fully in the ON (|) position, or if the power supply is not properly seated in the bay and the connectors are not making proper contact, or if the supply is not receiving AC input power.
The yellow DC Fail LED is normally off, but lights if the power supply shuts down for either of the following reasons:
In systems with a single power supply, and in systems with redundant power when both power supplies are being shut down, the DC Fail LED lights momentarily as the system ramps down, but goes out when the power supply has completely shut down. In systems with redundant power and one power supply still active, the DC Fail LED on the failed power supply will remain lit (powered by the active supply).
The AC Power LED will not light or will go out if the power supply reaches an out-of-tolerance temperature or voltage condition. It is unlikely that the power supply will shut down during startup because of an overtemperature condition; it can, however, shut down if it detects an over- or under-voltage condition during startup. Refer to the Cisco 7000 Hardware Installation and Maintenance or Cisco 7010 Hardware Installation and Maintenance publications for descriptions of environmental monitoring functions.
The DC OK LED on the IP end of the power supply, shown in Figure 9, goes on when the power supply is receiving AC source power and providing DC power to the internal system components.
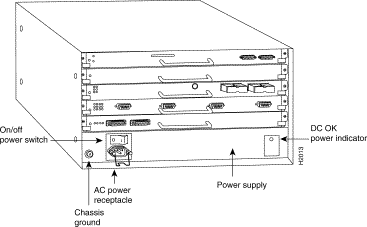
Figure 10 shows the LEDs on an RP installed in the chassis. The three LEDs on the RP indicate the system and RP status. When the system is turned on or restarted, the Boot Error LED lights for 1 or 2 seconds, then goes out. The Halt CPU LED, which lights only if the system detects a processor hardware failure, should never light. If the Boot Error LED remains lit for more than five seconds, the system is unable to boot and should be restarted. A successful boot is indicated when the Boot Error LED goes out; however, this does not necessarily mean that the system has reached normal operation. During normal operation, the Halt CPU and Boot Error LEDs should be off, and the Normal LED should be on.
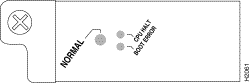
The SP and each IP contain an Enabled LED. When lit, this LED indicates that the SP or IP is operational and that it is powered up. It does not necessarily mean that the interface ports on the IPs are functional or enabled. When the boot sequence is complete, all of the Enabled LEDs (on the SP and all IPs) should light. If any do not light, one of the following errors is indicated:
By checking the state of the LEDs, you can determine when and where the system failed in the startup sequence. The functions of the chassis front panel LEDs are duplicated on the RP and the power supplies. Because you turn on the system power with the power supply switches, it is easiest to observe the startup behavior from the rear of the chassis. Use the following descriptions of the normal startup sequence to isolate the problem, then use the troubleshooting procedures wherever the system fails to operate as expected. If you are able to isolate the problem to a faulty hardware component, or if you are unable to successfully restart the system, contact your customer service representative.
When you start up the system by turning on the power supply switches (first turn the lower power supply ON (|), then turn the upper power supply, if any, ON) you should observe the following:
GS Software (GS7), Version 9.17(1)
Copyright (c) 1986-1993 by Cisco Systems, Inc.
Compiled Wed 5-Sept-92 11:06
If the system still fails to start up or operate properly after you have performed these troubleshooting procedures, or if you isolate the cause of the problem to a failed component, contact your customer service representative.
This completes the SP installation and replacement procedure. For complete command descriptions and examples, refer to the Cisco 7000 Addendum to Router Products Configuration and Reference publication.
You can configure a Cisco 7000 Series router to allow the switch processor (SP) and interface processors (IPs) to use microcode that is available either in Flash memory or on the onboard ROM for each processor.
Cisco 7000 Series routers support downloadable microcode, which enables you to upgrade microcode versions without having to physically replace the ROMs on the boards. You can download new microcode versions and store multiple versions in Flash memory, and you can boot from them just as you can with the system software images. System software upgrades can also contain upgraded microcode images, which will load automatically when the new software image is loaded.
With downloadable microcode, you should never need to replace the microcode ROM on the board. If, however, replacement is necessary in the future, specific instructions will also be provided with the replacement component in an upgrade kit.
You can download microcode to Flash memory by copying the TFTP image of a microcode version to Flash memory. When the microcode version is available in Flash memory, you can boot the router either automatically or manually from Flash memory.
Follow these steps to copy a microcode version from the TFTP server to Flash memory.
4096K bytes of flash memory on embedded flash (in RP1).
file   offset      length      name

 0     0x40        53330       eip-1.0

 1     0xD0D4      51432       sp-1.0

 [4089412/4194304 bytes free]
Step 2 To begin the process for copying a TFTP image into the current Flash configuration, enter the following command:
Router# copy tftp flash
Step 3 Enter the IP address of the remote host:
IP address or name of remote host [255.255.255.255]? 131.108.13.111
Step 4 Enter the name of the file you wish to copy to Flash:
Translating "Server1"...domain server (255.255.255.255) [OK]

Name of file to copy ? sp-1.0
Step 5 To confirm that you want the file copied into Flash, press Return.
Copy sp-1.0 from 121.108.13.1 into flash memory? [confirm]
Step 6 If you do not want Flash erased, enter no.
Erase flash before writing? [confirm] no
The file is copied and output similar to the following is displayed:
Zeroing bank...zzzzzzzzzzzzzzzz

Verify zeroed...vvvvvvvvvvvvvvvv

Erasing bank...eeeeeeeeeeeeeeee
Loading from 131.108.1.111:
!!!!!!!!!!!!!!!!!!!!!!!!!!!!!!!!!!!!!!!!!!!!!!!!!!!!
 [OK - 1906676/4194240 bytes]

Verifying via checksum...

Flash verification successful. Length = 1906676, checksum = 0x12AD
Step 7 Verify that the microcode has been copied to Flash:
Router# show flash
The output should display the file you copied to Flash.
Step 8 To ensure that the new microcode is used when you reboot the system, add the appropriate commands to the configuration file. To access the configuration file, enter the following command:
Router# config
Step 9 Enter the microcode reload commands to the configuration:
microcode sp flash sp-1.0

microcode reload
Step 10 To save the configuration file, press Ctrl-Z.
Step 11 Verify that the SP is using the correct microcode:
Router# show controller cbus
Step 12 Copy the new microcode version to NVRAM:
Router# write memory
You have now completed downloading microcode to Flash and ensured that this microcode will be used by the SP.

![]()
![]()
![]()
![]()
![]()
![]()
![]()
![]()
Posted: Mon Feb 12 15:53:14 PST 2001
All contents are Copyright © 1992--2001 Cisco Systems, Inc. All rights reserved.
Important Notices and Privacy Statement.