|
|

This appendix provides a summary of all the LEDs (status indicators) used in the router system. The LEDs on the chassis front panel and on the RP indicate the system power and route processor status; LEDs on the rest of the interface processors indicate the status of the individual interface processor and its interfaces.
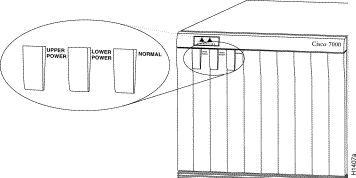
Three system status LEDs on the front of the router, shown in Figure B-1, indicate the status of the system and the power supplies. The normal LED goes on to indicate that the system is in a normal operating state. The upper power and lower power LEDs light to indicate that a power supply is installed in the indicated power supply bay and is providing power to the system. The power LEDs go out if the power supply in the corresponding bay reaches an out-of-tolerance temperature or voltage condition (for descriptions of thresholds and status levels, refer to the section "Environmental Monitoring and Reporting Functions" in the chapter "Product Overview"). The front panel normal LED is controlled by the RP, which contains an identical normal LED that provides system status on the rear of the chassis.

On the router front panel, the upper and lower power LEDs light when the power supply in the corresponding bay is installed and supplying power to the system. Both LEDs should light in systems with redundant power. The front panel LEDs are described in the following section.
There are two types of power supplies for the Cisco 7000: AC-input and DC-input.
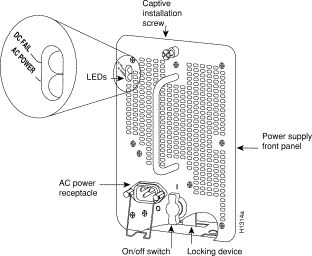
Each AC-input power supply contains AC power and DC fail LEDs and a power switch as shown in Figure B-2. The green AC power LED indicates that the power supply is turned on and is receiving input AC power. The yellow DC fail LED is normally off, but goes on if the power supply shuts down for any of the following reasons:
In systems with a single AC-input power supply, and in systems with redundant power when both AC-input power supplies are being shut down, the DC fail LED goes on momentarily as the system ramps down, but is off when the power supply has completely shut down. In systems with redundant power, and one power supply is still active, the DC fail LED on the failed power supply will remain on (powered by the active supply).

The DC-input power supply LEDs include the input power LED and the out fail LED. (See Figure B-3. Note that the LEDs are in a similar location to the AC-input power supply shown in Figure B-2.) The green input power LED is on when the input power is applied. The yellow out fail LED is normally off, but flashes at power on for a lamp test.
The out fail LED goes on if the power supply shuts down for either of the following reasons:

In systems with a single DC-input power supply, and in systems with redundant power when both power supplies are shutting down, the out fail LED goes on momentarily as the system ramps down, but goes out when the power supply has completely shut down. In systems with redundant power and one power supply still active, the out fail LED on the failed power supply will remain on (powered by the active supply).
The AC-input and DC-input power supplies are self-monitoring. Each supply monitors its own temperature and internal voltages. For a description of the power supply shutdown conditions and threshold status levels, refer to the section "Environmental Monitoring and Reporting Functions" in the chapter "Product Overview."
The SP and SSP have an enabled LED. The enabled LED goes on to indicate that the SP or SSP is operational and powered up. All enabled LEDs (on the SP, SSP, and all interface processors) go on when the boot sequence is complete. If the enabled LEDs do not come on, one of the following errors is indicated:
The three LEDs on the RP, which are shown in Figure B-4, indicate the system and RP status. The front panel normal LED and the RP normal LED, both of which are controlled by the RP, light to indicate that the system is operational.
During normal operation, the CPU halt and boot error LEDs on the RP should be off. When the system is turned on or restarted, the boot error LED goes on for one or two seconds, then goes out. The CPU halt LED, which goes on only if the system detects a processor hardware failure, should never light. If the boot error LED remains on for more than 5 seconds, the system is unable to boot and should be restarted.
A successful boot is indicated when the boot error LED goes out; however, this does not mean the system has reached normal operation.

Figure B-5 shows the LEDs on the RSP7000 faceplate. The LEDs on the RSP7000 indicate the system and RSP7000 status and which Flash memory card slot is active. The CPU halt LED, which goes on only if the system detects a processor hardware failure, should remain off. A successful boot is indicated when the normal LED goes on; however, this does not necessarily mean that the system has reached normal operation. During normal operation, the CPU halt LED should be off, and the normal LED should be on.
The slot 0 and slot 1 LEDs indicate which PCMCIA (Flash memory) card slot is in use, and each LED blinks when the card is accessed by the system.
 | Caution The reset switch resets the RSP7000 and the entire system. To prevent system errors and problems, use it only at the direction of your service representative. |

Each interface processor contain an enabled LED. When on, this LED indicates that the interface processor is operational and that it is powered up. It does not necessarily mean that the interface ports are functional or enabled.
The following sections describe the LEDs for each interface processor.
The three LEDs above the ATM port (see Figure B-6) indicate the following:

Following are the functions of the CIP LEDs. (See Figure B-7.)

Following are the sequences for the CIP LED indicators. The enabled LED is not part of the following sequences. On cold boots, the following four LED sequences apply:
| Present | Loaded | Signal | Online | |
|---|---|---|---|---|
Port 1 | On | On | Off | Off |
Port 0 | Off | Off | Off | Off |
| Present | Loaded | Signal | Online | |
|---|---|---|---|---|
Port 1 | On | On | On | On |
Port 0 | On | On | Off | Off |
| Present | Loaded | Signal | Online | |
|---|---|---|---|---|
Port 1 | On | On | On | On |
Port 0 | On | On | On | On |
The following sequence indicates that the CIP is waiting for commands from the RP.
| Present | Loaded | Signal | Online | |
|---|---|---|---|---|
Port 1 | Off | Off | Off | Off |
Port 0 | Off | Off | Off | Off |
On warm boots, the LEDs flash briefly. On downloads, the following three LED sequences apply; the first indicates that the system is downloading volatile programmable logic device (VPLD) code:
| Present | Loaded | Signal | Online | |
|---|---|---|---|---|
Port 1 | On | On | On | On |
Port 0 | On | On | On | Off |
The following sequence indicates that the CIP is downloading microcode:
| Present | Loaded | Signal | Online | |
|---|---|---|---|---|
Port 1 | Off | Off | Off | Off |
Port 0 | On | On | On | On |
The following sequence indicates that the CIP is starting to execute the microcode:
| Present | Loaded | Signal | Online | |
|---|---|---|---|---|
Port 1 | Off | Off | Off | Off |
Port 0 | Off | Off | Off | Off |
The EIP contains a bank of 18 LEDs: one horizontal row of 3 LEDs for each of the 6 Ethernet interfaces, as shown in Figure B-8.
As with the other interface processors, the enabled LED goes on to indicate that the EIP is enabled for operation. Three LEDs for each port indicate the following:

The FEIP contains the enabled LED, standard on all interface processors, and a bank of three status LEDs for the ports. After system initialization, the enabled LED goes on to indicate that the FEIP has been enabled for operation. (The LEDs are shown in Figure B-9.) The following conditions must be met before the enabled LED goes on:
If any of these conditions is not met, or if the initialization fails for other reasons, the enabled LED does not go on.

A bank of three LEDs indicates the following:
Either the MII LED or the RJ-45 LED should be on at one time; never both.
The FIP LEDs are shown in Figure B-10. The upper row of three LEDs indicates the state of Phy B, and the lower pair indicate the state of Phy A. (The Phy B interface is located above the Phy A interface on the face of the FIP.) As with the other interface processors, the enabled LED goes on to indicate that the FIP is enabled for operation.
The state of each B/A pair of LEDs indicates the status of one type of three possible station connections: dual attachment station (DAS), single attachment station (SAS), or dual homed. The states of the FIP LED combinations, and the meanings of each, are described and illustrated in Table B-1.

| LED Pattern1 | State | Indication |
|---|---|---|
B A | DAS | Both LEDs off means not connected. |
- - X X X X | Both LEDs off
| Not connected |
O O X X X X | Both LEDs on
| Through A |
O - X X X X | B on and A off
| Wrap B |
- O X X X X | B off and A on
| Wrap A |
B A | SAS |
|
X X - - X X |
Both LEDs off
|
Not connected |
X X O - X X |
B on and A off
| Single attachment B (PHY A shut down) |
X X - O X X |
B off and A on
| Single attachment A (PHY B shut down) |
B A | Dual Homed |
|
X X X X - - |
Both B and A off |
Not connected |
X X X O O O |
Single attachment A on plus both B and A on |
Dual homed with A active; not a normal condition; indicates potential problem on B |
X X O X O O |
Single attachment B on plus both B and A on plus |
Dual homed with B active, which is a normal condition |
X X O X O X |
Single attachment B on plus B on |
Single attachment B, Dual homed A failed |
X X X O X O |
Single attachment A on plus A on |
Single attachment A, Dual homed B failed |
| 1For the LED patterns, "-" means off, "O" means on, and "X" means does not apply. |
The FSIP LEDs are shown in Figure B-11. As with the other interface processors, the enabled LED goes on to indicate that the FSIP is enabled for operation. However, unlike the LED cluster at the top of the other interface processors, the LEDs for each serial port are adjacent to the connector. Table B-2 lists descriptions of each LED.

| LED | DTE Signal | DCE Signal |
|---|---|---|
RxC | Receive Clock (from DTE) | (TxC) Transmit Clock (to DTE) |
RxD | Receive Data (from DTE) | (TxD) Transmit Data (from DTE) |
TxC | Transmit Clock (from DCE) | (RxC) Receive Clock (to DTE) |
Conn | Connected | Connected |
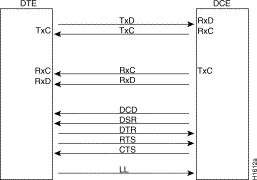
The labels on each LED indicate the signal state when the FSIP port is in DTE mode. However, the direction of the signals is reversed when the FSIP port is in DCE mode. For example, a DCE device usually generates a clock signal, which it sends to the DTE device. Therefore, when the Receive Clock (RxC) LED goes on, on a DTE interface, it indicates that the DTE is receiving the clock signal from the DCE device. However, when the RxC LED goes on, on a DCE interface, it indicates that the DCE is sending a clock signal (RxC) to the DTE device. Because of limited space on the FSIP faceplate, only DTE mode states are labeled on each port.
Figure B-12 shows the signal flow between a DTE and DCE device and the LEDs that correspond to signals for each mode. The following LED state descriptions include the meanings for both DTE and DCE interfaces.

The default mode for all interface ports without a port adapter cable attached is DCE, although there is no default clock rate set on the interfaces. The DCE default allows you to perform local loopbacks without having to terminate the port or connect a cable. Because the serial adapter cables determine the mode and interface type, the FSIP port becomes a DTE when a DTE cable is connected to it. If a DTE cable is connected to a port with a clockrate set, the DTE will ignore the clockrate and use the external clock signal that is sent from the remote DCE.
Four LEDs on the HIP indicate different states of the HSSI interface. As with the other interface processors, the enabled LED goes on to indicate that the HIP is enabled for operation. The four LEDs above the HSSI port (see Figure B-13) indicate the following.

After system initialization, the enabled LED (shown in Figure B-14), which is present on all interface processors, turns on to indicate that the MIP has been enabled for operation.

The following conditions must be met before the MIP is enabled:
If any of these conditions is not met, or if the initialization fails for other reasons, the enabled LED does not turn on.
The three LEDs above each MIP port indicate the following:
The TRIP LEDs are shown in Figure B-15. Each horizontal row of three LEDs, one for each Token Ring interface, indicates the speed (4 or 16 Mbps) of the interface and whether the interface is inserted into the ring.

All TRIPs, regardless of whether they provide two or four ports, contain the bank of LEDs shown in Figure B-15. As with the other interface processors, the enabled LED goes on to indicate that the TRIP is enabled for operation. Three LEDs for each port indicate the following:
![]()
![]()
![]()
![]()
![]()
![]()
![]()
![]()
Posted: Thu Nov 1 15:47:06 PST 2001
All contents are Copyright © 1992--2001 Cisco Systems, Inc. All rights reserved.
Important Notices and Privacy Statement.