|
|

This chapter describes the equipment and site requirements for router installation. It includes the power and cabling requirements that must be in place at the installation site, descriptions of additional equipment you will need to complete the installation, and the environmental conditions your site must meet to maintain normal operation. This chapter includes the following preinstallation requirements:
The following guidelines will help to ensure your safety and protect the equipment. This list is not inclusive of all potentially hazardous situations, so be alert.
 | Warning Metal objects heat up when connected to power and ground, and can cause serious burns. |
The router chassis weighs 76 pounds when empty (no interface processors or power supplies installed) and 145 pounds with 2 power supplies and 7 interface processors installed. The chassis is not intended to be moved frequently. Before you install the router, ensure that your site is properly prepared, so you can avoid having to move the chassis later to accommodate power sources and network connections.
Two people are required to lift the chassis. Whenever you lift the chassis or any heavy object, follow these guidelines:
| Warning Never attempt to lift an object that may be too heavy for you to lift safely. Never attempt to lift the chassis with the handles on the power supplies or the interface processors. These handles are not designed to support the weight of the chassis. Using them to lift or support the chassis can result in severe damage to the equipment and serious bodily injury. |

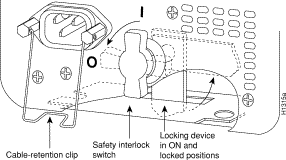
The power supplies (AC-input and DC-input) have two safety features, a safety interlock switch and a cable-retention clip (see Figure 2-2). The safety interlock switch on each power supply prevents the power supply from being removed from the chassis when the power supply switch (labeled O for off and | for on) is on. When the switch is in the on (|) position, a metal tab extends into a slot in the chassis. When the switch is turned off (O), the tab is raised and clears the slot. The cable-retention clip prevents the AC-input power supply power cable from being accidentally pulled out of the power supply socket. For additional information, refer to the section "Power Supplies" in the chapter "Product Overview."
Follow these basic guidelines when working with any electrical equipment:
In addition, use the guidelines that follow when working with any equipment that is disconnected from a power source, but still connected to telephone wiring or other network cabling.
Electrostatic discharge (ESD) damage, which occurs when electronic cards or components are improperly handled, can result in complete or intermittent failures. The RP, SP (or SSP), and interface processors each comprise a printed circuit board that is fixed in a metal carrier. Electromagnetic interference (EMI) shielding, connectors, and a handle are integral components of the carrier. Although the metal carrier helps to protect the boards from ESD, use a preventive antistatic strap whenever handling the RP, SP (or SSP), or interface processors. Handle the carriers by the handles and the carrier edges only; never touch the boards or connector pins.
 | Caution Always tighten the captive installation screws on RP, SP (or SSP), and interface processors. These screws prevent accidental removal, provide proper grounding for the system, and help to ensure that the bus connectors are properly seated in the backplane. |
Following are guidelines for preventing ESD damage:
| Caution For safety, periodically check the resistance value of the antistatic strap. The measurement should be within the range of 1 and 10 megohms. |
The environmental monitor in the router protects the system and components from potential damage from overvoltage and overtemperature conditions. To assure normal operation and avoid unnecessary maintenance, plan your site configuration and prepare your site before installation. After installation, make sure the site maintains an ambient temperature of 32° F through 104° F (0° C through 40° C), and keep the area around the chassis as free from dust as is practical.
The following sections address the site environment requirements for the router chassis.
The 700W, AC-input power supply uses a power factor corrector (PFC) that allows it to operate on input voltage and current within the ranges of 100 through 240 VAC and 47 through 63 Hz. The 700W, DC-input power supply allows the Cisco 7000 to operate between -40 and -72 VDC (-48 VDC nominal).
A second, identical power supply is also present in chassis configured with the redundant power option. Redundant power assures that power to the chassis continues uninterrupted in the event that one power supply fails. It also provides uninterrupted power in the event the input power line fails only if the power supplies are connected to separate input lines. If only one input line is available, and you must connect both power supplies to the same source, the redundant power supply will provide continuous power in the event the first power supply fails. It cannot, however, provide power backup in the event that the input power fails. Table 1-1 lists system power specifications including input voltage and operating frequency ranges.
| Caution To prevent problems, do not mix DC-input and AC-input power supplies in the same chassis. Your Cisco 7000 must have either DC-input or AC-input power supplies. |
Following are guidelines for setting up the plant wiring and cabling at your site. When planning the location of the new system, consider the distance limitations for signaling, electromagnetic interference, and connector compatibility, as described following.
When wires are run for any significant distance in an electromagnetic field, interference can occur between the field and the signals on the wires. This fact has two implications for the construction of plant wiring:
If you use twisted-pair cable in your plant wiring with a good distribution of grounding conductors, the plant wiring is unlikely to emit radio interference. When exceeding the recommended distances, use a high-quality twisted-pair cable with one ground conductor for each data signal.
If wires exceed recommended distances, or if wires pass between buildings, give special consideration to the effect of a lightning strike in your vicinity. The electromagnetic pulse (EMP) caused by lightning or other high-energy phenomena can easily couple enough energy into unshielded conductors to destroy electronic devices. If you have had problems of this sort in the past, you may want to consult experts in electrical surge suppression and shielding.
Most data centers cannot resolve the infrequent but potentially catastrophic problems just described without pulse meters and other special equipment. These problems can cost a great deal of time to identify and resolve, so take precautions by providing a properly grounded and shielded environment, with special attention to issues of electrical surge suppression.
The length of your networks and the distances between connections depend on the type of signal, the signal speed, and the transmission media (the type of cabling used to transmit the signals). For example, standard coax cable has a greater channel capacity than twisted-pair cabling. The distance and rate limits in these descriptions are the IEEE recommended maximum speeds and distances for signaling; however, you can usually get good results at speeds and distances far greater than these. For example, the recommended maximum rate for V.35 is 2 Mbps, but it is commonly used at 4 Mbps without any problems. If you understand the electrical problems that might arise and can compensate for them, you should get good results with rates and distances greater than those shown here. However, do so at your own risk. We do not recommend exceeding published maximum data rates and transmission distances.
The following distance limits are provided as guidelines for planning your network connections before installation.
Network connections to the coaxial cables are tapped into a network segment and must be spaced at specific intervals. Table 2-1 lists the maximum number of connections (taps) per segment and the intervals at which they must be placed. A maximum of four repeaters can be used to link segments in a single network.
| Parameter | 10Base5 | 10Base2 |
|---|---|---|
Cable diameter | 0.4" (1 cm) | 0.25" (0.6 cm) |
Max. segment length | 1640' (500 m) | 656' (200 m) |
Max. network length (with 4 repeaters) | 8200' (2500 m) | 3280' (1000 m) |
Max. connections (taps) per segment | 100 | 30 |
Min. connection (tap) spacing | 8.2' (2.5 m) | 1.64' (0.5 m) |
The unshielded twisted-pair (UTP) cabling used with 10Base-T is suitable for voice transmission, but may incur problems at 10-Mbps transmission rates. UTP wiring does not require the fixed spacing between connections that is necessary with the coax-type connections. IEEE recommends a maximum distance of 328 feet (100 meters) between station (connection) and hub for 10Base-T connections.
IEEE 802.3u specifies several different physical layers for 100BaseT: among them are 100BaseTX, which is 100BaseT, full duplex or half duplex, over Category 5, unshielded twisted-pair (UTP), Electronics Industry Association/Telecommunications Industry Association (EIA/TIA)-568-compliant cable; 100BaseFX, which is 100BaseT, full duplex or half duplex over optical fiber; and 100BaseT4, which is 100BaseT using Category 3, 4, or 5 UTP or shielded twisted-pair (STP) cabling with four pairs. 100BaseT4 is also called 4T+ or T2, which is 2-pair UTP over Category 3 cable.
Table 2-2 lists the cabling specifications for 100-Mbps transmission over 100BaseT, Category 5 UTP and MII connections.
| Parameter | RJ-45 | MII |
|---|---|---|
Cable specification | Category 3, 4 or 5, 150-ohm UTP or STP or multimode optical fiber | |
Maximum cable length | - | 0.5 m (1.64 ft.) (MII-to-MII cable4) |
Maximum segment length | 100 m (328 ft.) for 100BaseTX | 1 m (3.28 ft.)5 or 400 m (1,312 ft.) for 100BaseFX |
Maximum network length | 200 m (656 ft.)5. (with 1 repeater) | - |
| 1EIA/TIA-568 or EIA/TIA-568 TSB-36 compliant. 2Cisco Systems does not supply Category 5 UTP RJ-45 or 150-ohm STP MII cables. Both are commercially available. 3AWG = American Wire Gauge. This gauge is specified by the EIA/TIA-568 standard. 4This is the cable between the MII port on the FEIP port adapter and the appropriate transceiver. 5This refers specifically to any two stations on a repeated segment. |
Table 2-3 summarizes the characteristics of 100BaseT with respect to IEEE 802.3u physical characteristics.
| 100BaseT | |
|---|---|
Data rate (Mbps) | 100 |
Signaling method | Baseband |
Maximum segment length (meters) | 100 |
Media | UTP1 |
Topology | Star |
| 1UTP = unshielded twisted pair. |
Following are the MIP T1 specifications:
Following are the MIP E1 specifications:
Referring to the CIP, the maximum transmission distance for ESCON (with LED) is 1.9 miles (3.1 km) point-to-point or 5.7 miles (9.2 km) with two ESCON Directors. The maximum transmission distance for bus and tag is 400 feet (122 m). The IBM 3044 C/D (host side/remote side) copper-to-fiber repeater can be used to extend the bus and tag distance up to 1.2 miles (2 km).
Unbalanced G.703 interfaces allow for a longer maximum cable length than those specified for balanced circuits. Table 2-4 lists the maximum cable lengths for each FSIP E1-G.703/G.704 cable type by the connector used at the network (non-FSIP) end.
| Connection Type | BNC | Twinax |
|---|---|---|
Balanced | - | 300 meters (m) |
Unbalanced | 600m | - |
Currently there is no maximum transmission distance defined for IEEE 802.5 (Token Ring) networks. Shielded twisted-pair cabling is most commonly used for rates of 16 Mbps, and either shielded or unshielded twisted-pair cabling is used for rates of 1 and 4 Mbps. When planning your connections, remember that twisted-pair cabling is more susceptible to interference than other types of cabling, so plan the total network length and repeater spacing accordingly.
The FDDI standard sets the maximum distances between stations to the fiber lengths shown in Table 2-5. The maximum circumference of the FDDI network is only half the specified distance because of signal wrapping or loopback during fault correction. The standard allows a maximum of 500 stations. Both single-mode and multimode transceiver types provide 11 dB of optical power.
| Transceiver Type | Max. Distance Between Stations |
|---|---|
Single-mode | 6.2 miles (up to 10 km) |
Multimode | 1.2 miles (up to 2 km) |
As with all signaling systems, serial signals can travel a limited distance at any given bit rate; generally, the slower the baud rate, the greater the distance. Table 2-6 shows the standard relationship between baud rate and distance for EIA/TIA-232 signals.
| Rate (bps) | Distance (Feet) | Distance (Meters) |
|---|---|---|
2400 | 200 | 60 |
4800 | 100 | 30 |
9600 | 50 | 15 |
19200 | 25 | 7.6 |
38400 | 12 | 3.7 |
56000 | 8.6 | 2.6 |
Balanced drivers allow EIA/TIA-449 signals to travel greater distances than EIA/TIA-232. Table 2-7 shows the standard relationship between bit rate and distance for EIA/TIA-449 signals.
| Rate (bps) | Distance (Feet) | Distance (Meters) |
|---|---|---|
2400 | 4100 | 1250 |
4800 | 2050 | 625 |
9600 | 1025 | 312 |
19200 | 513 | 156 |
38400 | 256 | 78 |
56000 | 102 | 31 |
1544000 (T1) | 50 | 15 |
The SONET specification for fiber-optic transmission defines two types of fiber: single mode and multimode. Modes can be thought of as bundles of light rays entering the fiber at a particular angle. Single-mode fiber allows only one mode of light to propagate through the fiber, while multimode fiber allows multiple modes of light to propagate through the fiber. As multiple modes of light propagate through the fiber, they travel different distances depending on the entry angles. This causes them to arrive at the destination at different times (a phenomenon called modal dispersion). As a result, single-mode fiber is capable of higher bandwidth and greater cable run distances than multimode fiber. The maximum distances for single-mode and multimode transmissions, as defined by SONET, are in Table 2-8. If the distance between two connected stations is greater than these maximum distances, significant signal loss can result, making transmission unreliable.
| Transceiver Type | Maximum Distance between Stations1 |
|---|---|
Single-mode | Up to 9 miles (14.8 kilometers) |
Multimode | Up to 1.5 miles (2.4 kilometers) |
| 1This table gives typical results. You should use the power budget calculations to determine the actual distances. |
To design an efficient optical data link, evaluate the power budget. The power budget is the amount of light available to overcome attenuation in the optical link and to exceed the minimum power that the receiver requires to operate within its specifications. Proper operation of an optical data link depends on modulated light reaching the receiver with enough power to be correctly demodulated.
Attenuation, caused by the passive media components (cables, cable splices, and connectors), is common to both multimode and single-mode transmission.
The following variables reduce the power of the signal (light) transmitted to the receiver in multimode transmission:
Attenuation is significantly lower for optical fiber than for other media. For multimode transmission, chromatic and modal dispersion reduce the available power of the system by the combined dispersion penalty (in decibels [dB]). The power lost over the data link is the sum of the component, dispersion, and modal losses. Table 2-9 lists the factors of attenuation and dispersion limit for typical fiber-optic cable.
| Single-Mode | Multimode | |
|---|---|---|
Attenuation | 0.5 dB | 1.0 dB/km |
Dispersion Limit | No limit | 500 MHzkm1 |
| 1The product of bandwidth and distance must be less than 500 MHzkm. |
The LED used for a multimode transmission light source creates multiple propagation paths of light, each with a different path length and time requirement to cross the optical fiber, causing signal dispersion (smear). Higher order mode loss (HOL) results from light from the LED entering the fiber and being radiated into the fiber cladding. A worst case estimate of power margin (PM) for multimode transmissions assumes minimum transmitter power (PT), maximum link loss (LL), and minimum receiver sensitivity (PR). The worst case analysis provides a margin of error, although not all of the parts of an actual system will operate at the worst case levels.
The power budget (PB) is the maximum possible amount of power transmitted. The following equation lists the calculation of the power budget:
The power margin calculation is derived from the power budget and subtracts the link loss, as follows:
If the power margin is positive, as a rule, the link will work.
Table 2-10 lists the factors that contribute to link loss and the estimate of the link loss value attributable to those factors.
| Link Loss Factor | Estimate of Link Loss Value |
|---|---|
Higher order mode losses | 0.5 dB |
Clock recovery module | 1 dB |
Modal and chromatic dispersion | Dependent on fiber and wavelength used |
Connector | 0.5 dB |
Splice | 0.5 dB |
Fiber attenuation | 1 dB/km |
After calculating the power budget minus the data link loss, the result should be greater than zero. Results less than zero may have insufficient power to operate the receiver.
For SONET versions of the AIP module, the signal must meet the minimum parameters listed in Table 2-11.
| Single-Mode | Multimode | |
|---|---|---|
PT | -18.5 | -15 |
PR | -30 | -28 |
PB | -11.5 | -13 |
The following is an example multimode power budget calculation based on the following variables:
Estimate the power budget as follows:
The value of 2.5 dB indicates that this link would have sufficient power for transmission.
Following is an example with the same parameters as the previous example, but with a multimode link distance of 4 km:
The value of 1.5 dB indicates that this link would have sufficient power for transmission. However, due to the dispersion limit on the link (4 km x 155.52 MHz > 500 MHzkm), this link would not work with multimode fiber. In this case, single-mode fiber would be the better choice.
The single-mode signal source is an injection laser diode. Single-mode transmission is useful for longer distances, because there is a single transmission path within the fiber and smear does not occur. In addition, chromatic dispersion is also reduced because laser light is essentially monochromatic.
The maximum overload specification on the single-mode receiver is -14 dBm. The single-mode receiver can be overloaded when using short lengths of fiber because the transmitter can transmit up to -8 dB, while the receiver could be overloaded at -14 dB, but no damage to the receiver will result. To prevent overloading the receiver connecting short fiber links, insert a 5 to 10 dB attenuator on the link between any single-mode SONET transmitter and the receiver.
The following example of a single-mode power budget is of a two buildings, 11 kilometers apart, connected through a patch panel in an intervening building with a total of 12 connectors.
Estimate the power budget as follows:
The value of 2.5 dB indicates that this link would have sufficient power for transmission and is not in excess of the maximum receiver input power.
Statistical models more accurately determine the power budget than the worst case method. Determining the link loss with statistical methods requires accurate knowledge of variations in the data link components. Statistical power budget analysis is beyond the scope of this document. For further information, refer to UNI Forum specifications, ITU-T standards, and your equipment specifications.
The following publications contain information on determining attenuation and power budget:
The High-Speed Serial Interface (HSSI) standard (EIA/TIA 612/613) specifies a maximum cable length of 50 feet (15 meters) for 52 Mbps HSSI connections. The typical (nominal) cable length between the HIP and the DSU is 6 feet (2 meters). The HSSI interface cable comprises 25 twisted pairs and a 50-pin plug at each end. Both DTE and DCE ports on the HIP and the DSU are 50-pin receptacles. The HSSI interface cable is similar to a SCSI-II-type (small computer systems interface) cable; however, the HSSI cable specification is more stringent than that for a SCSI-II. Substituting a SCSI-type cable to connect the HSSI interface may prevent proper operation of the interface.
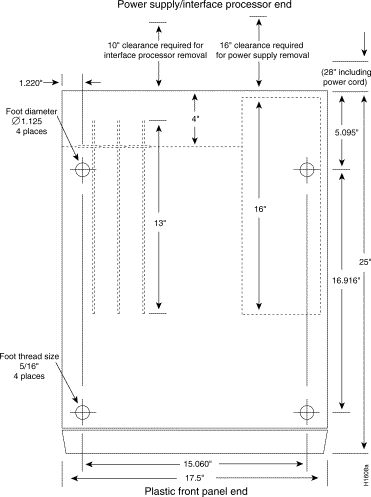
An optional rack-mounting kit is available for mounting the router in a standard 19-inch equipment rack. The mounting kit is not suitable for use with Telco-type equipment racks, or those with obstructions (such as a power strip) that could impair access to the interface processors and power supplies. In Telco environments or at installation sites that use nonstandard racks, the router can be mounted on an equipment shelf, provided that the rack dimensions allow safe installation and access to the power supplies and interface processors. Figure 2-3 show the chassis footprint and outer dimensions.
To use the optional rack-mount kit, your equipment rack must meet the following requirements:
When planning your rack installation, consider the following guidelines:
In addition to the preceding guidelines, review the precautions for avoiding overtemperature conditions in the section Equipment-Rack Ventilation in this chapter.
| Caution Never install the router in an enclosed rack that is not properly ventilated or air-conditioned. |
The router operates as a standalone system placed on a table or as a rack-mounted system in a data processing or lab environment. Because the noise level of the chassis blower is approximately 60 dBa, it is best suited for unattended or computer room use.
The router requires a dry, clean, well-ventilated, and air-conditioned environment. An internal blower pulls cooling air through the chassis from the front (intake) to the rear (exhaust). The flow of ambient air must be maintained to ensure normal operation. If the airflow is blocked or restricted, or if the intake air is too warm, an overtemperature condition can occur. Under extreme conditions, the environmental monitor will shut down the system to protect the system components. To assure normal operation and avoid unnecessary maintenance, plan your site configuration and prepare your site before installation. After installation, make sure the site maintains an ambient temperature of 0-40° C (32-104° F), and keep the area around the chassis as free from dust as is practical. For a description of the environmental monitor and status levels, refer to the section "Environmental Monitoring and Reporting Functions" in the chapter "Product Overview."
If the temperature of the room air drawn into the chassis is higher than desirable, the air temperature inside the chassis may also be too high. This condition can occur when the wiring closet or rack in which the chassis is mounted is not ventilated properly, when the exhaust of one device is placed so it enters the air intake vent of the chassis, or when the chassis is the top unit in an unventilated rack. Any of these conditions can inhibit airflow and create an overtemperature condition.
Multiple routers can be rack-mounted with little or no clearance above and below the chassis. However, when mounting a router in a rack with other equipment, or when placing it on the floor with other equipment located close by, ensure that the exhaust from other equipment does not blow into the intake vent (lower front panel) of the chassis.
Table 2-12 lists the operating and nonoperating environmental site requirements. To maintain normal operation and ensure high system availability, maintain an ambient temperature and clean power at your site. The following ranges are those within which the router will continue to operate; however, a measurement that is approaching the minimum or maximum of a range indicates a potential problem. You can maintain normal operation by anticipating and correcting environmental anomalies before they exceed the maximum operating range.
| Minimum | Maximum | |
|---|---|---|
Temperature, ambient operating | 32° F (0° C) | 104° F (40° C) |
Temperature, ambient nonoperating and storage | -4° F (-20° C) | 149° F (65° C) |
Humidity (RH), ambient (noncondensing) operating | 10% | 90% |
Humidity (RH), ambient (noncondensing) nonoperating and storage | 5% | 95% |
Altitude, operating and nonoperating | Sea level | 10,000' (3050 m) |
Vibration, operating | 5-200 Hz, 0.5 g (1 oct./min.) |
|
Vibration, nonoperating | 5-200 Hz, 1 g (1 oct./min.) | |
| Caution Keep the air filter clean to maintain normal airflow through the system. |
Planning a proper location for the router and the layout of your equipment rack or wiring closet are essential for successful system operation. Equipment placed too close together or inadequately ventilated can cause system overtemperature conditions. In addition, chassis panels made inaccessible by poor equipment placement can make system maintenance difficult. Following are precautions that can help avoid problems during installation and ongoing operation.
Follow these general precautions when planning your equipment locations and connections:
If you plan to install the router in an equipment rack, follow these precautions for avoiding overtemperature conditions in addition to the guidelines that are provided in the section "Equipment Racks" in this chapter:
For a functional description of the environmental monitor and the status levels, refer to the section "Environmental Monitoring and Reporting Functions" in the chapter "Product Overview."
Follow these precautions when planning power connections to the router.
When preparing your site for network connections to the router, you must consider a number of factors related to each type of interface, such as the type of cabling required for each type (fiber, thick or thin coaxial, or twisted-pair cabling), distance limitations for each signal type, the specific cables you need to connect each interface, and any additional interface equipment you need, such as transceivers, modems, channel service units (CSUs), or data service units (DSUs). Before installing the router, have all additional external equipment and cables on hand. If you intend to build your own cables, refer to the cable pinouts in the appendix "Cabling Specifications." For ordering information, contact a customer service representative.
You may need some of the following data communications equipment to complete your installation.
| Caution Before you attach an MII transceiver to an MII receptacle on your FEIP, ensure that your MII transceiver responds to physical sublayer (PHY) address 0 per section 22.2.4.4. "PHY Address" of the IEEE 802.3u specification; otherwise, interface problems might result. Confirm that this capability is available on your MII transceiver with the transceiver's vendor or in the transceiver's documentation. If a selection for "Isolation Mode" is available, we recommend you use this setting (if no mention is made of "PHY addressing"). |
All AIP ATM interfaces are full-duplex. You must use the appropriate ATM interface cable to connect the AIP with an external ATM network.
The AIP provides an interface to ATM switching fabrics for transmitting and receiving data at rates of up to 155 Mbps bidirectionally; the actual rate is determined by the physical layer interface module (PLIM). The AIP can support PLIMs that connect to the following physical layers:
The E3 and DS3 PLIMs both require cable CAB-ATM-DS3/E3. The E3 PLIM connection requires an EMI filter clip (CLIP-E3-EMI) on the receive port (RCVR).
For wide-area networking, ATM is currently being standardized for use in Broadband Integrated Services Digital Networks (BISDNs) by the International Telecommunications Union Telecommunication Standardization Sector (ITU-T) and the American National Standards Institute (ANSI). (The ITU-T carries out the functions of the former Consultative Committee for International Telegraph and Telephone [CCITT]). BISDN supports rates from E3 (34 Mbps) to multiple gigabits per second (Gbps). The DS3 interface performs physical layer translation from the AIP to a DS3 line interface in accordance with ATM Forum UNI Specification Version 3.1, ACCUNET T45 service specifications, and ANSI T1.107.
The ATM User-to-Network (UNI) specification defines the required Management Information Base (MIB) functionality for ATM interfaces. Refer to the ATM UNI specification for additional details.
ATM UNI information is arranged in a MIB fashion. MIB attributes are readable and writable across the Interim Local Management Interface (ILMI) using a Simple Network Management Protocol (SNMP). The ILMI uses SNMP, without User Datagram Protocol (UDP), and uses IP addressing along with the ATM MIB.
The AIP supports RFC 1213 interface MIBs as specified in the ATM MIB V2 specification
The ATM interface cable is used to connect your router to an ATM network, or to connect two routers back-to-back.
Cables can be obtained from the following vendors:
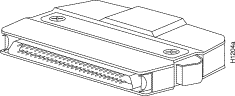
For TAXI 4B/5B traffic over multimode fiber, use the multimode MIC interface cable to connect the AIP with the external ATM switch. (See Figure 2-4.)

For SONET/SDH multimode connections, use one multimode duplex SC connector (see Figure 2-5) or two single SC connectors. (See Figure 2-6.)
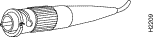
For SONET/SDH single-mode connections, use the single-mode (ST2) connector (bayonet-style twist-lock). (See Figure 2-7.)
| Warning Invisible laser radiation can be emitted from the aperture ports of the single-mode ATM products when no fiber-optic cable is connected. Avoid exposure and do not stare into open apertures. This product meets the Class 1 Laser Emission Requirement from CDRH FDDI. |
For E3 and DS3 connections, use the 75 ohm, RG-59, coaxial cable, CAB-ATM-DS3/E3, which has bayonet-style, twist-lock (BNC) connectors and ferrite beads. (See Figure 2-8.) The E3 and DS3 PLIMs both require cable CAB-ATM-DS3/E3.

| Caution To ensure compliance with EMI standards, the E3 PLIM connection requires an EMI filter clip (CLIP-E3-EMI) on the receive port (RCVR); the DS3 PLIM connection does not require this clip. |
For multimode connections, connect the multimode interface cable to the media interface cable (MIC) connector. (See Figure 2-9.)
For multimode SONET connections, connect the multimode cable to the SC connector on the PLIM. (See Figure 2-10.)
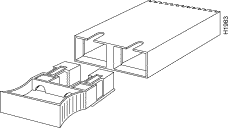
The SONET multimode SC-duplex connector is shipped with a dust plug. (See Figure 2-11.) Remove the plug by pulling on the plug as you squeeze the sides of the connector.
For single-mode SONET connections, connect the single-mode cable to the ST connector on the SONET PLIM. (See Figure 2-12.)
For E3 and DS3 connections, connect the coaxial cable to the BNC connector on the E3 or DS3 PLIM. (See Figure 2-13.) The E3 and DS3 PLIMs require cable CAB-ATM-DS3/E3. Ensure that the transmit and receive portions of the cable are connected to the appropriate PLIM connector. The E3 PLIM connection requires an EMI filter clip (CLIP-E3-EMI) on the receive port (RCVR). Refer to the chapter "Installing the Router."
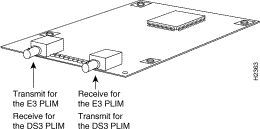
| Caution To ensure compliance with EMI standards, the E3 PLIM connection requires an EMI filter clip (CLIP-E3-EMI) on the receive port (RCVR); the DS3 PLIM connection does not require this clip. |
The two CIP adapters—the ESCON Channel Adapter (ECA) and the bus and tag Parallel Channel Adapter (PCA)—are available as FRUs; however, they are field replacable by Cisco-certified field service personnel only. For more information on the ECA, PCA, and CIP cables and installation, refer to the configuration note Channel Interface Processor (CIP) Installation and Configuration (document number 78-1342-xx, where xx is the latest version of the document).
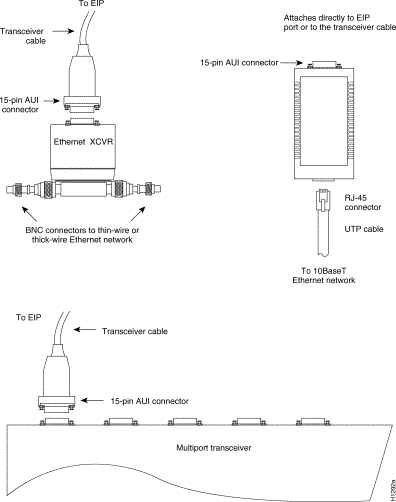
You will need an IEEE 802.3 MAU and an AUI, or an Ethernet transceiver and transceiver cable between each EIP port and the Ethernet network. The Ethernet connectors on the EIP are standard 15-pin AUI receptacles that require an AUI or transceiver interface cable with a 15-pin AUI plug. (See Figure 2-14.)
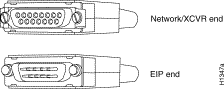
Transceivers are available from a variety of sources for thick-wire (10Base5), thin-wire (10Base2), or unshielded twisted-pair cabling (10BaseT at 10 Mbps); Figure 2-15 shows examples of transceivers and connection equipment. You can connect either Ethernet Version 1 or Version 2/IEEE 802.3 interfaces; the EIP automatically supports both types.
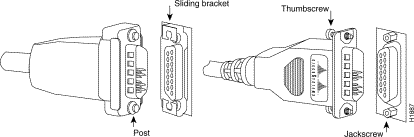
Typically, Ethernet connectors have either slide-type or jackscrew-type locks. (See Figure 2-16.) The most common are those which use a slide-type lock, which is the type used on the EIP ports. The connector on the left in Figure 2-16 shows a slide-type lock. When the cable is connected to the 15-pin port, you snap a metal bracket up over two posts on the cable connector to secure it in the port and provide strain relief.
The jackscrew-type lock, shown on the right in Figure 2-16, uses two thumbscrews or jackscrews, which are usually attached to the cable connector instead of the posts and sliding bracket. When the cable is connected to the 15-pin port, you secure it by screwing the thumbscrews into the jackscrews adjacent to the connector. The slide-type locks are standard on the EIP ports; however, conversion kits are included with each EIP to replace the slide-type locks on ports you will connect to interface equipment that uses the screw-type locks. For specific replacement instructions, refer to the installation document that accompanies the jackscrew kit.
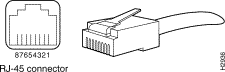
The two connectors on the FEIP port adapter are a single MII, 40-pin, D-shell type, and a single RJ-45. You can use either one or the other. Only one connector can be used at one time. The FEIP can have up to two port adapters installed. Each connection supports IEEE 802.3u interfaces compliant with the 100BaseX and 100BaseT standards. The RJ-45 connection does not require an external transceiver; however, the MII connection does depending on the type of connection you use.
The RJ-45 modular connector (see Figure 2-17) has strain relief functionality incorporated into the design of its standard plastic connector. Figure 2-17 and Figure 2-18 show the RJ-45 and MII connectors.
Depending on the type of media you use between the MII connection on the port adapter and your switch or hub, the network side of your 100BaseT transceiver should be appropriately equipped: with ST-type connectors (for optical fiber), BNC connectors (for 10Base2 coaxial cable), and so forth. Figure 2-18 shows the pin orientation of the female MII connector on the port adapter.
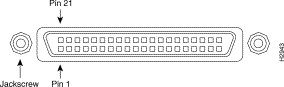
The MII receptacle uses 2-56 screw-type locks, called jackscrews (shown in Figure 2-18), to secure the cable or transceiver to the MII port. MII cables and transceivers have knurled thumbscrews (screws you can tighten with your fingers) that you fasten to the jackscrews on the FEIP MII connector. Use the jackscrews that are appropriate for your MII cable.
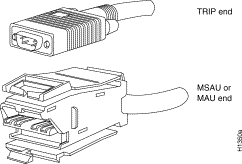
You will need an 802.5 MAU and Token Ring adapter cable between each TRIP port and the network ring. The Token Ring connectors on the TRIP are DB-9 (PC type) receptacles that require an interface cable with a 9-pin DB-9 plug at the TRIP end and a MAU connector at the network end. Both connectors are shown in Figure 2-19.
The term Token Ring refers to both IBM's Token Ring Network, which IBM developed in the 1970s, and to IEEE 802.5 networks. The IEEE 802.5 specification was modeled after, and still closely shadows, IBM's network. The two types are compatible, although the specifications differ slightly.
The IBM Token Ring specifies a star topology, with all end stations connected through a device called a multistation access unit (MSAU). IEEE 802.5 does not specify any topology, although most implementations are based on a star configuration with end stations attached to a device called a media access unit (MAU). Also, IBM Token Ring specifies twisted pair cabling, whereas IEEE 802.5 does not specify media type. Most Token Ring networks use shielded twisted pair cabling; however, some networks that operate at 4 Mbps use unshielded twisted pair cable. Table 2-13 shows a comparison of the two types.
| Network Type | Data Rates | Stations/ Segment | Topology | Media | Signaling | Access Method | Encoding |
|---|---|---|---|---|---|---|---|
IBM Token Ring network | 4, 16 Mbps | 260 shielded twisted pair | Star | Twisted pair | Baseband | Token passing | Differential Manchester |
IEEE 802.5 network | 4, 16 Mbps | 250 | Not specified | Not specified | Baseband | Token passing | Differential Manchester |
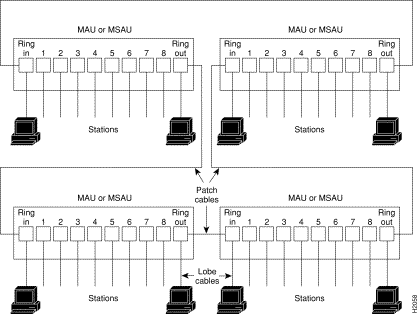
In the typical Token Ring network shown in Figure 2-20, lobe cables connect each Token Ring station (TRIP port) to the MSAU (or MAU), and patch cables connect adjacent MSAUs (or MAUs) to form one large ring.
Token Ring and IEEE 802.5 are token-passing networks, which move a small frame, called a token, around the network. Possession of the token grants the right to transmit; a station with information to transmit must wait until it detects a free token passing by.
When all stations on the ring are idle, the token packet is labeled as a free token. If the station receiving the token has no information to send, it simply passes the free token to the next station. A station that does have information to transmit seizes the token, alters a bit of the token frame (which changes the free token to a busy token), appends the information it wishes to transmit, and then sends this information to the next station on the ring. The busy token, with the information frame, circulates the ring until it reaches the intended destination station, which copies the information for further processing and passes the busy token and information frame back out to the ring. The information frame continues to circle the ring until it reaches the original sending station, which checks the returned frame to ensure that the destination station received the information. When the original sending station determines that the receiving station accepted the information, it purges the token and information frame, and transmits a new free token out to the ring.
While the information frame is circling the ring, there is no token on the network (unless early token release is enabled, which is described later in this section), so other stations wishing to transmit must wait. Therefore, collisions cannot occur in Token Ring networks.
A priority scheme allows the user to designate any station as high priority, which allows the station to use the ring more frequently than lower-priority stations. Stations cannot seize or reserve a passing token with a higher priority than its own designated priority, which allows highest-priority stations to seize the token as soon as possible. The token frame contains a priority field, which is set by the station that generates the token, and a reservation field, which can be set by a higher-priority station as it receives and passes the token.
When a token is circulating, only stations with a priority equal to or higher than the priority value in the token fields can seize that token or reserve the next token. Once the token is seized and changed to a busy token with an information frame, a station with a higher priority than the transmitting station can reserve the next token (for the next pass around the network) by setting the reservation field. When the original sending station receives a token with the reservation field set for a higher-priority station, it issues the new free token with the priority field set to that of the reserving station. Only the reserving station or another station with an equal or higher priority can seize the token. After the higher priority station seizes the token and completes it transmission, it must first determine that all other higher-priority stations are finished transmitting then reinstate the previous, lower priority. When the station detects a free token with the higher priority, it assumes that there is no more higher-priority traffic waiting and downgrades the priority of the token before passing it back onto the ring.
Unlike CSMA/CD networks such as Ethernet, token-passing networks are deterministic. Each station can hold the token for a maximum period of time, so it is possible to calculate the maximum time that will pass before any end station will be able to transmit. This and the fault management mechanisms discussed in the following section make Token Ring networks robust and predictable.
Token Ring networks employ several mechanisms for detecting and compensating for network faults. For example, one station in the Token Ring network is designated as the active monitor. This station, which potentially can be any station on the network, acts as a centralized source of timing information for other ring stations and performs a variety of ring maintenance functions. These functions include detecting and correcting a lost or persistent busy (continuously circulating) token on the ring.
To detect a lost token, the active monitor uses a timeout greater than the time required for the longest frame to traverse the ring completely. If the active monitor does not see a token during this time, it assumes that the token is lost, purges the ring of any residual data, and issues a new token.
When a sending device fails, its frame may continuously circle the ring, preventing other stations from transmitting their own frames and essentially locking up the network. To detect a circulating busy token, the active monitor sets a monitor bit to 1 on any passing busy token. If it sees a busy token with a bit already set, it knows that the transmitting station failed to purge its packet. The monitor changes the busy token to a free token, and sends it back out to the ring.
Other stations on the ring have the role of passive monitor; their primary job is to detect failure of the active monitor and assume that role if necessary. A contention-resolution algorithm determines which station takes over if the active monitor fails.
A Token Ring algorithm called beaconing detects and tries to repair certain network faults. Whenever a station detects a serious problem with the network (such as a cable break), it sends a beacon frame. The beacon frame defines a failure domain, which includes the station reporting the failure, its nearest active upstream neighbor, and everything in between. Beaconing initiates a process called autoreconfiguration, where nodes within the failure domain automatically perform diagnostics and attempt to reconfigure the network around the failed areas. Physically, the MSAU or MAU can accomplish this through electrical reconfiguration.
All information in a Token Ring network is seen by active MSAUs or MAUs. Some of these devices can be programmed to check for problems and automatically remove problem stations from the ring, and some contain bypass relays so that you can selectively remove stations from the ring without affecting traffic on the network.
All TRIP ports support both 4 and 16-Mbps operation and early token release. The default for all ports is for 4 Mbps operation and early token release disabled. Both states are enabled with configuration commands in the configuration mode. To enable 16 Mbps, specify the slot/port address and use the configuration command ring-speed 16; to return to 4-Mbps operation, use the command ring-speed 4. To enable and disable early token release, specify the slot/port address and use the configuration command [no] early token release. For examples of these commands, refer to the section "Token Ring Connection Equipment" in the chapter "Preparing for Installation." For complete descriptions and examples of software commands, refer to the related software configuration and command reference documentation.
Fiber-optic transceivers on the FIP provide a direct interface between the router and the Fiber Distributed Data Interface (FDDI) ring. The FIP supports both single-mode and multimode transceivers and is available with any combination of the two types. Both transceiver types provide a Class A dual attachment interface that can be connected to a Class A or a Class B station. Class A is a dual attachment station (DAS) with primary and secondary rings; Class B is a single attachment station (SAS) with only a primary ring. A detailed description of Class A and B and of DASs and SASs follows the descriptions of FDDI connection equipment.
FDDI networks use two types of fiber-optic cable: single-mode (also called monomode) and multimode. Mode refers to the angle at which light rays (signals) are reflected and propagated through the optical fiber core, which acts as a waveguide for the light signals. Multimode fiber has a relatively thick core (62.5/125-micron) that reflects light rays at many angles. Single-mode fiber has a narrow core (8.7 to 10/125-micron) that allows the light to enter only at a single angle.
Although multimode fiber allows more light signals to enter at a greater variety of angles (modes), the different angles create multiple propagation paths that cause the signals to spread out in time and limits the rate at which data can be accurately received. This distortion does not occur on the single path of the single-mode signal; therefore, single-mode fiber is capable of higher bandwidth and greater cable run distances than multimode fiber. In addition, multimode transmitters usually use LEDs as a light source, and single-mode transmitters use a laser diode, which is capable of sustaining faster data rates. Both types use a photodiode detector at the receiver to translate the light signal into electrical signals.
The FIP single-mode interface uses simplex FC-type connectors for the Transmit and Receive ports. (See Figure 2-21.) The connector accepts standard 8.7 to 10/125-micron single-mode fiber-optic cable. The single-mode interface supports connections at distances up to 6 miles (10 kilometers).

The multimode transceiver supports distances of up to 1.2 miles (1.9 kilometers). The multimode connector is an FDDI-standard physical sublayer (PHY) connector that encodes and decodes the data into a format acceptable for fiber transmission. The multimode connector accepts standard 62.5/125-micron multimode fiber-optic cable using the media interface cable (MIC) and, with proper cable terminators, can accept 50/125 micron fiber-optic cable. Multimode uses the integrated MIC connector shown in Figure 2-22 at both the FIP and network ends.
The multimode/multimode FIP (Cx-FIP-MM) provides a control port for an optical bypass switch, which allows the light signal to pass directly through the bypass switch and completely bypass the FIP transceivers when the interface has failed or is shut down. Most optical bypass switches provide the necessary interface cables for connection to the multimode MIC connectors on the FIP; however, not all manufacturers use the same type of DIN connector for the control port. Some manufacturers use a DIN, and some use a smaller version, a mini-DIN. The optical bypass control port on the FIP requires a mini-DIN connector. A DIN-to-mini-DIN adapter cable (CAB-FMDD) is included with the multimode/multimode and single-mode/single-mode FIPs to ensure that you can connect to either type.
The FIP supports both Class A and Class B station connections and provides an interface for both single-mode and multimode fiber-optic cable. The two physical ports (PHY A and PHY B) are available with either single-mode (FC) or multimode (MIC) port connectors, or with a combination of one of each for matching multimode and single-mode fiber in the same FDDI network.
Fiber Distributed Data Interface (FDDI), which specifies a 100-Mbps, token-passing dual-ring network using fiber-optic transmission media, is defined by the ANSI X3.1 standard and by ISO 9314, the international version of the ANSI standard. An FDDI network comprises two token-passing fiber-optic rings: a primary ring and a secondary ring.
An FDDI ring consists of two or more point-to-point connections between adjacent stations. On most networks, the primary ring is used for data communication, and the secondary ring is used as a backup. Class B, or single attachment stations (SAS), attach to one ring and are typically attached through a concentrator; Class A, or dual attachment stations (DAS), attach to both rings. Figure 2-23 shows a typical FDDI configuration with both DAS and SASs.

SASs (Class B) typically attach to the primary ring through a concentrator, which provides connections for multiple SASs. The concentrator ensures that a failure or power-down of any SAS does not interrupt the ring. SASs use one transmit port and one receive port to attach to the single ring. DASs (Class A) have two physical ports, designated PHY A and PHY B, each of which connects the station to both the primary and secondary rings. Each port is a receiver for one ring and a transmitter for the other. For example, PHY A receives traffic from the primary ring, and PHY B transmits to the primary ring.
The dual rings in an FDDI network provide fault tolerance. If a station on a dual ring shuts down or fails, such as Station 3 in Figure 2-24, the ring automatically wraps (doubles back on itself) to form a single contiguous ring. This removes the failed station from the ring, but allows the other stations to continue operation. In Figure 2-24, the ring wraps to eliminate Station 3 and forms a smaller ring that includes only Stations 1, 2, and 4.
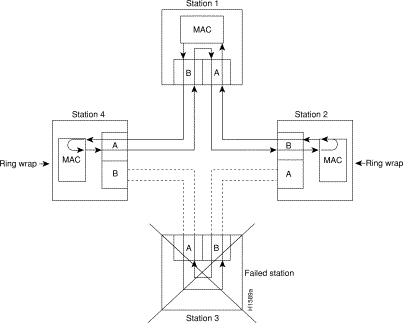
A second failure could cause the ring to wrap in both directions from the point of failure, which would segment the ring into two separate rings that could not communicate with each other. For example, if Station 1 in Figure 2-24 fails after Station 3 fails, Stations 2 and 4 will each be isolated because no path for communication exists between them. Subsequent failures cause additional segmentation.
Figure 2-25 shows an optical bypass switch installed at Station 1. In the normal configuration shown on the left of the figure, Station 1 is functioning normally, so the optical bypass switch appears transparent. The switch essentially allows the signals to pass through it without interruption. However, if Station 1 fails, the optical bypass switch enables the bypassed configuration shown on the right of Figure 2-25.
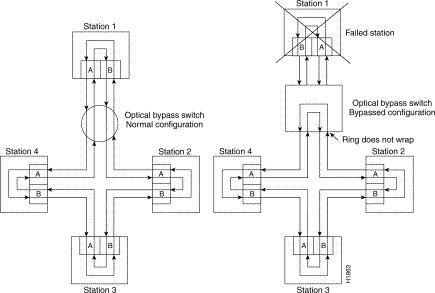
The bypass switch reroutes the light signal by intercepting it before it reaches the failed Station 1 and sends it back out to the ring. This allows the signal to maintain its existing path and direction without wrapping back on itself. However, stations that are operating normally repeat the signal when sending it back out to the ring. Optical bypass switches do not repeat or drive the signal; they just allow the signal to pass through them. Therefore, significant signal loss can occur when the downstream neighbor, the next station on the ring, is far away.
Another technique for fault tolerance is dual homing, whereby critical devices are attached to two concentrators. Only the designated primary concentrator is active unless it (or its link) fails. If the primary does fail, the backup (passive) concentrator is activated automatically and sustains the ring.
The MIP T1 interface cable has two 15-pin DB connectors at each end to connect the MIP with the external T1 CSU. Figure 2-26 shows the MIP interface cable, connectors and pin-outs.

For E1, four serial cables are available from Cisco Systems for use with the MIP. All three have DB-15 connectors on the MIP end and either BNC, DB-15, Twinax, or RJ-45 connectors on the network end. Figure 2-27, Figure 2-28, Figure 2-29, and Figure 2-30 show the E1 interface cables (respectively).


The FSIP supports synchronous serial connections at speeds of up to 8 Mbps (16 Mbps aggregate on an eight-port FSIP); the speed depends on the type of electrical interface used. Use EIA/TIA-232 for speeds of 64 kbps and below, and use X.21, EIA/TIA-449, V.35, or EIA-530 for higher speeds. All FSIP ports use an identical 60-pin, D-shell receptacle.
Each serial port requires a serial port adapter cable that provides the network connection and defines the electrical interface type and mode of that port. All adapter cables use a 60-pin D-shell plug at the router (FSIP) end. The network end of each cable provides the standard connector used with each respective interface type. (See Figure 2-31.) Cables are available for all interfaces except EIA-530 in DTE mode with a plug at the network end, or in DCE mode with a receptacle at the network end. The mode, DCE or DTE, is labeled on the connectors at both ends of the cables. Metric (M3) thumbscrews are included with each port adapter cable to allow connection to devices that use metric hardware.
Following are the available interface cable options for the mode and network-end connectors for each:
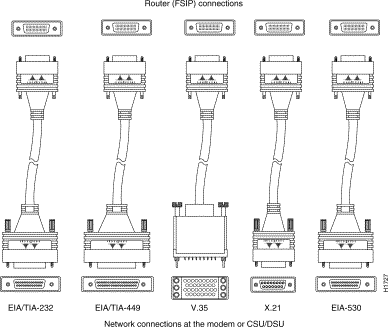
Figure 2-32, Figure 2-33, and Figure 2-34 show the unbalanced and balanced cables used for connection between the E1-G.703/G.704 port adapter and your network. The port-adapter end of each cable has a DB-15 connector.
| Caution It is a requirement of the statutory approval of the E1-G.703/G.704 interface that the jackscrews on the DB-15 connector backshell are securely screwed down while the FSIP is operating. |
All interfaces support both nonreturn to zero (NRZ) and nonreturn to zero inverted (NRZI) formats. Both formats use two different voltage levels for transmission. NRZ signals maintain constant voltage levels with no signal transitions (no return to a zero voltage level) during a bit interval and are decoded using absolute values (0 and 1). NRZI uses the same constant signal levels but interprets the presence of data at the beginning of a bit interval as a signal transition and the absence of data as no transition. NRZI uses differential encoding to decode signals, rather than determining absolute values. NRZ, the factory default on all interface types, is most common. All interface types also support NRZI format, which is commonly used with EIA/TIA-232 connections in IBM environments. (See the section "Configuring NRZI Format" in the chapter "Maintenance" for configuration instructions.)
All interfaces (except the E1-G.703/G.704) use a 16-bit cyclic redundancy check (CRC) by default but also support a 32-bit CRC. (The E1-G.703/G.704 interface uses a 4-bit CRC).
CRC is an error-checking technique that uses a calculated numeric value to detect errors in transmitted data. The sender of a data frame divides the bits in the frame message by a predetermined number to calculate a remainder or frame check sequence (FCS). Before it sends the frame, the sender appends the FCS value to the message so that the frame contents are exactly divisible by the predetermined number. The receiver divides the frame contents by the same predetermined number that the sender used to calculate the FCS. If the result is not 0, the receiver assumes that a transmission error occurred and sends a request to the sender to resend the frame.
The designators 16 and 32 indicate the number of check digits per frame that are used to calculate the FCS. CRC-16, which transmits streams of 8-bit characters, generates a 16-bit FCS. CRC-32, which transmits streams of 16-bit characters, generates a 32-bit FCS. CRC-32 transmits longer streams at faster rates, and therefore provides better ongoing error correction with less retransmits. Both the sender and the receiver must use the same setting. (See the section "Configuring 32-Bit Cyclic Redundancy Check (CRC)" in the chapter "Maintenance" for configuration instructions.)
DCE is the default mode for all serial ports. You normally use DCE when connecting the router to a DTE device such as a PC, host, or another router. DCE mode requires an internal clock signal. To set up a port as a DCE interface, you must use a DCE adapter cable and use the clockrate configuration command to set the internal clock speed.
DTE is the most commonly used mode. You normally use DTE when connecting the router to a DCE device such as a modem or CSU/DSU. Most DTE interfaces require an external clock signal, which the remote DCE device provides. Although DCE is the default mode, you do not need to specify the mode of the port when configuring DTE interfaces. When the port recognizes the DTE interface cable, it automatically uses the clock signal from the remote DCE device.
Occasionally, systems with long cables may experience high error rates when operating at the higher transmission speeds. Slight variances in cable construction, temperature, and other factors can cause the clock and data signals to shift out of phase. Inverting the clock can often correct this shift. If an FSIP port is reporting a high number of error packets, suspect a phase shift and invert the clock with the invert-transmit-clock command.
For brief descriptions of the clockrate and invert-transmit-clock commands, refer to the section "Configuring Timing (Clock) Signals" in the chapter "Maintenance." For complete command descriptions and instructions, refer to the related software configuration and command reference documentation on UniverCD or in the printed manuals.
All serial signals are subject to distance limits, beyond which a signal degrades significantly or is completely lost. For specific cabling distance limitations refer to the section "Distance Limitations" earlier in this chapter. The distance and rate limits in these descriptions are the IEEE-recommended maximum speeds and distances for signaling; however, you can usually get good results at speeds and distances far greater than these. For instance, the recommended maximum rate for V.35 is 2 Mbps, but 4 Mbps is commonly used without any problems. If you understand the electrical problems that might arise and can compensate for them, you should get good results with rates and distances greater than those shown here. However, do so at your own risk. We do not recommend that you exceed published data rates and transmission distances.
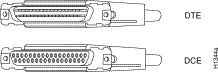
By far the most common interface standard in the U.S., EIA/TIA-232, supports unbalanced circuits at signal speeds up to 64 kbps. The router (FSIP) end of all EIA/TIA-232 adapter cables is a high-density 60-pin plug. The opposite (network) end of the adapter cable is a standard 25-pin D-shell connector (known as a DB-25) that is commonly used for EIA/TIA-232 connections. Figure 2-35 shows the connectors at the network end of the adapter cable. The system console and auxiliary ports on the RP also use EIA/TIA-232 connections; however, the FSIP ports support synchronous connections, and the console and auxiliary ports support only asynchronous connections. For further information on the RP ports, refer to the section "Console and Auxiliary Port Connection Equipment" later in this chapter.
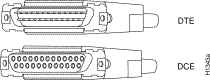
EIA/TIA-449, which supports balanced (RS-422) and unbalanced (RS-423) transmissions, is a faster (up to 2 Mbps) version of EIA/TIA-232 that provides more functions and supports transmissions over greater distances. The EIA/TIA-449 standard was intended to replace EIA/TIA-232, but it was not widely adopted. Industry's resistance to convert to EIA/TIA-449 was due primarily to the large installed base of DB-25 hardware and to the larger size of the 37-pin EIA/TIA-449 connectors, which limited the number of connections possible (fewer than possible with the smaller, 25-pin EIA/TIA-232 connector). The FSIP end of all EIA/TIA-449 adapter cables is a high-density 60-pin plug. The network end of the adapter cable provides a standard 37-pin D-shell connector commonly used for EIA/TIA-449 connections. Figure 2-36 shows the connectors at the network end of the adapter cable. EIA/TIA-449 cables are available as either DTE (DB-37 plug) or DCE (DB-37 receptacle).
The router (FSIP) end of all V.35 adapter cables is a high-density 60-pin plug. The opposite (network) end of the adapter cable provides a standard 34-pin Winchester-type connector commonly used for V.35 connections.
Figure 2-37 shows the connectors at the network end of theV.35 adapter cable. V.35 cables are available with a standard V.35 plug (male) for DTE mode or a V.35 receptacle (female) for DCE mode.
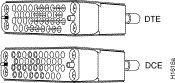
The router (FSIP) end of all X.21 adapter cables is a high-density 60-pin plug. The opposite (network) end of the adapter cable is a standard DB-15 connector. Figure 2-38 shows the connectors at the network end of the X.21 adapter cable. X.21 cables are available as either DTE (DB-15 plug) or DCE (DB-15 receptacle).

The EIA-530 adapter cable is available in DTE mode only. The router (FSIP) end of the EIA-530 adapter cable is a high-density 60-pin plug. The opposite (network) end of the adapter cable is a standard DB-25 plug commonly used for EIA/TIA-232 connections. Figure 2-39 shows the DB-25 connector at the network end of the adapter cable.

You will need a T3, E3, or SONET STS-1 DSU and HSSI interface cable to connect the HIP with the external network. The HIP HSSI interface port is a 50-pin SCSI-II-type receptacle. The HSSI interface cable comprises 25 twisted pairs and a 50-pin plug at each end; Figure 2-40 shows the connector that is at both ends of the cable. Although the HSSI cable is similar to a SCSI-II cable, it is not identical; you cannot substitute a SCSI-II cable for a HSSI interface cable. (See the following Caution.)
| Caution Although the HIP connector and the HSSI interface cable are similar to SCSI-II format, the HSSI cable specification is more stringent than that for a SCSI-II. We cannot guarantee proper operation if a SCSI-II cable is used instead of a HSSI interface cable. |
A null modem cable (CAB-HNUL) allows you to connect two routers directly back to back between an available HSSI port on each. This setup allows you to verify the operation of the HSSI port or to directly link the routers in order to build a larger node. The two routers must be in the same location, and can be two Cisco 7000s, two AGS+ routers, or one of each. Also, you must enable the internal clock on both routers with a software command. The null modem cable uses the same 50-pin connectors as the HSSI interface cable, but the signals are wired differently. For instructions for connecting a null modem cable refer to the section "HSSI Connections" in the chapter "Installing the Router." The appendix "Cabling Specifications" lists the cable pinouts.
The RP (and RSP7000) contain two EIA/TIA-232 ports: a DCE-mode console port (DB-25 receptacle) and a DTE-mode auxiliary port (DB-25 plug). These are asynchronous ports (unlike the synchronous FSIP serial ports), so be sure that any devices you connect to these ports are asynchronous. Synchronous transmission uses precise timing to synchronize transmissions between the transmitter and receiver, and maintains separate clock and data signals. Asynchronous transmission uses control bits to indicate the beginning and end of characters instead of a precise clock signal.
You need a console terminal to configure the interfaces and bring the system online. You also need an EIA/TIA-232 DCE console cable to connect the terminal to the console port on the RP (or RSP7000). After you establish normal operation, you can disconnect the terminal. Both ends of the console cable should be EIA/TIA-232 plugs to enable you to connect to the RP (or RSP7000) DCE console port DB-25 receptacle and to the DB-25 receptacles used on the DTE ports on most terminals.
Before you connect a terminal to the console port, configure the terminal to match the router console port as follows: 9600 baud, 8 data bits, no parity, 2 stop bits (9600 8N2).
The auxiliary port is a DTE DB-25 plug that you can use to connect an asynchronous modem, another router, a CSU/DSU, or other DCE equipment. You also must supply your own interface cable between the auxiliary port and the equipment you are connecting. For console and auxiliary port pinouts, refer to the appendix "Cabling Specifications."
Following are the tools and equipment you will need to install the chassis and the optional rack-mount kit:
Use the Installation Checklist in to assist you with your installation and to provide a historical record of what was done, by whom, and when. Make a copy of this checklist and indicate when each procedure or verification is completed. When the checklist is completed, place it in your Site Log (described at the end of this chapter) along with the other records for your new router.
Following is the procedure for checking the contents of the shipping container. Use the Installation Checklist in Table 2-14, the Component List in Table 2-14, and the record of your order to ensure that you received all the components you ordered.
Step 2 Check the contents of the second accessories box against the Installation Checklist and the packing slip and verify that you received all listed equipment, which should include the following:
Step 3 Check the interface processors in each slot. Ensure that the configuration matches the packing list and that all of the interfaces are included.
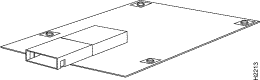
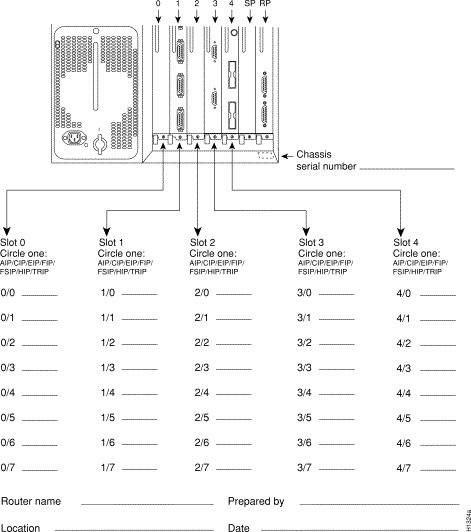
Step 4 Complete the Port Configuration Worksheet shown in Figure 2-41. Check the interface processors in the rear of the chassis, and record the interface type for each populated interface address. You may need to refer to this worksheet during installation.
Step 5 Proceed to the section "Site Log," then to the chapter "Installing the Router" to begin installation.
Table 2-14 lists all of the standard components that are included with the router and the optional equipment available. Check each item on the Component List as you unpack and verify it. Insert the completed checklist into the Site Log, which is described in the following sections.
A site log provides a historical record of all actions relevant to the router operation and maintenance. Keep your site log in a common place near the chassis where anyone who performs tasks has access to it. Site Log entries might include the following:
Figure 2-42 shows a sample Site Log page. Make copies of the sample, or design your own Site Log to meet the needs of your site and equipment.
| Task | Verified by | Date |
|---|---|---|
Date router received |
|
|
Router and accessories unpacked |
|
|
UniverCD and/or printed documentation as specified on your order received |
|
|
Types and numbers of interfaces verified |
|
|
Safety recommendations and guidelines reviewed |
|
|
Installation Checklist copied |
|
|
Site Log established and background information entered |
|
|
Site power voltages verified |
|
|
Site environmental specifications verified |
|
|
Required passwords, IP addresses, device names, and so on, available1 |
|
|
Required tools available |
|
|
Network connection equipment available |
|
|
Cable management brackets installed (optional but recommended) |
|
|
Router mounted in rack (optional) |
|
|
First power supply installed in lower bay |
|
|
Second (optional) power supply installed in upper bay |
|
|
AC power cord connected to AC source and router; retention clip secured |
|
|
DC power cable connected to DC source and router; strain relief secured |
|
|
All ejector levers checked and secure |
|
|
Captive installation screws on RP, SP (or SSP), RSP7000, RSP7000CI, interface processors, and power supplies checked |
|
|
Port Configuration Worksheet completed (optional) |
|
|
Network interface cables and devices connected |
|
|
Flash memory card (if present) inserted all the way into PCMCIA slot |
|
|
ASCII terminal attached to console port |
|
|
Console port set for 9600 baud, 8 data bits, 2 stop bits, no parity |
|
|
All power supplies turned on (power LED lights on each supply) |
|
|
Upper/lower power LEDs light for all power supplies |
|
|
System boot complete (Normal LEDs light) |
|
|
RP and SP (or SSP), or RSP7000, and all interface processors operational (enabled LED indicator on SP [or SSP] and all interface processors is on) |
|
|
Console screen displays correct hardware configuration (displayed after system banner) |
|
|
System ready for global and interface-specific configuration |
|
|
| 1Refer to the related software documentation for first-time software configuration requirements. |
| Component | Description | Rec'd |
|---|---|---|
Chassis | Router chassis |
|
Accessories | The following accessories may arrive in separate shipping containers: |
|
Rack-mount kit | Two brackets, two chassis ears (each holds two captive grommets), and fasteners (screws). |
|
Cable management kit | Two brackets and Phillips screws for attaching the brackets to the chassis |
|
Power cable | One power cable |
|
EIP port jackscrews | One jackscrew conversion kit for each Ethernet port |
|
FEIP port jackscrews | One jackscrew conversion kit for each Fast Ethernet port |
|
FSIP interface cables | Verify that you receive 1 of the following adapter cables for each FSIP port: |
|
| EIA/TIA-232 DTE or DCE serial port adapter cable, 1 per port required |
|
| EIA/TIA-449 DTE or DCE serial port adapter cable, 1 per port required |
|
| V.35 DTE or DCE serial port adapter cable, 1 per port required |
|
| X.21 DTE or DCE serial port adapter cable, 1 per port required |
|
| EIA-530 DTE serial port adapter cable, 1 per port required |
|
| One pair of M-30 metric thumbscrews with each cable type except V.35 |
|
Optional interface cables | AUI or Ethernet transceiver cable, 1 per EIP port required |
|
| One jackscrew conversion kit for each Ethernet AUI ports (install only if needed) |
|
| Token Ring interface cable, 1 per TRIP port required |
|
| FDDI interface cables, 1 or 2 multimode, 2 or 4 single-mode for each FIP |
|
| HSSI interface cable, 1 per port required |
|
| Null modem cable for back-to-back HSSI connections |
|
| MIP cables, 1 per port required |
|
| AIP cables and types, 1 per AIP port required |
|
Other optional equipment | Ethernet/Fast Ethernet transceiver or 802.3 attachment unit |
|
| MAU, CSU/DSU for network connections |
|
| Flash memory card |
|
Documentation | Cisco 7000 User Guide and UniverCD (ship with chassis), and any printed documentation as ordered |
|
System components: | Processor slots 5 and 6 should contain an SP (or SSP) and RP, or an RSP7000 (slot 5) and an RSP7000CI (slot 6), and any combination of 5 interface processors or blank interface processor fillers |
|
RP | Installed in the RP slot (rightmost slot) |
|
SP | Installed in SP slot instead of SSP (immediately left of the RP) |
|
SSP | Installed in SSP slot instead of SP (immediately left of the RP) |
|
RSP7000 | Installs in the SP (or SSP) slot (slot 5) instead of the SP (or SSP). Used with the RSP7000CI. |
|
RSP7000CI | Installs in the RP slot (slot 6) instead of the RP. Used with the RSP7000. |
|
AIPs | Enter slot locations and port addresses on Configuration Worksheet |
|
CIPs | Enter slot locations and port addresses on Configuration Worksheet |
|
EIPs | Enter slot locations and port addresses on Configuration Worksheet |
|
FEIPs | Enter slot locations and port addresses on Configuration Worksheet |
|
TRIPs | Enter slot locations and port addresses on Configuration Worksheet |
|
FIPs | Enter slot locations and port addresses on Configuration Worksheet |
|
FSIPs | Enter slot locations and port addresses on Configuration Worksheet |
|
HIPs | Enter slot locations and port addresses on Configuration Worksheet |
|
MIPs | Enter slot locations and port addresses on Configuration Worksheet |
|
Other optional equipment: |
|
|
for _________________________________________
| Date | Description of Action Performed or Symptoms Observed | Initials |
|
|
|
|
|
|
|
|
|
|
|
|
|
|
|
|
|
|
|
|
|
|
|
|
|
|
|
|
|
|
|
|
|
|
|
|
|
|
|
|
|
|
|
|
|
|
|
|
|
|
|
|
|
|
|
|
|
|
|
|
|
|
|
|
|
|
|
|
|
|
|
|
Page _______
![]()
![]()
![]()
![]()
![]()
![]()
![]()
![]()
Posted: Thu Nov 1 15:55:38 PST 2001
All contents are Copyright © 1992--2001 Cisco Systems, Inc. All rights reserved.
Important Notices and Privacy Statement.