|
|

This chapter provides maintenance procedures for the Cisco 7010 router and its components. Your Cisco 7010 is configured to your order and ready for installation and startup when it leaves the factory. In the future, as your communication requirements change, you may want to upgrade your system, add components, or change the initial configuration. This chapter describes the procedures for installing, replacing, and reconfiguring interface processors, and for adding and replacing internal system components. Software and microcode component upgrades require specific part numbers and other frequently updated information; therefore, only basic hardware replacement guidelines are included in this publication. Detailed, up-to-date instructions (called configuration notes) are shipped with the replacement parts or upgrade kits.
The replaceable system components fall into two categories: those that support online insertion and removal (OIR) and those that require you to shutdown the system power before replacement. Because interface processors support OIR, you can remove and replace them while the system is operating. However, you must shutdown the system power before removing the RP, the SP (or SSP), RSP7000, RSP7000CI, or any of the internal components (the fan tray, power supply, and arbiter). Access to the internal components also requires that you remove the chassis cover panel and power harness cover in the noninterface processor end of the router, which exposes the power supply backplane connection. If the power is not shutdown, the high current present in the wiring, and on the backplane if the backplane cover is removed, becomes a hazard. Therefore, always make sure that the system power switch is turned off before removing any internal components or interior chassis panels.
This chapter contains information on the following:
 | Warning Before performing any procedures in this chapter, review the section "Safety Recommendations" in the chapter "Preparing for Installation." |
This section provides installation and removal procedure for all processor modules, which include the RP, SP, SSP, RSP7000, RSP7000CI, and CxBus interface processors. This section also includes instructions for replacing spares on the interface processors, for configuring jumpers, and for using basic configuration commands that you may need when setting up new interfaces.
On the RP, you can change the settings of the hardware configuration register and Flash memory write-protection jumpers to define boot instructions, set broadcast addresses and console baud rates, and set (or remove) write protection for the contents of Flash memory.
On the FSIP, you can replace a port adapter if one fails, and with software commands you can change the rate or direction timing signals, change the default NRZ to NRZI format, or change the default 16-bit error correction cyclic redundancy check (CRC) to 32-bit on individual interfaces.
EPROM replacement procedures are included in this section in case replacement is necessary for some unforeseen reason. An EPROM component on the SP (or SSP) and each interface processor contains a default microcode image. The router supports downloadable microcode, so it is unlikely that you will ever need to replace the microcode EPROM.
Each RP, SP (or SSP), RSP7000, RSP7000CI, and interface processor contains a bus-type connector that mates with the system backplane. Each card connector comprises a set of tiered pins, in three lengths. The pins send specific signals to the system as they make contact with the backplane. The system assesses the signals it receives and the order in which it receives them to determine what event is occurring and what task it needs to perform, such as reinitializing new interfaces or shutting down removed ones. For example, when inserting an interface processor, the longest pins make contact with the backplane first, and the shortest pins make contact last. The system recognizes the signals and the sequence in which it receives them. The system expects to receive signals from the individual pins in this logical sequence, and the ejector levers help to ensure that the pins mate in this sequence.
 | Caution Only CxBus interface processors support online insertion and removal (OIR). Do not remove or install the RP or SP (or SSP) while the system is powered on. Doing so can cause a system crash and can destroy memory files. |
System software upgrades also can contain upgraded microcode images, which will load automatically when the new software image is loaded. Although most upgrades support the downloadable microcode feature and are distributed on floppy disk or Flash memory card, some may require ROM replacement. If replacement is necessary, refer to the section "Microcode Component Replacement" in this chapter. Also, specific up-to-date replacement and configuration instructions will be provided with the replacement component in the upgrade kit.
All CxBus interface processors (AIP, CIP, EIP, FIP, FSIP, HIP, MIP, and TRIP) support online insertion and removal (OIR), which allows you to install, remove, replace, and rearrange the interface processors without turning off the system power. When the system detects that an interface processor has been installed or removed, it automatically runs diagnostics and discovery routines, acknowledges the presence or absence of the interface processor, and resumes system operation without any operator intervention. You do not need to notify the software or shutdown the system power.
When you remove or insert an interface processor, the backplane pins send signals to notify the system, which then performs as follows:
1. Rapidly scans the backplane for configuration changes and does not reset any interfaces.
2. Initializes all newly inserted interface processors, noting any removed interfaces and placing them in the administratively shutdown state.
3. Brings all previously configured interfaces on the interface processor back to the state they were in when they were removed. Any newly inserted interfaces are put in the administratively shutdown state, as if they were present (but unconfigured) at boot time. If a similar interface processor type has been reinserted into a slot, then its ports are configured and brought online up to the port count of the original interface processor.
OIR functionality enables you to add, remove, or replace interface processors with the system online, which provides a method that is seamless to end users on the network, maintains all routing information, and ensures session preservation.
When you insert a new interface processor, the system runs a diagnostic test on the new interfaces and compares them to the existing configuration.
If this initial diagnostic test fails, the system remains off line for another 15 seconds while it performs a second set of diagnostic tests to determine whether or not the interface processor is faulty and if normal system operation is possible.
If the second diagnostic test passes, which indicates that the system is operating normally and the new interface processor is faulty, the system resumes normal operation but leaves the new interfaces disabled. If the second diagnostic test fails, the system crashes, which usually indicates that the new interface processor has created a problem on the bus and should be removed.
The system brings online only interfaces that match the current configuration and were previously configured as up; all other interfaces require that you configure them with the configure command. On interface processors with multiple interfaces, only the interfaces that have already been configured are brought online.
For example, if you replace a single-PCA CIP with a dual-PCA CIP, only the previously configured interface is brought online automatically; the new interface remains in the administratively shutdown state until you configure it and bring it online.
| Caution When removing or replacing interface processors, you can avoid erroneous failure messages by allowing at least 15 seconds for the system to reinitialize before removing or inserting another interface processor. |
You will need a number 1 Phillips or 3/16-inch flat-blade screwdriver to remove any blank interface processor carriers (fillers) and to tighten the captive installation screws that secure the interface processor in its slot. (Most interface processor carriers use slotted screws, but some were manufactured with Phillips screws.) Whenever you handle interface processors, use a wrist strap or other grounding device to prevent ESD damage. (See the section "Preventing Electrostatic Discharge Damage" in the chapter "Preparing for Installation.")
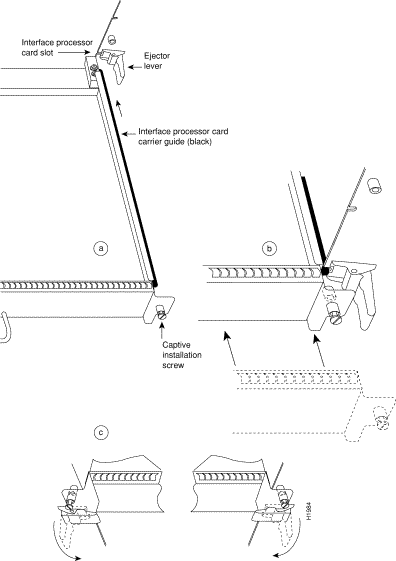
The function of the ejector levers is to align and seat the card connectors in the backplane. Failure to use the ejector levers and insert the interface processor properly can disrupt the order in which the pins make contact with the backplane. Follow the installation and removal instructions carefully, and review the following examples of incorrect insertion practices and results:
It is also important to use the ejector levers when removing an interface processor to ensure that the board connector pins disconnect from the backplane in the logical sequence expected by the system. Any RP, SP (or SSP), or interface processor that is only partially connected to the backplane can hang the bus. Detailed steps for correctly performing OIR are included in the following procedures for installing and removing interface processors.
Following are detailed steps for removing and replacing interface processors and successfully performing OIR. Figure 5-1 shows the functional details of the ejector levers, which you must use properly when inserting or removing interface processors.
The RP, SP (or SSP), RSP7000, and RSP7000CI do not support OIR, because they are all required system components. Removing these boards without first shutting down the system will cause an abrupt system shutdown and can damage or destroy memory files.
To remove or replace one of these processor modules, first shut down all system power, then follow the procedures in the following sections, "Removing CxBus Interface Processors" and "Installing CxBus Interface Processors."
| Caution Before removing the RP, SP or SSP, RSP7000, or RSP7000CI, make sure the system is shut down and the power switch is OFF. |
To remove a CxBus interface processor, follow these steps:
Step 2 You must pull processor modules straight out of the slot. Ensure that there are no obstructions that will prevent you from doing so, such as a power strip on a rack post, network connection devices attached to adjacent interface processors, or extensive cabling in front of the processor slots.
Step 3 Use a screwdriver to loosen the captive installation screws at the both ends of the interface processor. (See Figure 5-1a.)
Step 4 Place your thumbs on the ejector levers on both ends of the interface processor (see Figure 5-1c) and simultaneously pull them both outward to release the interface processor from the backplane connector.
Step 5 Grasp the interface processor handle with one hand and place your other hand under the carrier to support it. Pull the interface processor straight out of the slot keeping it at a 90-degree orientation to the backplane. (See Figure 5-2.)
Step 6 Place the removed interface processor on an antistatic mat or immediately install it in another slot.
Step 7 If the slot is to remain empty, install a blank interface processor filler (MAS-7KBLANK) to keep dust out of the chassis, to maintain proper air flow through the interface processor compartment, and to maintain the EMI integrity of the system.
| Caution Always install blank interface processor fillers in empty processor slots to maintain the proper flow of cooling air through the chassis. |
| Caution The RP, SP (or SSP), RSP7000, and RSP7000CI are required system components; removing any of them without first shutting down the system will cause an abrupt system shutdown and can damage or destroy memory files. To remove or replace them, first shutdown system power, then follow removal and insertion procedures to ensure that the processor module is seated properly. |
You can install interface processors in any of the three interface processor slots, numbered 0 through 2 from the bottom slot upward when viewing the chassis from the interface processor end. (See Figure 1-3.) The top slot contains the RP, and the slot directly below the RP contains the SP (or SSP). Blank interface processor fillers are installed in slots without interface processors to maintain consistent air flow through the interface processor compartment.
Following are installation steps for the CxBus interface processors, which support OIR and can be removed and installed while the system is operating. The RP, SP (or SSP), RSP7000, or RSP7000CI are required system components. You must turn off the system power before removing or installing them. After you have turned the system power off, the installation steps for the RP, SP (or SSP), RSP7000, and RSP7000CI are the same as those for the interface processors.

| Caution Handle interface processors by the handles and carrier edges only to prevent ESD damage. |
Step 2 Interface processors are secured with two captive installation screws. Use a number 1 Phillips or a 1/4-inch flat-blade screwdriver to loosen the two captive installation screws and remove the interface processor filler (or the existing interface processor) from the slot to be filled.
Step 3 Hold the interface processor handle with one hand, and place your other hand under the carrier to support it. (See Figure 5-2.) Avoid touching the board.
Step 4 Place the back of the interface processor in the slot and align the carrier guides along the sides of the interface processor with the grooves in the side of the slot. (See Figure 5-1a.)
Step 5 While keeping the interface processor at a 90-degree orientation to the backplane, carefully slide the interface processor into the slot until the interface processor faceplate makes contact with the ejector levers.
Step 6 Using your thumbs, simultaneously push both ejector levers inward until they push the interface processor completely into the slot. The ejectors should be in approximately the same orientation as the interface processor faceplate. (See Figure 5-1c.)
Step 7 Use a screwdriver to tighten both of the captive installation screws.
Step 8 Attach network interface cables or other devices to the interface ports.
Step 9 Check the status of the interfaces as follows:
| Caution You must turn OFF power to the system before removing or installing an RP or SP (or SSP). After the chassis power has been turned OFF, the installation and removal procedure is the same as the preceding steps for replacing interface processors. |
When you remove and replace CxBus interface processors, the system provides status messages across the console screen. The messages are only informational. In the following sample display, the events logged by the system show that an EIP was removed from slot 0, the system reinitialized the remaining interface processors, and marked the EIP that was removed from slot 0 as down. When the EIP was reinserted, the system marked the interfaces as up again.
7010#

%OIR-6-REMCARD: Card removed from slot 0, interfaces disabled
%LINK-5-CHANGED: Interface TokenRing2/0, changed state to initializing
%LINK-5-CHANGED: Interface Ethernet0/1, changed state to administratively down
%LINK-5-CHANGED: Interface Ethernet0/5, changed state to administratively down
%LINK-5-CHANGED: Interface TokenRing2/0, changed state to up

7010#

%OIR-6-INSCARD: Card inserted in slot 0, interfaces administratively shut down
%LINK-5-CHANGED: Interface TokenRing2/0, changed state to initializing
%LINK-5-CHANGED: Interface Ethernet0/1, changed state to up
%LINK-5-CHANGED: Interface Ethernet0/5, changed state to up
%LINK-5-CHANGED: Interface TokenRing2/0, changed state to up
The SP (or SSP) and each interface processor contain default microcode, which is an image of board-specific software instructions on a single ROM device on each board. Microcode operates with the system software and controls features and functions that are unique to an interface processor type. New features and enhancements to the system or interfaces are often implemented in microcode upgrades. Although each processor type contains the latest available microcode version (in ROM) when it leaves the factory, updated microcode images are periodically distributed with system software images to enable new features, improve performance, or fix bugs in earlier versions. The latest available microcode version for each interface processor type is bundled with each new system software maintenance upgrade; the bundled images are distributed as a single image on floppy disk or a Flash memory card.
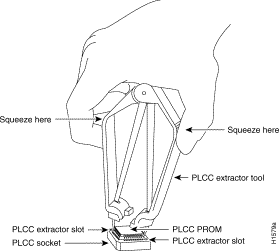
You must use a PLCC extractor to remove the FSIP microcode component. (See Figure 5-3.) You cannot use a small flat-blade screwdriver to pry it out of the socket as with the older type of integrated circuits (ICs). A PLCC IC does not have legs or pins that plug into the socket; instead, the contacts are on the sides of the IC and along the inner sides of the socket. When the IC is seated in the socket, the top of the IC is flush with the top of the socket. Forcing a small screwdriver or other tool between the IC and the sides of the socket to pry out the IC will damage the component or the socket or both, and you will have to replace them.
You need the following tools to replace the microcode component:
Following are the steps for replacing the microcode ROM device on the SP (or SSP) and any interface processor. Refer to the illustrations of the individual interface processors in the section "Interface Processors" in the chapter "Product Overview" for socket locations.
| Caution Handle interface processors by the handles and carrier edges only, and always use a grounding strap to prevent ESD damage. |
Step 2 If you are removing and reinserting the SP (or SSP), shutdown the system.
Step 3 Follow the steps in a previous section "Removing CxBus Interface Processors" to remove the interface processor or SP (or SSP) from the chassis. You can leave the cables connected if you perform the replacement close to the chassis to avoid straining the interface cables attached to an adjacent interface processor. Otherwise, label the cables before disconnecting them to avoid crossing them later.
Step 4 Place the removed interface processor on an antistatic mat or foam.
Step 5 Locate the microcode component; refer to the appropriate SP (or SSP) or interface processor illustrations in the chapter "Product Overview" for socket locations. The socket designators for each interface processor follow:
Step 6 Note the orientation of the notch on the existing microcode component so that you can install the new component with the same orientation.
Step 7 Use a chip or PLCC-type extractor (for the FSIP) to remove the microcode component from the socket. Place the removed component on antistatic foam or into an antistatic bag.
Step 8 Insert the new microcode component in the socket with the notched end in the same orientation as the previous component.
Step 9 Follow the steps in the section "Installing CxBus Interface Processors" in this chapter, to replace the interface processor, SP, or SSP.
Step 10 Verify that the enabled LED on the interface processor, SP, or SSP goes on and remains on. If it does not, eject the board and reinstall it in the slot. Turn OFF power before ejecting the SP or SSP.
Step 11 Connect any network interface cables that were removed.
Step 12 If the system power is OFF, turn it back ON.
The system automatically reloads the microcode when you insert an interface processor online or restart the system. The system default is to load the ROM microcode for all processor types. However, because microcode upgrades are usually distributed as files to be stored and loaded from Flash memory, the system may be configured to bypass the ROM image for a particular processor type and load an image from a Flash memory file instead. (This can be true for any or all processor types.) To determine whether the interface processor you just upgraded is loading the new ROM microcode or an image from Flash memory, issue the show controller cxbus command. The first line of the status display for the SP (or SSP) and for each interface processor displays the currently loaded and running microcode version for that particular processor type. The following example shows that the EIP in slot 0 is running EIP Microcode Version 1.0:
7010# show cont cxbus

 EIP 0, hardware version 5.1, microcode version 1.0
  Interface 0 - Ethernet0/0, station addr 0000.0c02.d0ec (bia 0000.0c02.d0cc)
If the microcode version in the display is different from the ROM version you just installed, use the microcode card-type rom configuration command to change the configuration so the system loads the ROM microcode for that processor type. Verify that the new microcode version is loading from ROM and, if necessary, correct the configuration with the following steps:
Step 2 Check the state of the interfaces with the LEDs and verify that the interfaces return to the same state they were in before you removed the interface processor (some may have been shutdown).
Step 3 Enter the show controller cxbus command to display the status of the SP (or SSP) and all interface processors.
Step 4 If the display indicates that the new ROM image is the currently running microcode version, your installation is complete. If a different (older) version is displayed, the microcode is still loading from a Flash memory file. Proceed with the following steps to configure the ROM microcode to load.
Step 5 Enable the privileged level of the EXEC command interpreter (which usually requires a password) and enter the configuration mode from the terminal:
7010> enable

Password:
7010# configure terminal
Step 6 Enter the command microcode card-type rom to negate the instruction to load from Flash memory, then issue the microcode reload command to reload the microcode with the new instructions. The following example shows the command used to load EIP microcode from ROM:
microcode eip rom

microcode reload
Step 7 Press Ctrl-Z (^Z) to return to the system prompt, and save (write) the new configuration to memory with the write terminal command.
^Z

write terminal

[OK]
Step 8 Enter the show controller cxbus command again. The first line of the display for the interface processor (and for all interface processors of the same type) should show the new ROM microcode version.
The replacement procedure is complete. If the Enabled indicator does not go on after a second installation attempt, or if any of the interfaces fail to return to their previous state, refer to the troubleshooting procedures in the chapter "Troubleshooting the Installation."
This section describes the following maintenance aspects of the RP and RSP7000, with differences noted:
Most system software upgrades are distributed on floppy disk or Flash memory cards. However, occasionally it might be necessary to replace the system software ROMs to ensure proper operation with a newer software release.
The RP contains the hardware configuration register and the Flash memory write-protect jumper, both of which are shown in Figure 5-4. Jumpers installed on the hardware configuration register define boot instructions and set broadcast addresses and console baud rates. Jumper J2, when removed, protects the contents of Flash memory by preventing any information to be written to Flash memory. Jumpers J3 and J4 (see Figure 5-4) are set according to the size of the eight software EPROMs on the RP. These jumpers correspond to the EPROMs only and not to the software image size; you do not need to reset the jumpers when loading a larger software image into Flash memory. (See Figure 5-8 for jumper settings.)
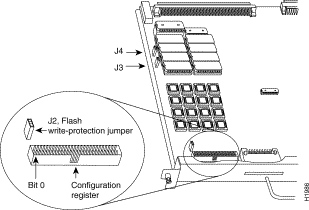
The hardware configuration register (see Figure 5-4) comprises the upper 32 pins of a 50-pin jumper block located above the Flash memory card port on the RP. You can define system boot instructions, set broadcast addresses and console baud rates, or instruct the router to perform factory diagnostics at startup by installing jumpers on specific pins. Jumper bit (or position) 0 is the top pair of pins. To set a bit to 1, insert a jumper. To clear a bit to 0, remove the jumper.
To change configuration register settings, you must turn off the system power and remove the RP. Figure 5-5 shows the configuration register with the factory default setting, with jumpers installed on bits 0 and 8. Bit 0 instructs the system to boot from ROM; bit 8 instructs the system to ignore the Break key on the console terminal keyboard.
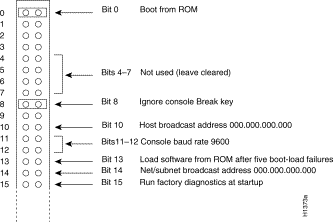
The lowest four bits of the configuration register (bits 3 through 0) form the boot field. The boot field specifies a number in binary. When the boot field is set to either 0 or 1 (0-0-0-0 or 0-0-0-1) the system ignores any boot instructions in the configuration file. When the boot field is set to 0, you must boot the operating system manually by giving a b (or boot) command to the system bootstrap program or rom monitor. You can enter the boot command only, or include additional boot instructions with the command such as the name of a file stored in Flash memory or a file that you specify for netbooting. If you use the boot command only, without specifying a file or any other boot instructions, the system boots from the ROM image. Otherwise, you can instruct the system to boot from a specific image such as a Flash file (boot system flash filename), or to netboot by sending broadcast TFTP requests (boot system filename) or a direct TFTP request to a specific server (boot system filename address). When the boot field is set to 1 (the factory default), the system boots from ROM. Boot field settings of 0 and 1 both override any boot instructions in the system configuration file.
If you set the boot field to any bit pattern other than 0 or 1, the system uses the resulting number to form a file name for netbooting. To form the file name, the system starts with cisco and links the octal equivalent of the boot field value (jumper setting) and the processor type in the format cisco<jumpervalue>-<processorname>. (Table 5-1 lists the default boot file names or actions for the RP.) The system uses the default filename for netbooting. However, if the configuration file contains any boot instructions, the system uses those boot instructions instead of the filename it computed from the jumper settings.
| Action/Filename | Bit 3 | Bit 2 | Bit 1 | Bit 0 |
|---|---|---|---|---|
bootstrap mode | 0 | 0 | 0 | 0 |
ROM software | 0 | 0 | 0 | 1 |
cisco2-rp1 | 0 | 0 | 1 | 0 |
cisco3-rp1 | 0 | 0 | 1 | 1 |
cisco4-rp1 | 0 | 1 | 0 | 0 |
cisco5-rp1 | 0 | 1 | 0 | 1 |
cisco6-rp1 | 0 | 1 | 1 | 0 |
cisco7-rp1 | 0 | 1 | 1 | 1 |
cisco10-rp1 | 1 | 0 | 0 | 0 |
cisco11-rp1 | 1 | 0 | 0 | 1 |
cisco12-rp1 | 1 | 0 | 1 | 0 |
cisco13-rp1 | 1 | 0 | 1 | 1 |
cisco14-rp1 | 1 | 1 | 0 | 0 |
cisco15-rp1 | 1 | 1 | 0 | 1 |
cisco16-rp1 | 1 | 1 | 1 | 0 |
cisco17-rp1 | 1 | 1 | 1 | 1 |
Bit 8 in the configuration register controls the console Break key. Setting bit 8 to 1 (the factory default) causes the processor to ignore the console Break key. Clearing bit 8 to 0 causes the processor to interpret Break as a command to force the system into the bootstrap monitor, thereby suspending normal operation.
Bit 9 in the configuration register is not used.
Bit 10 in the configuration register controls the host portion of the Internet broadcast address. Setting bit 10 causes the processor to use all zeros; clearing bit 10 (the factory default) causes the processor to use all ones. Bit 10 interacts with bit 14, which controls the network and subnet portions of the broadcast address. Table 5-2 shows the combined effect of bits 10 and 14.
| Bit 14 | Bit 10 | Address (<net><host>) |
|---|---|---|
out | out | <ones><ones> |
out | in | <zeros><zeros> |
in | in | <net><zeros> |
in | out | <net><ones> |
Bits 11 and 12 in the configuration register determine the console port baud rate. Table 5-3 shows the bit settings for the four available baud rates. (The factory default is 9600.)
| Baud | Bit 12 | Bit 11 |
|---|---|---|
9600 | 0 | 0 |
4800 | 0 | 1 |
1200 | 1 | 0 |
2400 | 1 | 1 |
Bit 13 in the configuration register determines the system's response to a boot-load failure. Setting bit 13 causes the system to load operating software from ROM after five unsuccessful attempts to load a boot file from the network. Clearing bit 13 causes the system to continue attempting to load a boot file from the network indefinitely. By factory default, bit 13 is cleared to 0.
Bit 14 in the configuration register controls the network and subnet portions of the Internet broadcast address. Setting bit 14 causes the system to include the network and subnet portions of its address in the broadcast address. Clearing bit 14 causes the system to set the entire broadcast address to all ones or all zeros, depending on the setting of bit 10. By factory default, bit 14 is cleared to 0. See Table 5-2 for the combined effect of bits 10 and 14.
Bit 15 in the configuration register controls factory diagnostic mode in the system. Setting bit 15 causes the system to produce detailed CPU self-check messages, to automatically prompt for interface addresses (not look for addresses on the network), to not read configuration files or nonvolatile memory, and to automatically set to diagnostic tracing modes using the debug commands. Clearing bit 15 (the factory default) causes the system to operate normally.
Bits 16 through 18 are not used and should remain cleared.
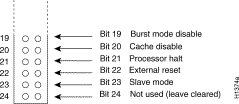
Bit 19 disables the fast page burst mode from the DRAM to the MC68EC040 processor.
Bits 20 through 23 (the four pairs of pins on the far left of the 50-pin header) are not used in normal operation; however, they can be used to invoke the cache disable, processor halt, external reset, and slave mode functions. (See Figure 5-6.)
The Flash memory write-protection option protects the contents of Flash memory against accidental erasure or reprogramming. The factory default, with a jumper installed on J2, is to allow programming (writing) to Flash memory. To protect the contents, remove the jumper from J2. You can later replace the jumper to enable Flash memory programming. The location of J2 is shown in Figure 5-4.
This section describes the software (virtual) configuration register that is used with the RP in a system running Cisco Internetwork Operating System (Cisco IOS) Release 10.0 or later. Its functions are identical to the hardware configuration register except the settings are changed through the command line interface.
Following is the information included in this section:
Settings for the 16-bit software configuration register are written into the NVRAM. Following are some reasons for changing the software configuration register settings:
Table 5-4 lists the meaning of each of the software configuration memory bits, and Table 5-5 defines the boot field.
| Caution To avoid confusion and possibly halting the router, remember that valid configuration register settings might be combinations of settings and not just the individual settings listed in Table 5-4. For example, the factory default value of 0x0101 is a combination of settings. |
| Bit No.1 | Hexadecimal | Meaning |
|---|---|---|
00 to 03 | 0x0000 to 0x000F | Boot field (see Table 5-5) |
06 | 0x0040 | Causes system software to ignore NVRAM contents |
07 | 0x0080 | OEM bit enabled2 |
08 | 0x0100 | Break disabled |
09 | 0x0200 | Use secondary bootstrap |
10 | 0x0400 | Internet Protocol (IP) broadcast with all zeros |
11 to 12 | 0x0800 to 0x1000 | Console line speed (default is 9,600 baud) |
13 | 0x2000 | Boot default ROM software if network boot fails |
14 | 0x4000 | IP broadcasts do not have network numbers |
15 | 0x8000 | Enable diagnostic messages and ignore NVRAM contents |
| 1The factory default value for the configuration register is 0x0101. This value is a combination of the following: bit 8 = 0x0100 and bits 00 through 03 = 0x0001 (see Table 5-5). 2OEM = original equipment manufacturer. |
| Boot Field | Meaning |
|---|---|
00 | Stays at the system bootstrap prompt |
01 | Boots system image in system ROM |
02 to 0F | Specifies a default netboot filename |
Some common reasons to modify the value of the software configuration register are as follows:
To change the configuration register while running the system software, follow these steps:
Router> enable

Password:
router#
Step 2 At the privileged-level system prompt (router #), enter the command configure terminal. You will be prompted as shown in the following example:
Router# conf term

Enter configuration commands, one per line. End with CTRL/Z
Step 3 To set the contents of the configuration register, enter the config-register value configuration command where value is a hexadecimal number preceded by 0x (see Table 5-4), as in the following:
config-register 0xvalue
Step 4 Exit the configuration mode by entering Ctrl-Z. The new value settings will be saved to memory; however, the new settings do not take effect until the system software is reloaded by rebooting the router.
Step 5 To display the configuration register value currently in effect and the value that will be used at the next reload, enter the show version EXEC command. The value will be displayed on the last line of the screen display, as in the example following:
Configuration register is 0x141 (will be 0x101 at next reload)
Step 6 Reboot the router. The new value takes effect. Configuration register changes take effect only when the server restarts, such as when you switch the power OFF and on or when you issue a reload command from the console.
If the boot ROMs do not support the software configuration register (not Release 10.0 or later), the following message will be displayed:
 Boot ROMs do not support software configuration register.
 Value not written to NVRAM.
The lowest four bits of the software configuration register (bits 3, 2, 1, and 0) form the boot field. (See Table 5-5.) The boot field specifies a number in binary form. If you set the boot field value to 0, you must boot the operating system manually by entering the b command at the bootstrap prompt as follows:
> b [tftp] flash filename
Definitions of the various b command options follow:
For more information about the b [tftp] flash filename command, refer to the set of router products configuration publications.
If you set the boot field value to 0x2 through 0xF, and there is a valid system boot command stored in the configuration file, then the router boots the system software as directed by that value. If you set the boot field to any other bit pattern, the router uses the resulting number to form a default boot filename for netbooting. (See Table 5-6.)
In the following example, the software configuration register is set to boot the router from Flash memory and to ignore Break at the next reboot of the router:
Router# conf term

Enter configuration commands, one per line. End with CTRL/Z.
config-register 0x102

boot system flash [filename]

^z

Router#
The server creates a default boot filename as part of the automatic configuration processes. To form the boot filename, the server starts with the name cisco and adds the octal equivalent of the boot field number, a hyphen, and the processor-type name. Table 5-6 lists the default boot filenames or actions for the processor.
| Action/Filename | Bit 3 | Bit 2 | Bit 1 | Bit 0 |
|---|---|---|---|---|
bootstrap mode | 0 | 0 | 0 | 0 |
ROM software | 0 | 0 | 0 | 1 |
cisco2-rp1 | 0 | 0 | 1 | 0 |
cisco3-rp1 | 0 | 0 | 1 | 1 |
cisco4-rp1 | 0 | 1 | 0 | 0 |
cisco5-rp1 | 0 | 1 | 0 | 1 |
cisco6-rp1 | 0 | 1 | 1 | 0 |
cisco7-rp1 | 0 | 1 | 1 | 1 |
cisco10-rp1 | 1 | 0 | 0 | 0 |
cisco11-rp1 | 1 | 0 | 0 | 1 |
cisco12-rp1 | 1 | 0 | 1 | 0 |
cisco13-rp1 | 1 | 0 | 1 | 1 |
cisco14-rp1 | 1 | 1 | 0 | 0 |
cisco15-rp1 | 1 | 1 | 0 | 1 |
cisco16-rp1 | 1 | 1 | 1 | 0 |
cisco17-rp1 | 1 | 1 | 1 | 1 |
Bit 8 controls the console Break key. Setting bit 8 (the factory default) causes the processor to ignore the console Break key. Clearing bit 8 causes the processor to interpret the Break key as a command to force the system into the bootstrap monitor, thereby halting normal operation. A break can be sent in the first 60 seconds while the system reboots, regardless of the configuration settings.
Bit 9 controls the secondary bootstrap program function. Setting bit 9 causes the system to use the secondary bootstrap; clearing bit 9 causes the system to ignore the secondary bootstrap. The secondary bootstrap program is used for system debugging and diagnostics.
Bit 10 controls the host portion of the IP broadcast address. Setting bit 10 causes the processor to use all zeros; clearing bit 10 (the factory default) causes the processor to use all ones. Bit 10 interacts with bit 14, which controls the network and subnet portions of the broadcast address. Table 5-7 shows the combined effect of bits 10 and 14.
| Bit 14 | Bit 10 | Address (<net> <host>) |
|---|---|---|
Off | Off | <ones> <ones> |
Off | On | <zeros> <zeros> |
On | On | <net> <zeros> |
On | Off | <net> <ones> |
Bits 11 and 12 in the configuration register determine the baud rate of the console terminal.
Table 5-8 shows the bit settings for the four available baud rates. (The factory-set default baud rate is 9,600.)
| Baud | Bit 12 | Bit 11 |
|---|---|---|
9,600 | 0 | 0 |
4,800 | 0 | 1 |
1,200 | 1 | 0 |
2,400 | 1 | 1 |
Bit 13 determines the server response to a boot-load failure. Setting bit 13 causes the server to load operating software from ROM after five unsuccessful attempts to load a boot file from the network. Clearing bit 13 causes the server to continue attempting to load a boot file from the network indefinitely. By factory default, bit 13 is cleared to 0.
To enable booting from Flash, set configuration register bits 3, 2, 1, and 0 to a value between 2 and 15 in conjunction with the boot system flash [filename] configuration command.
To enter configuration mode while in the system software image and specify a Flash filename from which to boot, enter the configure terminal command at the enable prompt, as follows:
Router# configure terminal Enter configuration commands, one per line. End with CTRL/Z. boot system flash[filename]
To disable Break and enable the boot system flash command, enter the config-register command with the value shown in the following example:
config-reg 0x102

^Z

router#
Copying a new image to Flash memory might be required whenever a new image or maintenance release becomes available. To copy a new image into Flash (write to Flash), you must first reboot from ROM and then copy the new image into Flash. You cannot copy a new image into Flash while the system is running from Flash. Use the copy tftp flash command for the copy procedure.
Following is the sample output for reloading the router and then copying a file (called 7K10020Z) to Flash memory from a TFTP server (called server1):
Router# configure terminal

Enter configuration commands, one per line. End with CTRL/Z.
config-reg 0x101

^Z
The configuration register setting 0x0101 tells the system to boot from ROM, but does not reset the Break disable.
Router# reload

...
router# copy tftp flash

IP address or name of remote host [255.255.255.255]? server1

Name of tftp filename to copy into flash []? 7K10020Z

copy 7K10020Z from 131.131.101.101 into flash memory? [confirm] <Return>

xxxxxxxx bytes available for writing without erasure.
erase flash before writing? [confirm] <Return>

Clearing and initializing flash memory (please wait)####...
Loading from 101.2.13.110: !!!!!!!!!!!!!!!!!!!!!!!!!!!!!!!!!!!!
!!!!!!!!!!!!!... [OK - 324572/524212 bytes]
Verifying checksum...
VVVVVVVVVVVVVVVVVVVVVVVVVVVVVVVVVVVVVVVVVVVVVVVVVVVVVVVVVVVVVVVVVVVVVVVVVVVVVVV..
Flash verification successful. Length = 1204637, checksum = 0x95D9

router# config term

Enter configuration commands, one per line. End with CTRL/Z.
config-reg 0x102

^Z
The configuration register setting 0x102 tells the system to boot from ROM, disable Break, and check for a default netboot filename.
Router# reload

...
The system is now ready to be configured to boot from the new image you copied to Flash. For more information on the copy tftp flash command, and other related commands, refer to the set of router products configuration publications.
An overview of recovering a lost password follows:
To recover a lost password, follow these procedures.
Step 2 Configure the terminal to operate at 9600 baud, 8 data bits, no parity, 2 stop bits (or to whatever settings the router is set).
Step 3 Enter the show version command to display the existing configuration register value. Note this value for later use in Step 14.
Step 4 If Break is disabled, power cycle the router. (Turn the router OFF, wait five seconds, and then turn it ON again.) If Break is enabled on the router, press the Break key or send a break and then proceed to Step 5.
Step 6 To reset the configuration register to boot from the boot ROMs and ignore NVRAM, enter o/r at the bootstrap prompt as follows:
> o/r
Step 7 Initialize the router by entering the i command as follows:
> i
The router will power cycle, the configuration register will be set to 0x141, and the router will boot the boot ROM system image and prompt you with the system configuration dialog as follows:
--- System Configuration Dialog ---
Step 8 Enter no in response to the system configuration dialog prompts until the following system message is displayed:
Press RETURN to get started!
Step 9 Press Return. After some interface information, the boot ROM prompt appears as follows:
Router>
Step 10 Enter the enable command to enter the EXEC mode in the boot ROM image. The prompt changes to the following:
Router#
Step 11 Enter the show configuration EXEC command to display the enable password in the configuration file and to display any boot system commands.
Step 12 Enter the configure terminal command at the EXEC prompt. You are prompted as follows:
Router# conf term

Enter configuration commands, one per line. End with CTRL/Z.
Step 13 Enter no in response to any boot system command in the configuration file.
Step 14 Using the config-register 0x<value> command, change the configuration register value back to its original value (noted from Step 3) or change it to a value of 0x0101 (factory default).
Step 15 Exit configuration mode by entering Ctrl-Z.
Step 16 Reboot the router and enable it using the recovered password.
This section describes the procedures for saving and retrieving the system configuration using a Trivial File Transfer Protocol (TFTP) server.
The procedures for saving and retrieving the configuration file might be required for the following scenarios:
Configuration information resides in two places when the router is operating: the default (permanent) configuration in NVRAM, and the running (temporary) memory in RAM. The default configuration always remains available; NVRAM retains the information even when the power is shut down. The current information is lost if the system power is shut down. The current configuration contains all nondefault configuration information that you added with the configure command, the setup command facility, or by editing the configuration file.
The copy running-config startup-config command adds the current configuration to the default configuration in NVRAM, so that it will also be saved when power is shut down. Whenever you make changes to the system configuration, issue the copy running-config startup-config command to ensure that the new configuration is saved.
You also replace the entire configuration in NVRAM. If you copy the configuration file to a remote server before removing the RP (or RSP7000), you can retrieve it later and write it back into NVRAM. If you do not copy the configuration file, you will have to use the configure command or the setup command facility to reenter the configuration information after you install the RP (or RSP7000). This procedure requires privileged-level access to the EXEC command interpreter, which usually requires a password. Refer to the description that follows and contact your system administrator to obtain access, if necessary.
Before you use the configure command, you must enter the privileged level of the EXEC command interpreter using the enable command. The system prompts you for a password if one has been set.
The system prompt for the privileged level ends with a pound sign (#) instead of an angle bracket (>). At the console terminal, enter the privileged level as follows:
Router> enable


Password:
Step 2 Enter the password (the password is case sensitive). For security purposes, the password is not displayed.
Step 3 When you enter the correct password, the system displays the privileged-level system prompt (#) as follows:
Router#
The pound sign (#) at the system prompt indicates that you are at the privileged level of the EXEC command interpreter; you can now execute the EXEC-level commands that are described in the following sections.
Before you attempt to copy or retrieve a file from a remote host, ensure that the connection is good between the router and the remote server, by using the packet internet groper (ping) program. The ping program sends a series of echo request packets to the remote device and waits for a reply. If the connection is good, the remote device echoes them back to the local device.
The console terminal displays the results of each message sent: an exclamation point (!) indicates that the local device received an echo, and a period (.) indicates that the server timed out while awaiting the reply. If the connection between the two devices is good, the system displays a series of exclamation points (! ! !) or [ok]. If the connection fails, the system displays a series of periods (. . .) or [timed out] or [failed].
To verify the connection between the router and a remote host, issue the ping command followed by the name or Internet Protocol (IP) address of the remote server; then press Return. Although the ping command supports configurable options, the defaults, including interface processor as the protocol, are enabled when you enter a host name or address on the same line as the ping command. For a description of the configurable options, refer to the appropriate software documentation.
The following example shows a successful ping operation:
Router# ping 1.1.1.1
Type escape sequence to abort.
Sending 5, 100-byte ICMP Echos to 1.1.1.1, timeout is 2 seconds:
!!!!!
Success rate is 100 percent (5/5), round-trip min/avg/max = 12/12/12 ms
Router#
The following example shows the results of a failed ping operation:
Sending 5, 100-byte ICMP Echos to 1.1.1.1, timeout is 2 seconds:
.....
Success rate is 0 percent (0/5)
Router#
If the connection fails, check the physical connection to the remote file server and verify that you are using the correct address or name, then ping the server again. If you are unable to establish a good connection, contact your network administrator or refer to the end of this document for instructions on contacting technical assistance.
Before you copy the running configuration to the TFTP file server, ensure the following:
To store information on a remote host, enter the copy startup-config tftp privileged EXEC command. The command prompts you for the destination host's address and a filename, then display the instructions for confirmation. When you confirm the instructions, the router sends a copy of the currently running configuration to the remote host. The system default is to store the configuration in a file called by the name of the router with -confg appended. You can either accept the default filename by pressing Return at the prompt, or enter a different name before pressing Return.
Follow these steps to copy the currently running configuration to a remote host:
Step 2 Use the ping command to check the connection between the router and the remote host. (See the previous section "Using the ping Command to Verify Server Connectivity.")
Step 3 Issue the show running-config (or write term) command to display the currently running configuration on the terminal, and ensure that the configuration information is complete and correct. If it is not, use the configure command to add or modify the existing configuration. (Refer to the appropriate software documentation for descriptions of the configuration options available for the system and individual interfaces, and for specific configuration instructions.)
Step 4 Issue the copy startup-config tftp command. The EXEC command interpreter prompts you for the name or interface processor address of the remote host that is to receive the configuration file. (The prompt might include the name or address of a default file server.)
Router# copy startup-config tftp

Remote host []?
Step 5 Enter the name or interface processor address of the remote host. In the following example, the name of the remote server is servername:
Router# copy startup-config tftp

Remote host []? servername
Translating "servername"...domain server (1.1.1.1) [OK]
Step 6 The EXEC command interpreter prompts you for the name of the file that will contain the configuration. By default, the system appends -confg to the router's name to create the new filename. Press Return to accept the default filename, or enter a different name for the file before pressing Return. In the following example, the default is accepted:
Name of configuration file to write [Router-confg]?
Write file Router-confg on host 1.1.1.1? [confirm]
Writing Router-confg .....
Step 7 Before the router executes the copy process, it displays the instructions you entered for confirmation. If the instructions are not correct, enter n (no) then Return to abort the process. To accept the instructions, press Return, or y and then Return, and the system begins the copy process. In the following example, the default is accepted:
Write file Router-confg on host 1.1.1.1? [confirm]
Writing Router-confg: !!!! [ok]
While the router copies the configuration to the remote host, it displays a series of exclamation points (! ! !) or periods (. . .). The !!!! and [ok] indicate that the operation is successful. A display of . . . [timed out] or [failed] indicates a failure, which would probably be due to a network fault or the lack of a writable, readable file on the remote file server.
Step 8 If the display indicates that the process was successful (with the series of ! ! ! and [ok]), the copy process is complete. The configuration is safely stored in the temporary file on the remote file server.
If the display indicates that the process failed (with the series of . . . as shown in the following example):
Writing Router-confg .....
your configuration was not saved. Repeat the preceding steps, or select a different remote file server and repeat the preceding steps.
If you are unable to copy the configuration to a remote host successfully, contact your network administrator or refer to the end of this document for instructions on contacting technical assistance.
After you reinstall the RP (or RSP7000), you can retrieve the saved configuration and copy it back to NVRAM. To retrieve the configuration, enter configuration mode and specify that you will configure the router from the network. The system prompts you for a host name and address, the name of the configuration file stored on the host, and confirmation to reboot using the remote file.
You can access the router through a console terminal attached directly to the RP (or RSP7000) console port, or you can configure an interface port and Telnet to the router from a remote terminal.
Follow these steps to retrieve the currently running configuration from a remote host:
Step 2 Use the ping command to verify the connection between the router and the remote host. (See the section "Using the ping Command to Verify Server Connectivity.)
Step 3 At the system prompt, issue the copy tftp startup-config command and press Return to enter the configuration mode and specify that you will configure the system from a network device (instead of from the console terminal, which is the default).
Router# copy tftp startup-config
Step 4 The system prompts you to select a host or network configuration file. The default is host; press Return to accept the default.
Host or network configuration file [host]?
Step 5 The system prompts you for the interface processor address of the host. Enter the interface processor address or name of the remote host (the remote file server to which you copied the configuration file.
IP address of remote host [255.255.255.255]? 1.1.1.1
Step 6 The system prompts you for the name of the configuration file. When copying the file, the default is to use the name of the router with the suffix -confg (router-confg in the following example). If you specified a different filename when you copied the configuration, enter the filename; otherwise, press Return to accept the default.
Name of configuration file [router-confg]?
Step 7 Before the system reboots with the new configuration, it displays the instructions you entered for confirmation. If the instructions are not correct, enter n (no), and then press Return to cancel the process. To accept the instructions, press Return, or y, and then Return.
Configure using router-confg from 1.1.1.1? [confirm]
Booting router-confg from 1.1.1.1: ! ! [OK - 874/16000 bytes]
While the router retrieves and boots from the configuration on the remote host, the console display indicates whether or not the operation was successful. A series of !!!! and [OK] (as shown in the preceding example) indicates that the operation was successful. A series of . . . and [timed out] or [failed] indicate a failure (which would probably be due to a network fault or an incorrect server name, address, or filename). The following is an example of a failed attempt to boot from a remote server:
Booting Router-confg ..... [timed out]
Step 8 If the display indicates that the process was successful, proceed to the next step.
If the display indicates that the process failed, verify the name or address of the remote server and the filename, and repeat the preceding steps. If you are unable to retrieve the configuration, contact your network administrator or refer to the end of this document for instructions on contacting technical assistance.
Step 9 Issue the copy startup-config tftp command to display the currently running configuration on the terminal. Review the display and ensure that the configuration information is complete and correct. If it is not, verify the filename and repeat the preceding steps to retrieve the correct file, or use the configure command to add or modify the existing configuration. (Refer to the appropriate software documentation for descriptions of the configuration options available for the system and individual interfaces and specific configuration instructions.).
Step 10 When you have verified that the currently running configuration is correct, issue the copy running-config startup-config command to save the retrieved configuration in NVRAM. Otherwise, the new configuration will be lost if you restart the system.
This completes the procedure for retrieving the configuration file.
Copying a configuration file to a Flash memory card in the PCMCIA slot might be required if you do not have access to a TFTP server on which you can temporarily store your configuration file. You can then copy the configuration file back to NVRAM as required. Use the following sections to first copy the configuration file to a Flash memory card, and then to copy the configuration from the Flash memory card back to NVRAM.
Following is the procedure for copying your configuration file in NVRAM, to a Flash memory card. You can use the command copy startup-config [ slot0 | slot1 ]:filename for the copy procedure where startup-config is the file's source (NVRAM) and [slot0 | slot1 ]:filename is the file's destination, in either of the Flash memory cards. However, the environmental variable CONFIG_FILE must be pointing (set) to NVRAM, which is the system default.
Use the show boot command to display the current setting for the environmental variable CONFIG_FILE as follows:
Router# show boot

(display text omitted)

CONFIG_FILE variable =
Current CONFIG_FILE variable =

(display text omitted)
An example of the copy startup-config slot0:filename command follows:
Router# copy startup-config:myfile1 slot0:myfile1

20575008 bytes available on device slot0, proceed? [confirm]
Address or name of remote host [1.1.1.1]?
Loading new.image from 1.1.1.1 (via Ethernet1/0): !!!!!!!!!!!!!!!!!!!!!!!!!!!!!!
!!!!!!!!!!!!!!!!!!!!!!!!!!!!!!!!!!!!!!!!!!!!!!!!!!!!!!!!!!!!!!!!!!!!!!!!!!!!!!!!
!!!!!!!!!!!!!!!!!!!!!!!!!!!!!!!!!!!!!!!!!!!!!!!!!!!!!!!!!!!!!!!!!!!!!!!!!!!!!!!!
!!!!!!!!!!!!!!!!!!!!!!!!!!!!!!!!!!!!!!!!!!!!!!!!!!!!!!!!!!!!!!!!!!!!!!!!!!!!!!!!
!!!!!!!!!!!!!!!!!!!!!!!!!!!!!!!!!!!!!!!!!!!!!!!!!!!!!!!!!!!!!!!!!!!!!!!!!!!!!!!!
!!!!!!!!!!!!!!!!!!!!!!!!!!!!!!!!!!!!!!!!!!!!!!![OK - 7799951/15599616 bytes]
CCCCCCCCCCCCCCCCCCCCCCCCCCCCCCCCCCCCCCCCCCCCCCCCCCCCCCCCCCCCCCCCCCCCCCCCCCCCCCCC
CCCCCCCCCCCCCCCCCCCCCCCCCCCCCCCCCCCCCCCCCCCCCCCCCCCCCCCCCCCCCCCCCCCCCCCCCCCCCCCC
CCCCCCCCCCCCCCCCCCCCCCCCCCCCCCCCCCCCCCCCCCCCCCCCCCCCCCCCCCCCCCCCCCCCCCCCCC
Router#
Following is the procedure for copying your configuration file from the Flash memory card in the PCMCIA slot, back to NVRAM. Use the command copy [ slot0 | slot1 ]:filename startup-config for this copy procedure, where [slot0 | slot1 ]:filename is the source of the file (Flash memory card) and startup-config is the destination (NVRAM).
An example of the copy slot0:filename startup-config command follows:
Router# copy slot0:myfile1 startup-config

20575008 bytes available on device slot0, proceed? [confirm]
Address or name of remote host [1.1.1.1]?
Loading new.image from 1.1.1.1 (via Ethernet1/0): !!!!!!!!!!!!!!!!!!!!!!!!!!!!!!
!!!!!!!!!!!!!!!!!!!!!!!!!!!!!!!!!!!!!!!!!!!!!!!!!!!!!!!!!!!!!!!!!!!!!!!!!!!!!!!!
!!!!!!!!!!!!!!!!!!!!!!!!!!!!!!!!!!!!!!!!!!!!!!!!!!!!!!!!!!!!!!!!!!!!!!!!!!!!!!!!
!!!!!!!!!!!!!!!!!!!!!!!!!!!!!!!!!!!!!!!!!!!!!!!!!!!!!!!!!!!!!!!!!!!!!!!!!!!!!!!!
!!!!!!!!!!!!!!!!!!!!!!!!!!!!!!!!!!!!!!!!!!!!!!!!!!!!!!!!!!!!!!!!!!!!!!!!!!!!!!!!
!!!!!!!!!!!!!!!!!!!!!!!!!!!!!!!!!!!!!!!!!!!!!!![OK - 7799951/15599616 bytes]
CCCCCCCCCCCCCCCCCCCCCCCCCCCCCCCCCCCCCCCCCCCCCCCCCCCCCCCCCCCCCCCCCCCCCCCCCCCCCCCC
CCCCCCCCCCCCCCCCCCCCCCCCCCCCCCCCCCCCCCCCCCCCCCCCCCCCCCCCCCCCCCCCCCCCCCCCCCCCCCCC
CCCCCCCCCCCCCCCCCCCCCCCCCCCCCCCCCCCCCCCCCCCCCCCCCCCCCCCCCCCCCCCCCCCCCCCCCC
Router#
This section describes the procedure for upgrading the system software by replacing the eight erasable programmable read-only memory (EPROM) components on the RP and, if necessary, changing the positions of the jumpers on J3 and J4. (The components actually are EPROMs; however they are commonly known as the software or boot ROMs.) Although most system software maintenance releases for the Cisco 7000 series are distributed on floppy disk instead of on replacement EPROMs, some releases may require ROM replacement. System software images also can be netbooted.
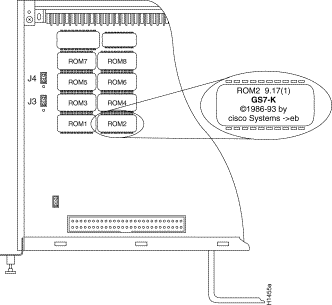
The system software resides on a set of eight EPROMs on the RP. The EPROMs are labeled with a ROM number that corresponds to the RP EPROM socket in which it should be installed. The sockets have labels too, although obscure, on the silk-screen portion of the RP board. Each EPROM has a notch cut on one end to indicate proper orientation. It should be placed so that its notch faces the same direction as the notch in the EPROM socket. Do not rely on the orientation of the EPROM labels to indicate the correct position of the EPROMs on the board. Figure 5-7 shows the location and socket numbers of the EPROMs on the RP.
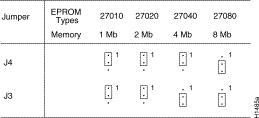
The jumpers on J3 and J4, which are shown in Figure 5-7, correspond to the size (capacity) of the EPROMs installed on the RP. If you replace the system software ROMs with new EPROMs of a different size (for example, if you replace 2-MB EPROMs with 4-MB EPROMs), you will also need to change the jumper settings on J3 or J4.
Figure 5-7 shows the orientation of J3 and J4 on the RP when set for 2 MB, the factory default. Figure 5-8 shows the jumper settings for each EPROM size with the jumpers oriented as in Figure 5-7. For example, if you are installing a new image that resides on 4-MB EPROMs, you will need to move the jumper on J3 from the upper two posts to the lower two posts. This is not required if you upgrade by downloading a new software image into Flash memory; it is only necessary when you physically replace the EPROMs.
Follow these steps to upgrade the EPROMs in the RP:
Step 2 Turn OFF the system power.
Step 3 Follow the steps in the section "Removing CxBus Interface Processors" to remove the RP from the slot and place it on an antistatic mat or foam pad.
Step 4 On the RP, locate the eight system software EPROMs. (See Figure 5-7.) The label on each installed EPROM indicates the EPROM number (1 through 8), as shown in Figure 5-7. Note the orientation of the notches on the end of each EPROM to aid in inserting the new ones. Do not rely on the orientation of the labels on the new EPROM for correct positioning.
| Caution The correct placement of the EPROM is crucial. If improperly positioned, the EPROM could be damaged when the system is powered on. Also, to prevent damage to the board or any of the components from electrostatic discharge, be sure to follow the ESD procedures described in "Preventing Electrostatic Discharge Damage" in the chapter "Preparing for Installation." |
Step 5 Use a chip extractor to remove the first EPROM from its socket. If you do not have a chip extractor available, use the tip of a screwdriver blade to gently pry the EPROM out of its socket.
Step 6 Install the new EPROM in the same numbered socket as old EPROM you just removed. Observe the correct notch orientation for the new EPROM.
Step 7 Repeat Steps 5 and 6 until all new EPROMs are installed. Be careful not to bend or break any of the pins. Use needlenose pliers to straighten a bent pin. If a pin breaks, you must obtain a replacement.
Step 8 If you installed ROMs of a different capacity than those that were previously installed, check Figure 5-8 and reset jumpers J3 or J4 if necessary (notification of a new ROM size will be included with the replacement EPROMs if applicable).
Step 9 Follow the Steps in the section "Installing CxBus Interface Processors" to reinstall the RP. Be sure to use the ejector levers to install the RP, then tighten the top and bottom captive installation screws.
Step 10 Reconnect any console or auxiliary port cables to the connectors on the RP.
Step 11 Turn ON the system for an installation check, which is described in "Starting the Router" in the chapter "Installing the Router."
The system DRAM resides on four single inline memory modules (SIMMs) on the RP. The default DRAM configuration is 16 MB (four 4 MB x 9 SIMMs). This section provides the steps for increasing the amount of DRAM from 16 MB to 64 MB by replacing the four 4 MB SIMMs with four 16 MB SIMMs that you obtain from an approved vendor. Some (earlier) RPs do not support 16 MB SIMMs; before upgrading, use the prerequisites in the following section to ensure that your RP will support the larger SIMMs. You must use SIMMs that you obtain from an approved vendor; otherwise, Cisco Systems cannot ensure proper operation.
Before replacing SIMMs to increase the amount of DRAM available in your system, ensure that your RP supports 16 MB SIMMs and that you obtain the replacement SIMMs from an approved vendor.
Only RPs that meet the following prerequisites support the larger (16 MB) SIMMs:
Bootstrap Version 4.6 is used exclusively with Software Release 9.17, and Bootstrap Version 4.7 is used exclusively with Software Release 9.21. The revision numbers (indicated within parentheses) for each version are revised independently of other bootstrap versions. Therefore, 4.6(7) can be a later version than 4.7(2).
Software Release 9.17(8), RP board revision B0, and System Bootstrap Version 4.6(7.3) began shipping as the default for Cisco 7000 series systems in March 1994.
RPs that shipped from the factory with Release 9.17(7) or earlier in ROM do not support 16 MB SIMMs. To verify that your RP supports the larger SIMMs, issue the following commands:
7010# show version

GS Software (GS7), Version 9.17(8.1)
Copyright (c) 1986-1994 by cisco Systems, Inc.
Compiled Fri 04-Feb-94

System Bootstrap, Version 4.6(7.3)
7010# show diag 4


Slot 4:
        EEPROM format version 1
        Route Processor, HW rev 1.1, board revision B0
        Serial number: 00809933  Part number: 73-0877-04
In addition to the tools you need to remove and replace the RP, you will also need the following tools and parts to replace SIMMs. If you need additional equipment, contact a service representative for ordering information.
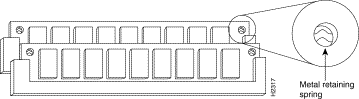
Because the SIMMs on the RP are not intended to be replaced often, if at all, the SIMM sockets do not use the thumb tabs that are often used in PCs and other computer equipment. Each RP SIMM socket has two metal retaining springs, one at each end. (See Figure 5-9.)When a SIMM is fully seated in the socket, the retaining springs snap upward into the holes at the ends of the SIMM to lock it in the socket. You need the AMP extraction tool to remove the SIMMs from this type of socket. The extraction tool has an embossed tip specifically designed to depress the retaining spring while wedging the SIMM out of the socket.
| Caution Handle SIMMs by the card edges only. SIMMs are sensitive components that can be shorted by mishandling. All four SIMM sockets must be filled, and all must contain SIMMs of the same size (capacity) and speed. You cannot mix SIMMs of different sizes or speeds in the four sockets. |
Follow these steps to remove the existing 4 MB SIMMs:
Step 2 Follow the steps in the section "Removing CxBus Interface Processors" to remove the RP from the slot and place it on an antistatic mat or foam pad.
Step 3 Place the RP on an antistatic mat or pad, and ensure that you are wearing an antistatic device, such as a wriststrap. Position the RP so that the backplane edge is closest to you, and the handle is away from you. The RP should be rotated 180 degrees from the orientation shown in Figure 5-7.
Step 4 Locate SIMMs in sockets U35, U36, U58, and U59. You will remove the SIMM from the socket closest to you first, then work backward to remove the remaining SIMMs.
Step 5 While holding the extraction tool at the handle (at the top of the T), insert the embossed tip into the hole in the right side of the SIMM. (See Figure 5-10a.)
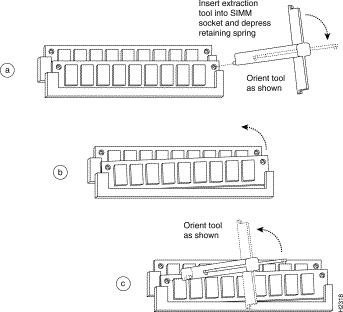
Step 6 While pressing the tool downward (to keep the retainer spring depressed), rotate the tool clockwise until the right side of the SIMM is partially released from the socket. (See Figure 5-10b.)
Step 7 Remove the tool from the right side, and insert the embossed tip into the hole in the left side of the same SIMM.
Step 8 While pressing the tool downward, rotate the tool counterclockwise until the left side of the SIMM is released from the socket. (See Figure 5-10c.)
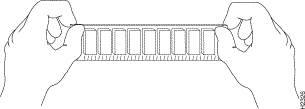
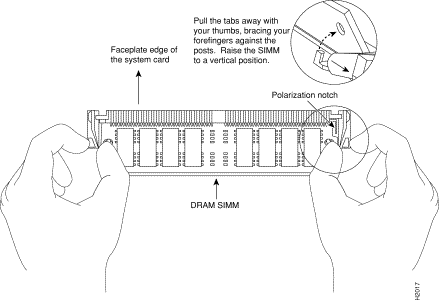
Step 9 When both ends of the SIMM are released from the socket, grasp the ends of the SIMM with your thumb and forefinger and pull the SIMM completely out of the socket. Handle the edges of the SIMM only; avoid touching the memory module or pins, and the metal traces or fingers along the socket edge.
Step 10 Place the SIMM in an antistatic bag to protect it from ESD damage.
Step 11 Repeat Steps 4 through 10 for the remaining SIMMs.
This completes the SIMM removal procedure. Proceed to the next section to install the new SIMMs.
SIMMs are sensitive components that are susceptible to ESD damage. Handle SIMMs by the edges only; avoid touching the memory modules, pins, or traces (the metal fingers along the connector edge of the SIMM). (See Figure 5-11.)
| Caution Handle SIMMs by the card edges only. SIMMs are sensitive components that can be shorted by mishandling. |
Follow these steps to install the new SIMMs:
Step 2 Remove a new SIMM from the antistatic bag.
Step 3 Hold the SIMM component side up, with the connector edge (the metal fingers) closest to you.
Step 4 Hold the sides of the SIMM between your thumb and middle finger, with your forefinger against the far edge, opposite the connector edge. (See Figure 5-11.)
Step 5 Tilt the SIMM to approximately the same angle as the socket and insert the entire connector edge into the socket.
| Caution When inserting SIMMs, use firm but not excessive pressure. If you damage a socket, you will have to return the RP to the factory for repairs. |
Step 6 Gently push the SIMM into the socket until the retaining springs snap into the holes in the SIMM. If necessary, rock the SIMM gently back and forth to seat the SIMM properly.
Step 7 Repeat Steps 2 through 6 for the remaining SIMMs.
Step 8 When all four SIMMs are installed, check all eight alignment holes (two on each SIMM), and ensure that the spring retainer is visible. If it is not, the SIMM is not seated properly. If any SIMM appears misaligned, carefully remove it and reseat it in the socket. Push the SIMM firmly back into the socket until the retainer springs snap into place.
Step 9 Follow the steps in the section "Installing CxBus Interface Processors" to reinstall the RP. Be sure to use the ejector levers to install the RP, then tighten the top and bottom captive installation screws.
Step 10 Reconnect any console or auxiliary port cables to the connectors on the RP.
Step 11 Turn ON the system for an installation check, which is described in the section "Starting the Router" in the chapter "Installing the Router."
If the system fails to boot properly, or if the console terminal displays a checksum or memory error, check the following:
If after several attempts the system fails to restart properly, contact a service representative for assistance. Before you call, make note of any error messages, unusual LED states, or any other indications that might help solve the problem.
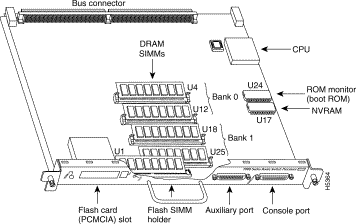
The system DRAM resides on up to four SIMMs on the RSP7000. The DRAM SIMM sockets are U4 and U12 for bank 0, and U18 and U25 for bank 1. The default DRAM configuration is 16 MB (two 8-MB SIMMs in bank 0). (See Figure 5-12.)
This section describes the steps for increasing the amount of DRAM by replacing up to four SIMMs that you obtain from an approved vendor.
The SIMM sockets use the thumb tabs that are often used in PCs and other computer equipment. Each RSP7000 SIMM socket has two metal retaining springs, one at each end. (See Figure 5-13.) When a SIMM is fully seated in the socket, the retaining springs snap over the ends of the SIMM to lock it in the socket.
Before proceeding, ensure that you have the proper tools and ESD-prevention equipment available. To upgrade DRAM, you install SIMMs in one or two banks. Table 5-9 lists the various configurations of DRAM SIMMs that are available. Note which banks are used given the combinations of available SIMM sizes and the maximum DRAM you require. SIMMs must be 60 ns or faster and no taller than one inch.
| DRAM Bank 0 | Quantity | DRAM Bank 1 | Quantity | Total DRAM | Product Names |
U4 and U12 | 2 8-MB SIMMs | U18 and U25 | - | 16 MB | MEM-RSP-16M |
U4 and U12 | 2 8-MB SIMMs | U18 and U25 | 2 4-MB SIMMs | 24 MB1 | MEM-RSP-24M |
U4 and U12 | 2 16-MB SIMMs | U18 and U25 | - | 32 MB | MEM-RSP-32M(=) |
U4 and U12 | 2 32-MB SIMMs | U18 and U25 | - | 64 MB | MEM-RSP-64M(=) |
U4 and U12 | 2 32-MB SIMMs | U18 and U25 | 2 32-MB SIMMs | 128 MB | MEM-RSP-128M(=) |
| Caution To prevent DRAM errors, each DRAM bank used must contain no less than two SIMMs of the same type. You must install either two SIMMs in bank 0 or four SIMMs in two banks. |
Place removed SIMMs on an antistatic mat and store them in an antistatic bag. You can use the SIMMs that you remove in compatible equipment.
| Caution To prevent ESD damage, handle SIMMs by the card edges only. |
Follow these steps to remove the existing SIMMs:
Step 2 Place the RSP7000 on an antistatic mat or pad, and ensure that you are wearing an antistatic device, such as a wrist strap. Position the RSP7000 so that the handle is away from you, and the edge connector is toward you; opposite of the position shown in Figure 5-12.
Step 3 Locate SIMMs. The DRAM SIMMs occupy U4 and U12 in bank 0, and U18 and U25 in bank 1. (See Figure 5-12.)
Step 4 Release the spring clips from the SIMM that you wish to remove and release the SIMM from the socket. (See Figure 5-13.)
Step 5 When both ends of the SIMM are released from the socket, grasp the ends of the SIMM with your thumb and forefinger and pull the SIMM completely out of the socket. Handle the edges of the SIMM only; avoid touching the memory module or pins, and the metal traces, or fingers, along the socket edge.
Step 6 Place the SIMM in an antistatic bag to protect it from ESD damage.
Step 7 Repeat Steps 4 through 6 for the remaining SIMMs, as required for your upgrade.
This completes the SIMM removal procedure. Proceed to the next section to install the new SIMMs.
SIMMs are sensitive components that are susceptible to ESD damage. Handle SIMMs by the edges only; avoid touching the memory modules, pins, or traces (the metal fingers along the connector edge of the SIMM).(See Figure 5-14.)
| Caution Handle SIMMs by the card edges only. SIMMs are sensitive components that can be shorted by mishandling. |
Follow these steps to install the new SIMMs:
Step 2 Remove a new SIMM from the antistatic bag.
Step 3 Hold the SIMM component side up, with the connector edge (the metal fingers) closest to you.
Step 4 Hold the sides of the SIMM between your thumb and middle finger, with your forefinger against the far edge, opposite the connector edge. (See Figure 5-14.)
Step 5 Tilt the SIMM to approximately the same an angle as the socket and insert the entire the connector edge into the socket.
| Caution When inserting SIMMs, use firm but not excessive pressure. If you damage a socket, you will have to return the RSP7000 to the factory for repair. |
Step 6 Gently push the SIMM into the socket until the spring clips snap over the ends of the SIMM. If necessary, rock the SIMM gently back and forth to seat it properly.
Step 7 Repeat Steps 2 through 6 for the remaining SIMMs.
Step 8 When all SIMMs are installed, check all alignment holes (two on each SIMM), and ensure that the spring retainer is visible. If it is not, the SIMM is not seated properly. If any SIMM appears misaligned, carefully remove it and reseat it in the socket. Push the SIMM firmly back into the socket until the retainer springs snap into place.
This completes the SIMM replacement procedure.
Proceed to the section "Removing and Replacing the RP, SP or SSP, RSP7000, or RSP7000CI" to replace the RSP7000 in the chassis and restart the system for an installation check. Note that the RSP7000 does not support OIR
If the system fails to boot properly, or if the console terminal displays a checksum or memory error, check the following:
If after several attempts the system fails to restart properly, contact a service representative for assistance. Before you call, make note of any error messages, unusual LED states, or any other indications that might help solve the problem.
The system DRAM resides on up to four SIMMs on the RSP7000. The DRAM SIMM sockets are U4 and U12 for bank 0, and U18 and U25 for Bank 1. The default DRAM configuration is 16 MB (two 8-MB SIMMs in bank 0). (See Figure 5-15.)
This section describes the steps for increasing the amount of DRAM by replacing up to four SIMMs that you obtain from an approved vendor.
The SIMM sockets use the thumb tabs that are often used in PCs and other computer equipment. Each RSP7000 SIMM socket has two metal retaining springs, one at each end. (See Figure 5-16.) When a SIMM is fully seated in the socket, the retaining springs snap over the ends of the SIMM to lock it in the socket.
Before proceeding, ensure that you have the proper tools and ESD-prevention equipment available. To upgrade DRAM, you install SIMMs in one or two banks. Table 5-10 lists the various configurations of DRAM SIMMs that are available. Note which banks are used given the combinations of available SIMM sizes and the maximum DRAM you require. SIMMs must be 60 ns or faster and no taller than one inch.
| DRAM Bank 0 | Quantity | DRAM Bank 1 | Quantity | Total DRAM | Product Names |
U4 and U12 | 2 8-MB SIMMs | U18 and U25 | - | 16 MB | MEM-RSP-16M |
U4 and U12 | 2 8-MB SIMMs | U18 and U25 | 2 4-MB SIMMs | 24 MB1 | MEM-RSP-24M |
U4 and U12 | 2 16-MB SIMMs | U18 and U25 | - | 32 MB | MEM-RSP-32M(=) |
U4 and U12 | 2 32-MB SIMMs | U18 and U25 | - | 64 MB | MEM-RSP-64M(=) |
U4 and U12 | 2 32-MB SIMMs | U18 and U25 | 2 32-MB SIMMs | 128 MB | MEM-RSP-128M(=) |
| Caution To prevent DRAM errors, each DRAM bank used must contain no less than two SIMMs of the same type. You must install either two SIMMs in bank 0 or four SIMMs in two banks. |
Place removed SIMMs on an antistatic mat and store them in an antistatic bag. You can use the SIMMs that you remove in compatible equipment.
| Caution To prevent ESD damage, handle SIMMs by the card edges only. |
Follow these steps to remove the existing SIMMs:
Step 2 Place the RSP7000 on an antistatic mat or pad, and ensure that you are wearing an antistatic device, such as a wrist strap. Position the RSP7000 so that the handle is away from you, and the edge connector is toward you, opposite of the position shown in Figure 5-15.
Step 3 Locate SIMMs. The DRAM SIMMs occupy U4 and U12 in bank 0, and U18 and U25 in bank 1. (See Figure 5-15.)
Step 4 Release the spring clips from the SIMM that you want to remove and release the SIMM from the socket. (See Figure 5-16.)
Step 5 When both ends of the SIMM are released from the socket, grasp the ends of the SIMM with your thumb and forefinger and pull the SIMM completely out of the socket. Handle the edges of the SIMM only; avoid touching the memory module or pins, and the metal traces, or fingers, along the socket edge.
Step 6 Place the SIMM in an antistatic bag to protect it from ESD damage.
Step 7 Repeat Steps 4 through 6 for the remaining SIMMs, as required for your upgrade.
This completes the SIMM removal procedure. Proceed to the next section to install the new SIMMs.
SIMMs are sensitive components that are susceptible to ESD damage. Handle SIMMs by the edges only; avoid touching the memory modules, pins, or traces (the metal fingers along the connector edge of the SIMM). (See Figure 5-17.)
| Caution Handle SIMMs by the card edges only. SIMMs are sensitive components that can be shorted by mishandling. |
Follow these steps to install the new SIMMs:
Step 2 Remove a new SIMM from the antistatic bag.
Step 3 Hold the SIMM component side up, with the connector edge (the metal fingers) closest to you.
Step 4 Hold the sides of the SIMM between your thumb and middle finger, with your forefinger against the far edge, opposite the connector edge. (See Figure 5-17.)
Step 5 Tilt the SIMM to approximately the same an angle as the socket and insert the entire the connector edge into the socket.
| Caution When inserting SIMMs, use firm but not excessive pressure. If you damage a socket, you will have to return the RSP7000 to the factory for repair. |
Step 6 Gently push the SIMM into the socket until the spring clips snap over the ends of the SIMM. If necessary, rock the SIMM gently back and forth to seat it properly.
Step 7 Repeat Steps 2 through 6 for the remaining SIMMs.
Step 8 When all SIMMs are installed, check all alignment holes (two on each SIMM), and ensure that the spring retainer is visible. If it is not, the SIMM is not seated properly. If any SIMM appears misaligned, carefully remove it and reseat it in the socket. Push the SIMM firmly back into the socket until the retainer springs snap into place.
This completes the SIMM replacement procedure.
Proceed to the section "Removing and Replacing the RP, SP or SSP, RSP7000, or RSP7000CI" to replace the RSP7000 in the chassis and restart the system for an installation check. Note that the RSP7000 does not support OIR
If the system fails to boot properly, or if the console terminal displays a checksum or memory error, check the following:
If after several attempts the system fails to restart properly, contact a service representative for assistance. Before you call, make note of any error messages, unusual LED states, or any other indications that might help solve the problem.
The FSIP supports EIA/TIA232, EIA/TIA449, V.35, and X.21 electrical interfaces in both DTE and DCE mode, and EIA-530 interfaces in DTE mode. The port adapter cable connected to each port determines the electrical interface type and mode of the port. To change the electrical interface type or mode of a port, you replace the port adapter cable and use software commands to reconfigure the port for the new interface. At system startup or restart the FSIP polls the interfaces and determines the electrical interface type of each port (according to the type of port adapter cable attached). However, it does not necessarily repoll an interface when you change the adapter cable online. To ensure that the system recognizes the new interface type, you must shutdown and reenable the interface after changing the cable. When setting up a new DCE interface or changing the mode of an interface from DTE to DCE, or when setting up a loopback test, you must also set the clock rate on the interface. If necessary, you can also use software commands to invert the clock to compensate for phase shifts caused by circuit delays or variances in cable lengths.
The default configuration for serial ports is DCE mode, NRZ format, and 16-bit CRC error detection. All serial interfaces support nonreturn to zero inverted (NRZI) format and 32-bit error detection, both of which are enabled with a software command.
To use an FSIP port as a DCE interface, you must connect a DCE port adapter cable and set the clock speed with the clockrate command. You must also set the clock rate to perform a loopback test. This section describes how to use software commands to set the clock rate on a DCE port and, if necessary, how to invert the clock to correct a phase shift between the data and clock signals.
All DCE interfaces require a noninverted internal transmit clock signal, which is generated by the FSIP. The default operation on an FSIP DCE interface is for the DCE device (FSIP) to generate its own clock signal (TxC) and send it to the remote DTE. The remote DTE device returns the clock signal to the DCE (FSIP port). When using DCE interfaces, you must connect a DCE-mode adapter cable to the port and specify the rate of the internal clock with the clockrate configuration command followed by the bits-per-second value. In the following example, the first serial interface on an FSIP in interface processor slot 2 (2/0) is defined as having a clock rate of 2 Mbps.
7010# configure terminal

interface serial 2/0

clockrate 2000000

^z
Following are acceptable clockrate settings:
1200 , 2400, 4800, 9600, 19200, 38400, 56000, 64000, 72000, 125000, 148000, 500000, 800000 , 1000000, 1300000 , 2000000 , or 4000000
Speeds above 64 kbps (64000) are not appropriate for EIA/TIA-232; use EIA/TIA-449 on faster interfaces. Note that the faster speeds might not work if your cable is too long. If you change an interface from DCE to DTE, you can use the no clockrate command to remove the clock rate although it is not necessary to do so. The port automatically recognizes the DTE cable and ignores the clock rate until a DCE cable is attached to the port again.
The FSIP ports support full duplex operation at DS1 (1.544 Mbps) and E1 (2.048 Mbps) speeds. Each four-port module (see the section "Fast Serial Interface Processor (FSIP)" in the chapter "Product Overview") can support an aggregate bandwidth of 6.132 Mbps.
Because each four-port module shares a processor, you can delegate bandwidth to a single port and leave the other ports idle to optimize speed and bandwidth on a single interface. For example, you can configure four T1 interfaces on a module (one T1 on each port) such that they do not exceed 6.132 Mbps, or you can configure one port to operate at up to 6.132 Mbps, and leave the remaining three ports shut down. The type of electrical interface, the amount of traffic processed, and the types of external data service units (DSUs) connected to the ports affect actual rates.
Systems that use long cables may experience high error rates when operating at the higher speeds. Slight variances in cable length, temperature, and network configuration can cause the data and clock signals to shift out of phase. Inverting the clock can often correct this shift. The invert-transmit-clock configuration command inverts the TxC clock signal for DCE interfaces. This prevents phase shifting of the data with respect to the clock. To change the clock back to its original phase, use the no invert-transmit-clock command. In the example that follows, the clock is inverted for the first serial port on an FSIP in interface processor slot 2:
7010# configure terminal

interface serial 2/0

invert-transmit-clock

^z
The default for all interface types is for nonreturn to zero (NRZ) format; however, all types also support nonreturn to zero inverted (NRZI). NRZ encoding is most common. NRZI encoding is used primarily with EIA/TIA232 connections in IBM environments. To enable NRZI encoding on any interface, specify the slot and port address of the interface followed by the command nrzi-encoding. In the example that follows, the first serial port on an FSIP in interface processor slot 2 is configured for NRZI encoding:
7010# configure terminal

interface serial 2/0

nrzi-encoding

^z
To disable NRZI encoding on a port, specify the slot and port address and use the no nrzi-encoding command.
For a brief overview of NRZ and NRZI, refer to "NRZ and NRZI Formats" in the chapter "Preparing for Installation." For complete command descriptions and instructions, refer to the related software documentation.
All interfaces (including the HIP) use a 16-bit cyclic redundancy check (CRC) by default but also support a 32-bit CRC.
The default for all serial interfaces is for 16-bit CRC. To enable 32-bit CRC on an interface, specify the slot and port address of the interface followed by the command crc32. In the example that follows, the first serial port on an FSIP in interface processor slot 2 is configured for 32-bit CRC:
7010# configure terminal

interface serial 2/0

crc32

^z
To disable 32-bit mode and return to the default 16-bit setting on a specific interface, specify the slot and port address of the interface and use the no crc32 command.
For a brief overview of CRCs, refer to the section "Cyclic Redundancy Checks (CRCs)" in the chapter "Preparing for Installation." For complete command descriptions and instructions, refer to the related software documentation.
The E1-G.703/G.704 interface supports 4-bit CRC in framed mode only. CRC-4 is not enabled by default.
To enable CRC-4 on the E1-G.703/G.704 interface, specify the slot and port address of the interface followed by the command crc4. In the example that follows, the top port on an FSIP in interface processor slot 3 is configured for CRC:
Router# configure terminal

interface serial 3/0

crc4

^z
To disable CRC-4 and return to the default of no CRC error checking, specify the slot and port address and use the no crc4 command. For complete command descriptions and instructions, refer to the related software documentation.
The port adapter cable connected to each FSIP port determines the electrical interface type and mode of the port. The FSIP ports are not configured for either DTE or DCE mode by default. When there is no cable attached to a port, the software identifies the port as Universal, Cable Unattached rather than either a DTE or DCE interface. When a cable is attached, the port recognizes the mode and automatically uses the clock signal from the appropriate source (external for DTE or internal for DCE).
Although you do not have to configure a clock source for the ports, you do have to define the clock speed the first time you configure a port as a DCE interface. Because the ports automatically use the appropriate clock source for the type (mode) of cable it detects, you can configure a clock rate for a DCE interface and later replace the DCE cable with a DTE cable; the FSIP will ignore the internal clockrate unless it detects that a DCE cable is attached. This configuration allows you to perform a loopback test on a serial port without a port adapter cable attached.
Following is an example of the show controller cxbus command that shows an interface port (2/0) that has an EIA/TIA232 DTE cable attached, and a second port (2/1) that does not have a cable attached:
7010# show controller cxbus


Switch Processor 7, hardware version 11.1, microcode version 1.4
  512 Kbytes of main memory, 128 Kbytes cache memory, 299 1520 byte buffers
  Restarts: 0 line down, 0 hung output, 0 controller error
 FSIP 2, hardware version 3, microcode version 1.0
  Interface 16 - Serial2/0, electrical interface is RS-232 DTE
    31 buffer RX queue threshold, 101 buffer TX queue limit, buffer size 1520
    Transmitter delay is 0 microseconds
  Interface 17 - Serial2/1, electrical interface is Universal (cable unattached)
    31 buffer RX queue threshold, 101 buffer TX queue limit, buffer size 1520
To change the electrical interface type or mode of a port on line, replace the serial adapter cable and use software commands to restart the interface and, if necessary, reconfigure the port for the new interface. At system startup or restart, the FSIP polls the interfaces and determines the electrical interface type of each port (according to the type of port adapter cable attached). However, it does not necessarily repoll an interface when you change the adapter cable on line. To ensure that the system recognizes the new interface type, shutdown and reenable the interface after changing the cable.
Perform the following steps to change the mode or interface type of a port by replacing the adapter cable. If you are replacing a cable with one of the same interface type and mode, these steps are not necessary. (Simply replace the cable without interrupting operation.)
Step 2 Connect the new cable between the FSIP port and the network connection. Tighten the thumbscrews at both ends of the cable to secure it in the ports.
Step 3 At the privileged level of the EXEC, specify the port address, shutdown the interface, and write the configuration to NVRAM. Add additional configuration commands, if any, before you exit from the configuration mode (before you press Ctrl-Z.
7010> en

Password:
7010# configure terminal

int serial 2/5

shutdown

^z


7010# write mem
Step 4 Enter the configuration mode again and bring the port back up.
7010# configure terminal

int serial 2/5

no shutdown

^z
These steps will prompt the system to poll the interface and recognize the new interface immediately.
When configuring a port for a DCE interface for the first time, or when setting up a loopback test, you must set the clock rate for the port. When you connect a DCE cable to a port, the interface will remain down, the clock LEDs will remain off, and the interface will not function until you set a clock rate (regardless of the DCE mode default).
If you are changing the mode of the interface from DCE to DTE, you do not need to change the clock rate for the port. After you replace the DCE cable with a DTE cable and the system recognizes the interface as a DTE, it will use the external clock signal from the remote DCE device and ignore the internal clock signal that the DCE interface normally uses. Therefore, once you configure the clock rate on a port for either a DCE interface or loopback, you can leave the clock rate configured and still use that port as a DTE interface.
Serial port adapters provide the high-density ports for FSIP serial interfaces. Each port adapter provides two ports, and each port supports any one of the available interface types: EIA/TIA232, EIA/TIA449, V.35, X.21, and EIA-530. The adapter cable connected to the port determines the electrical interface type and mode (DTE or DCE) of the interface. Each FSIP is shipped from the factory with four or eight port adapters installed. Port adapters are field replaceable; if you have spares on hand and have a failure, you can replace interfaces without having to return the FSIP to the factory. You cannot, however, add ports to an FSIP by installing additional port adapters. The four-port FSIP supports only one 4-port module. To change the electrical interface type or mode of a port, you need only replace the adapter cable and reset the interface. When setting up DCE port, you must also set the clock rate. Although DCE is the default mode, you do not need to specify the mode when configuring DTE interfaces. When the port recognizes the DTE interface cable, it automatically uses the clock signal from the remote DCE device.
| Caution Remove and install port adapters only when it is necessary to replace interfaces. Do not attempt to isolate faults or to troubleshoot FSIPs or serial interfaces by swapping port adapters. The surface-mount circuitry on the port adapters will not tolerate excessive handling. |
All serial interface types support NRZI format and 32-bit CRC, both of which you set with software commands. (Refer to the section "Replacing RSP7000 DRAM SIMMs" earlier in this section.) For complete command descriptions and instructions, refer to the related software documentation.
You need the following tools to complete this procedure:
Two or four port adapters (each port adapter provides two ports) are installed on each FSIP at the factory, so in order to install a new port adapter (or to replace an existing one), you need to remove an existing port adapter. Each four-port module on an FSIP is driven by a CPU; four-port FSIPs contain one processor, and eight-port FSIPs contain two processors. You cannot add additional ports to a four-port FSIP to upgrade it to eight ports.
Follow these steps to remove and replace the FSIP:
Step 2 Put on a grounding strap and attach the equipment end to one of the captive installation screws on the rear of the chassis.
Step 3 Use a screwdriver to loosen the two captive installation screws on the FSIP.
Step 4 Place your thumbs on the upper and lower ejector levers and simultaneously push the top lever up and the bottom lever down to release the FSIP from the backplane connector.
Step 5 Grasp the FSIP handle with one hand and place your other hand under the carrier to support and guide the FSIP out of the slot. Avoid touching the board.
Step 6 Carefully pull the FSIP straight out of the slot, keeping your other hand under the carrier to guide it. (See Figure 5-2.) Keep the FSIP at a 90-degree orientation to the backplane.
Step 7 Place the removed FSIP on an antistatic mat or antistatic foam and proceed to the section "Removing Port Adapters."
Port adapters are installed on each FSIP at the factory. You must remove an existing port adapter in order to replace or install a new one. Each port adapter is anchored to the FSIP with two double-row vertical board-to-board (BTB) connectors and two Phillips-head screws that extend down into the standoffs. (See Figure 5-18.) The port adapter is also anchored to the carrier faceplate with four jackscrews with lock washers (two per port).
| Caution The surface-mounted components on the port adapters are extremely susceptible to ESD damage. Keep each port adapter in a separate antistatic bag until you are ready to install it. Always wear a ground strap and handle boards as little as possible. When you must handle the board, limit contact to the board edges only, avoiding contact between the board and clothing. |
To remove a port adapter from the FSIP perform the following steps:
Step 2 Position the FSIP so that it is in the same orientation as shown in Figure 5-18.
Step 3 Locate the port adapter to be replaced. Use a 3/16-inch nut driver to loosen the four jackscrews, one on either side of both serial connector ports.
Step 4 Remove the jackscrews and washers and put them aside. You may need them to install the new port adapter.
Step 5 Use a Phillips screwdriver to loosen and remove the two standoff screws. (See Figure 5-18.) You will need the standoff screws to install the new port adapter.
Step 6 While avoiding contact with any traces or components on the board, insert your thumb and forefinger into the finger holes on the sides of the port adapter and gently lift it upward to dislodge the BTB connectors. If the port adapter resists, rock it very slightly from side to side until it pulls free of the FSIP connector.
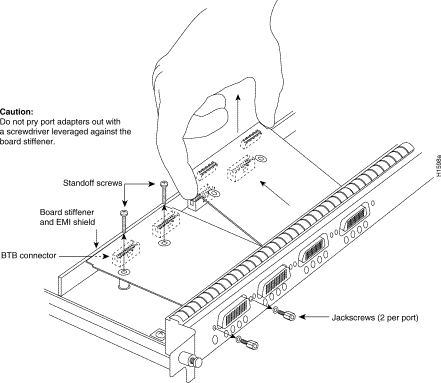
| Caution Do not use a screwdriver or other tool to pry the port adapter up or out of the BTB connectors. In particular, do not use the board stiffener for leverage, or you will damage the FSIP board. |
Step 7 When the port adapter BTB connector is completely disconnected from the BTB connector on the FSIP, tilt the back of the port adapter up at about a 70-degree angle from vertical and slowly pull it upward and outward (up and out using the orientation shown in Figure 5-18) away from the faceplate. The serial port connector will pull out of the cutouts in the faceplate.
Step 8 Immediately place the removed port adapter into an antistatic bag.
Step 9 Proceed to the next section to install a new port adapter.
| Caution Do not reinstall the FSIP in the chassis unless all port adapters are in place. The empty port will allow cooling air to escape freely through the cutouts in the faceplate, which could misdirect the airflow inside the chassis and allow components on other boards to overheat. |
The FSIP should already be out of the chassis and have an empty space available for the new port adapter. If it is not, refer to the two previous sections to remove the FSIP from the chassis and remove a port adapter from the FSIP. Refer to Figure 5-19 while performing the following steps.
Step 2 Carefully remove the new port adapter from its antistatic bag. Handle the port adapter by the board edges only.
Step 3 If jackscrews are installed on the sides of the connectors, remove them and the four lock washers by turning them counterclockwise. If necessary, use a 3/16-inch nut driver to loosen them. Put the screws and washers aside.
Step 4 While still handling the board edges only, position the port adapter so that it is in the orientation shown in Figure 5-19: at about a 70-degree angle from vertical, component side down, standoffs on the underside, and the external interface port connectors facing the inside of the carrier faceplate.
Step 5 As shown in Figure 5-19, partially insert the port connectors through the back of the cutouts in the carrier faceplate. Do not force the connectors through the cutouts until the standoffs and BTB connectors are aligned.
Step 6 With the port connectors partially inserted into the faceplate cutouts, slowly lower the back (opposite) side of the port adapter and continue to ease the port connectors through the cutouts until the BTB connectors on the FSIP and port adapter meet, and the standoffs on the underside of the port adapter are aligned with the standoff holes in the FSIP. Shift the port adapter until the port connectors are fully inserted through the cutouts, and the standoffs are aligned with the standoff holes.
| Caution Before seating the port adapter onto the FSIP, ensure that the port adapter is aligned properly with the BTB connectors and the standoffs. Forcing a misaligned port adapter into place can damage the port adapter or the FSIP and cause immediate or intermittent failures. |
Step 7 Place your fingers along the back edge of the port adapter board and press down firmly until the BTB connectors mate. If the connectors resist, do not force them. Shift the port adapter around until the connectors mate properly.
Step 8 Insert the two long Phillips-head screws through the two standoffs and finger-tighten them. These screws extend through the standoffs and the FSIP board and thread into the metal carrier.
Step 9 Install a lockwasher on each of the four jackscrews.
Step 10 On the front of the carrier faceplate, insert the four jackscrews through the front of the faceplate and into the holes on either side of both port connectors.
Step 11 When all screws and connectors are aligned properly, use a Phillips screwdriver to tighten the standoff screws and a 3/16-inch nut driver to tighten the four jackscrews. Do not overtighten any of the screws.
Step 12 Proceed to the next section to reinstall the FSIP in the chassis.
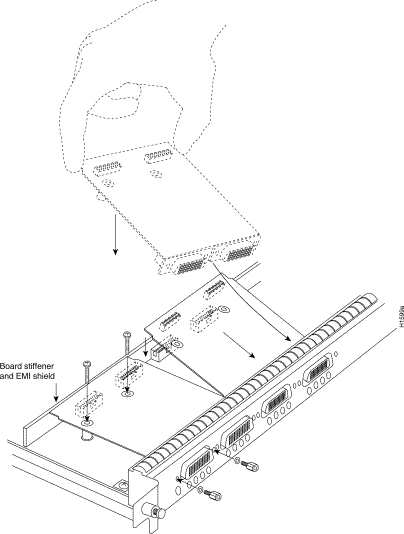
There should now be four or eight port adapters installed on the FSIP. If there are not, do not install the FSIP until you install all port adapters or until you install a blank interface processor filler in the FSIP slot.
| Caution Handle interface processors by the handles and carrier edges only to prevent ESD damage. |
| Caution Do not reinstall the FSIP unless all port adapters are installed. The empty port will allow cooling air to escape freely through the cutouts in the faceplate, which could misdirect the airflow inside the chassis and allow components on other boards to overheat. |
Step 2 Place the back of the FSIP in the slot and align the notch on the bottom of the carrier with the groove in the slot. (See Figure 5-1.)
Step 3 While keeping the FSIP at a 90-degree orientation to the backplane, carefully slide the carrier into the slot until the FSIP faceplate makes contact with the ejector levers. (See Figure 5-1.)
Step 4 Using the thumb and forefinger of each hand, simultaneously push the top lever down and the bottom lever up (as shown in Figure 5-1) to fully seat the FSIP in the backplane connector.
Step 5 Use a number 1 Phillips or a 3/16-inch flat-blade screwdriver to tighten the captive installation screws on the top and bottom of the FSIP.
Step 6 Reconnect the network interface cables or other connection equipment to the FSIP interface ports.
Step 7 When you insert the new FSIP, the console terminal will display several lines of status information about the OIR as it reinitializes the interfaces. Change the state of the interfaces to up and verify that the configuration matches that of the interfaces you replaced.
Step 8 Use the configure command or the setup command facility to configure the new interfaces. You do not have to do this immediately, but the interfaces will not be available until you configure them and bring them up.
Step 9 After you configure the interfaces, use the show controller serial or the show interfaces command to display the status of the new interfaces.
This completes the port adapter replacement procedure. For complete command descriptions and instructions, refer to the related software documentation.
Following are procedures for configuring T1 and E1 interfaces on the MIP.
If you installed a new MIP or if you want to change the configuration of an existing controller, you must enter the configuration mode. If you replaced the MIP that was previously configured, the system will recognize the new MIP and bring it up in the existing configuration.
After you verify that the new MIP is installed correctly (the enabled LED is on), use the
privileged-level configure command to configure the new MIP controller. Be prepared with the information you will need, such as the following:
Refer to the Router Products Configuration Guide and Router Products Command Reference publications for a summary of the configuration options available and instructions for configuring the MIP controller.
By default, channelized E1 port adapters are set with capacitive coupling between the receive (Rx) shield and chassis ground. This provides direct current (DC) isolation between the chassis and external devices, as stated in the G.703 specification. Jumper J6 controls this function. To make changes, remove the E1 port adapter from the mother board, place one of the spare jumpers on J6 pins one and two or pins two and three (refer to Table 5-11), and replace the port adapter on the mother board. Pin 1 of J6 is designated with a square. (See Figure 5-20.)
For procedures on removing the E1 port adapter from the MIP, refer to the section "Removing and Replacing MIP Port Adapters" in this chapter.
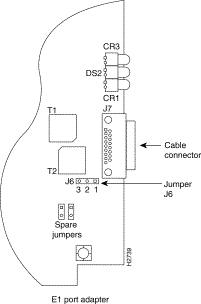
| Jumper | Pins and Impedance | Function |
|---|---|---|
J6 | 1 and 2 for 120 ohm | Controls capacitive coupling for either 120-ohm or 75-ohm operation. An installed jumper directly connects the Rx shield to chassis ground. |
| Warning To prevent problems with the E1 interface and to reduce the potential for injury, jumper J6 should be installed by trained service personnel only. For either impedance option, a jumper installed at J6 bypasses the AC-decoupling capacitor to ground, thereby coupling the interface directly to AC. This is a setting that could pose a risk of severe injury. By default and for safety, J6 has no jumper installed. |
After you set jumper J6, proceed to the section "Removing and Replacing MIP Port Adapters" in this chapter.
Before you use the configure command, you must enter the privileged level of the EXEC command interpreter with the enable command. The system will prompt you for a password if one has been set.
The system prompt for the privileged level ends with a pound sign (#) instead of an angle bracket (>). At the console terminal, enter the privileged level as follows:
Router> enable


Password:
Step 2 Enter the password (the password is case sensitive). For security purposes, the password is not displayed.
Step 3 When you enter the correct password, the system displays the privileged-mode system prompt (#) as follows:
Router#
Step 4 Proceed to the following section to configure the MIP controller.
Following are instructions for a configuration: enabling a controller and specifying IP routing. You might also need to enter other configuration subcommands, depending on the requirements for your system configuration and the protocols you plan to route on the interface.
The channel-groups must be mapped before the MIP controller can be configured.
For complete descriptions of configuration subcommands and the configuration options available, refer to the Router Products Configuration Guide and Router Products Command Reference publications, which are available on UniverCD.
Table 5-12 list commands used to map the channel-group, with the default variable is listed first.
| Commands for T1 | Commands for E1 |
|---|---|
controller t1 slot/applique | controller e1 slot/applique |
clock source [line | internal] | Not required for E1 |
linecode [ami | b8zs] | linecode [hdb3 | ami] |
framing [sf | esf] | framing [crc4 | no-crc4] |
loopback [local | remote] | loopback |
shutdown | shutdown |
channel-group number timeslots list [speed {56 | 48 | 64}] For speed, 56 is the default.1 | channel-group number timeslots list [speed {56 | 48 |64}] For speed, 64 is the default.1. |
| 1Number is the channel-group 0 to 23 for T1 and 0 to 29 for E1. Timeslots list is a number between 1 to 24 for T1 and 1 to 31 for E1. It conforms to D3/D4 numbering for T1. Timeslots may be entered individually and separated by commas or as a range that is separated by a hyphen (for example, 1-3, 8, 9-18). For E1 and T1, 0 is illegal. Speed specifies the DSO speed of the channel-group: T1 default is 56 kbps and E1 default is 64 kbps. |
The following steps describe a basic T1 configuration. Press the Return key after each configuration step.
Router# conf t

Enter configuration commands, one per line. End with CNTL/Z. Router(config)#
Step 2 At the prompt, specify the controller to configure by entering the subcommand cont, followed by t1, and slot/applique (interface processor slot number/applique). The example that follows is for the MIP in interface processor slot 4, applique 1:
Router(config)# cont t1 4/1
Step 3 At the prompt, specify the clock source for the controller. The clock source command will determine which end of the circuit provides the clocking.
Router(config-controller)# clock source line
Step 4 At the prompt, specify the framing type.
Router(config-controller)# framing esf
Step 5 At the prompt, specify the linecode format.
Router(config-controller)# linecode b8zs

Router(config-controller)#
%CONTROLLER-3-UPDOWN: Controller T1 4/1, changed state to up
Router(config-controller)#
Step 6 At the prompt, specify the channel-group modification command, channel-group and timeslots to be mapped. The example shows channel-group 0 and timeslots 1, 3 through 5, and 7 selected for mapping.
Router(config-controller)# channel-group 0 timeslots 1,3-5,7

Router(config-controller)#

%LINEPROTO-5-UPDOWN: Line protocol on Interface Serial4/1:0, changed state to down
%LINEPROTO-5-UPDOWN: Line protocol on Interface Serial4/1:0, changed state to up
Router(config-controller)#

Router(config-controller)#
Step 7 At the prompt, specify the interface, serial, slot, applique, and channel-group to modify.
Router(config-controller)# int serial 4/1:0
Step 8 At the prompt, assign an IP address and subnet mask to the interface with the ip address configuration subcommand as in the following example:
Router(config-if)# ip address 1.1.15.1 255.255.255.0

Router(config-if)#
Step 9 Add any additional configuration subcommands required to enable routing protocols and adjust the interface characteristics.
Step 10 After including all of the configuration subcommands, and to complete the configuration, enter Ctrl-Z (hold down the Control key while you press Z) to exit the configuration mode.
Step 11 Write the new configuration to memory as follows:
Router# write memory
The system will display an OK message when the configuration is stored.
Step 12 Exit the privileged level and return to the user level by entering disable at the prompt as follows:
Router# disable


Router>
Step 13 Proceed to the following section to check the interface configuration with show commands.
The following steps describe a basic E1 configuration. Press the Return key after each step.
Router# conf t

Enter configuration commands, one per line. End with CNTL/Z.

Router(config)#
Step 2 At the prompt, specify the controller to configure by entering the subcommand cont, followed by e1, and slot/applique (interface processor slot number/applique). The example that follows is for the MIP in interface processor slot 4, applique 1:
Router(config)# cont e1 4/1
Step 3 At the prompt, specify the framing type.
Router(config-controller)# framing crc4
Step 4 At the prompt, specify the linecode format.
Router(config-controller)# linecode hdb3

Router(config-controller)#
%CONTROLLER-3-UPDOWN: Controller E1 4/1, changed state to up

Router(config-controller)#
Step 5 At the prompt, specify the channel-group modification command, channel-group and timeslots to be mapped. The example shows channel-group 0 and timeslots 1, 3 through 5, and 7 selected for mapping.
Router(config-controller)# channel-group 0 timeslots 1,3-5,7

Router(config-controller)#

%LINEPROTO-5-UPDOWN: Line protocol on Interface Serial4/1:0, changed state to down
%LINEPROTO-5-UPDOWN: Line protocol on Interface Serial4/1:0, changed state to up
Router(config-controller)#

Router(config-controller)#
Step 6 At the prompt, specify the interface, serial, slot, applique, and channel-group to modify.
Router(config-controller)# int serial 4/1:0
Step 7 At the prompt, assign an IP address and subnet mask to the interface with the ip address configuration subcommand as in the following example:
Router(config-if)# ip address 1.1.15.1 255.255.255.0

Router(config-if)#
Step 8 Add any additional configuration subcommands required to enable routing protocols and adjust the interface characteristics.
Step 9 After including all of the configuration subcommands, and to complete the configuration, enter Ctrl-Z (hold down the Control key while you press Z) to exit the configuration mode.
Step 10 Write the new configuration to memory as follows:
Router# write memory
The system will display an OK message when the configuration is stored.
Step 11 Exit the privileged level and return to the user level by entering disable at the prompt as follows:
Router# disable

Router>
Step 12 Proceed to the following section to check the interface configuration with show commands.
After configuring the new interface, use the show commands to display the status of the new interface or all interfaces.
Following are descriptions and examples of the show commands. Descriptions are limited to fields that are relevant for verifying the configuration.
Router> show version


GS Software (GS7), Version 10.0(5187) (for E1, 10.3[1])

Copyright (c) 1986-1994 by cisco Systems, Inc.

Compiled Wed 02-Feb-94 15:52

ROM: System Bootstrap, Version 4.6(1) [fc2], SOFTWARE

Router uptime is 42 minutes
System restarted by reload
System image file is "wmay/gs7-k", booted via tftp from 131.108.13.111

RP (68040) processor with 16384K bytes of memory. X.25 software, Version 2.0, NET2, BFE

and GOSIP compliant. Bridging software.
1 Switch Processor.
1 EIP controller (6 Ethernet).
1 TRIP controller (4 Token Ring).
1 FSIP controller (4 Serial).
1 MIP controller (1 T1). (or 1 E1, and so forth)

6 Ethernet/IEEE 802.3 interfaces.
4 Token Ring/IEEE 802.5 interfaces.
6 Serial network interfaces.
1 FDDI network interface.
128K bytes of non-volatile configuration memory.
4096K bytes of flash memory sized on embedded flash.
Configuration register is 0x100
Router# show controller cbus


Switch Processor 5, hardware version 11.1, microcode version 170.46
  Microcode loaded from system
  512 Kbytes of main memory, 128 Kbytes cache memory 105 1520 byte buffers,
  75 4496 byte buffers Restarts: 0 line down, 0 hung output, 0 controller error
FIP 0, hardware version 2.2, microcode version 170.12
 Microcode loaded from system
  Interface 0 - Fddi0/0, address 0000.0c03.648b (bia 0000.0c03.648b)
  15 buffer RX queue threshold, 37 buffer TX queue limit, buffer size 4496
  ift 0006, rql 13, tq 0000 01A0, tql 37

(text omitted from example)

MIP 2, hardware version 1.0, microcode version 10.0

 Microcode loaded from system

 Interface 16 - T1 2/0, electrical interface is Channelized T1

   10 buffer RX queue threshold, 14 buffer TX queue limit, buffer size 1580 ift 0001, rql

   7, tq 0000 05B0, tql 14

   Transmitter delay is 0 microseconds

Router#
Router# show cont t1

T1 4/1 is up.
  No alarms detected.
  Framing is ESF, Line Code is AMI, Clock Source is line
  Data in current interval (0 seconds elapsed):
     0 Line Code Violations, 0 Path Code Violations 0 Slip Secs, 0 Fr Loss Secs,
     0 Line Err Secs, 0 Degraded Mins 0 Errored Secs, 0 Bursty Err Secs,
     0 Severely Err Secs, 0 Unavail Secs
  Total Data (last 79 15 minute intervals):
     0 Line Code Violations, 0 Path Code Violations, 0 Slip Secs, 0 Fr Loss Secs,
     0 Line Err Secs, 0 Degraded Mins, 0 Errored Secs, 0 Bursty Err Secs,
     0 Severely Err Secs, 0 Unavail Secs
Router#
Router# show cont e1

E1 4/1 is up.
  No alarms detected.
  Framing is E1-crc, Line Code is hdb3
  Data in current interval (0 seconds elapsed):
     0 Line Code Violations, 0 Path Code Violations 0 Slip Secs, 0 Fr Loss Secs,
     0 Line Err Secs, 0 Degraded Mins 0 Errored Secs, 0 Bursty Err Secs,
     0 Severely Err Secs, 0 Unavail Secs
  Total Data (last 79 15 minute intervals):
     0 Line Code Violations, 0 Path Code Violations, 0 Slip Secs, 0 Fr Loss Secs,
     0 Line Err Secs, 0 Degraded Mins, 0 Errored Secs, 0 Bursty Err Secs,
     0 Severely Err Secs, 0 Unavail Secs
Router#
Router# show config


Using 1708 out of 130048 bytes
!
version 10.0 (or 10.3 for E1)

!
hostname Router
!
enable password *****
!
clns routing
!
!
!
controller T1 4/1 (for E1, E1 4/1, and so forth)

framing esf (for E1, crc4, and so forth)

linecode b8zs (for E1, hdb3, and so forth)

channel-group 0 1,3,5,7
channel-group 1 2,4,6,8-10
!
interface Ethernet 1/0
ip address 131.108.43.220 255.255.255.0
no mop enabled
!
interface Ethernet1/1
no ip address
shutdown
!
interface Ethernet1/2
no ip address
shutdown
!
interface Ethernet1/3

   (display text omitted)
Router> show protocols


Global values:
   Internet Protocol routing is enabled
CLNS routing is enabled (address 41.0000.0000.0000.0001.0000.0000.00) Fddi0/0 is down,

line protocol is down
Internet address is 1.1.20.1, subnet mask is 255.255.255.0
CLNS enabled
Ethernet1/0 is up, line protocol is up
Internet address is 131.108.43.220, subnet mask is 255.255.255.0


(display text omitted)
The following procedure describes how to use the show commands to verify that the new MIP interface is configured correctly:
Step 2 Display all of the current CxBus interface processors and their interfaces with the show controllers cbus command. Verify that the new MIP appears in the correct slot.
Step 3 Display the T1 and/or E1 alarm condition with the show controller T1 and/or show controller E1 command.
Step 4 Specify the new interface with the show interfaces serial slot/port:channel-group command and verify that the first line of the display specifies the serial interface with the correct slot, port and channel-group number. Also verify that the interface and line protocol are in the correct state: up or down.
Step 5 Display the protocols configured for the entire system and specific interfaces with the command show protocols. If necessary, return to the configuration mode to add or remove protocol routing on the system or specific interfaces.
Step 6 Display the entire system configuration file with the show configuration command. Verify that the configuration is accurate for the system and each interface.
If the interface is down and you configured it as up, or if the displays indicate that the hardware is not functioning properly, ensure that the network interface is properly connected and terminated. If you still have problems bringing the interface up, contact a customer service representative for assistance.
This completes the configuration procedure for the new MIP interface.
Port adapters provide the ports for the E1 and T1 interfaces. Each port adapter provides one port. Each MIP is shipped from the factory with one or two port adapters installed. You cannot add ports to an MIP by installing an additional port adapter. Port adapters are not field-replaceable units (FRUs); however, you need to remove an existing E1 port adapter in order to access jumper J6.
Before proceeding, refer to the section "Removing CxBus Interface Processors" in this chapter.
| Caution To prevent damaging the MIP and port adapters, remove and install port adapters only when it is necessary. Do not attempt to isolate faults or to troubleshoot MIPs or interfaces by swapping port adapters. The surface-mount circuitry on the port adapters will not tolerate excessive handling. Do not mix T1 and E1 port adapters on the same motherboard. |
You need the following tools to complete this procedure:
Port adapters are installed on each MIP at the factory. Each port adapter is anchored to the MIP with one plastic double-row vertical board-to-board (BTB) connector and four Phillips screws that extend through standoffs, into the mother board. (See Figure 5-21.) The port adapter is also anchored to the carrier faceplate with two jackscrews and two lock washers.
| Caution The surface-mounted components on the port adapters are extremely susceptible to ESD damage. Keep each port adapter in a separate antistatic bag until you are ready to install it. Always wear an ESD-preventive ground strap and handle boards as little as possible. When you must handle the board, limit contact to the board edges only, avoiding contact between the board and clothing. |
To remove an E1 port adapter from the MIP, refer to Figure 5-21 and perform the following steps:
Step 2 Position the MIP so that it is in the same orientation shown in Figure 5-21.
Step 3 Locate the E1 port adapter to be removed and use a 3/16-inch nut driver to loosen the two jackscrews, one on either side of the cable connector. (See Figure 5-21.)
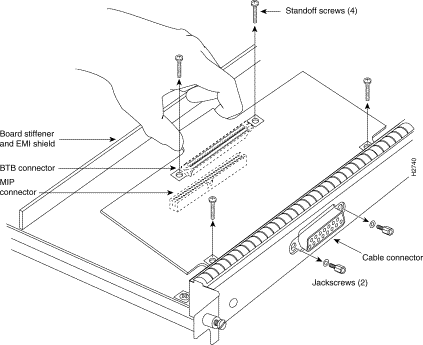
Step 4 Remove the jackscrews and washers and put them aside.
Step 5 Use a number 1 Phillips screwdriver to loosen and remove the four standoff screws. (See Figure 5-21.) The port adapter is now held in place only by the plastic BTB connector.
Step 6 While avoiding contact with any traces or components on the board, insert your thumb and forefinger under the extension behind the BTB connector and gently lift the adapter upward to dislodge it from the MIP connector. If the port adapter resists, rock it very slightly from side to side until it pulls free of the MIP connector.
| Caution To prevent damage to the MIP, do not pry the port adapter out with a screwdriver or any other tool. In particular, do not use the board stiffener for leverage. |
Step 7 When the port adapter is completely disconnected from the MIP connector, tilt the back of the port adapter up at about a 70-degree angle from vertical and slowly pull it up and out (using the orientation shown in Figure 5-21) and away from the faceplate. The MIP cable connector will pull out of the cutout in the faceplate.
Step 8 To reconfigure jumpers on the E1 port adapter, refer to the section "Configuring Jumper J6 on the E1 Port Adapter." After you have set the jumpers, proceed to the next section "Replacing a Port Adapter."
| Caution To prevent overheating chassis components, do not reinstall the MIP in the chassis unless all port adapters are in place. The empty port will allow cooling air to escape freely through the cutouts in the faceplate, which could misdirect the airflow inside the chassis and allow components on other boards to overheat. |
If necessary, refer to the previous section to remove an E1 port adapter from the MIP. Refer to Figure 5-22 while you perform the following steps:
Step 2 Handle the port adapter by the board edges only.
Step 3 Position the port adapter so that it is in the orientation shown in Figure 5-22: at about a 70-degree angle from vertical, component-side down, standoffs on the underside, and the external interface cable connector facing the inside of the carrier faceplate.
Step 4 As shown in Figure 5-22, partially insert the cable connector through the back of the cutout in the carrier faceplate. Do not force the cable connector through the cutout until the standoffs and BTB connector is aligned.
Step 5 With the cable connector partially inserted into the faceplate cutout, slowly lower the back (opposite) side of the port adapter. Continue to ease the cable connector through the cutout until the BTB connector and the MIP and port adapter meet and the standoffs on the MIP are aligned with the standoff holes in the port adapter. Shift the port adapter until the cable connector is fully inserted through the cutouts and the standoffs are aligned with the standoff holes. (See Figure 5-22.)
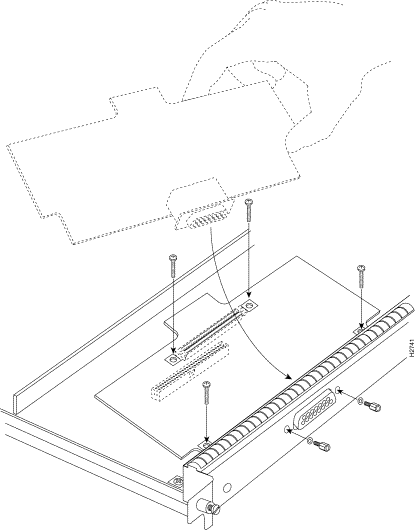
Step 6 Place your fingers over the BTB connector and firmly (but gently) press down until the BTB connector mates with the MIP connector. If the connector resists, do not force it. Shift the port adapter around until the connectors mate properly.
Step 7 Insert the four long Phillips screws through the four port adapter holes and finger-tighten them. These screws extend through the standoffs and the MIP board and thread into the metal carrier.
Step 8 Install a lockwasher on each of the two jackscrews.
Step 9 Insert the two jackscrews through the front of the carrier faceplate and into the holes on either side of the cable connector.
Step 10 When all screws and connectors are aligned properly, use a Phillips screwdriver to tighten the four standoff screws and a 3/16-inch nut driver to tighten the two jackscrews. Do not overtighten any of these screws.
Step 11 Follow the steps in the section "Installing CxBus IPs" to reinstall the MIP in the chassis.
Step 12 Reconnect the network interface cables or other connection equipment to the MIP interface ports.
| Caution To prevent potential EMI and overheating problems, do not replace the MIP in the chassis unless all port adapters are installed. An empty port violates the EMI integrity of the system, and also allows cooling air to escape freely through the cutouts in the carrier faceplate, which could misdirect the airflow inside the chassis and allow components on other boards to overheat. |
When you insert the new MIP, the console terminal will display several lines of status information about OIR as it reinitializes the interfaces. Change the state of the interfaces to up and verify that the configuration matches that of the interfaces you replaced.
Use the configure command or the setup command facility to configure the new interfaces. You do not have to do this immediately, but the interfaces will not be available until you configure them and bring them up.
After you configure the interfaces, use the show controller cbus, show controller T1 and the show controller E1 commands to display the status of the new interface. For brief descriptions of commands, refer to the section "Using Show Commands to Verify the MIP Status" in this chapter
For complete command descriptions and instructions refer to the appropriate software publications, which are available on UniverCD.
This completes the port adapter replacement procedure.
Internal components fall into two categories: those that support online insertion and removal (OIR) and those that require you to shutdown the system power before replacement. Because interface processors support OIR, you can remove and replace them while the system is operating. However, you must shutdown the system power before removing the RP, the SP (or SSP), or any of the internal components (the fan tray, power supply, and arbiter). (See Figure 5-23.)
This section contains replacement procedures for the following components:
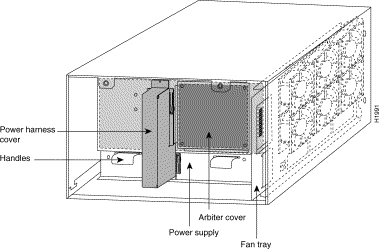
Figure 5-23 shows the locations of each of the internal components inside the service (noninterface processor) end of the chassis. In addition to the internal components, the following assemblies are also available as spares. This document does not include replacement instructions for chassis spares or packing materials. However, specific replacement instructions, called configuration notes, accompany all field-replaceable components.
| Warning Before replacing any internal components, review "Safety Recommendations" in the chapter "Preparing for Installation." |
To replace internal components, all of which are inside the service (noninterface processor) end of the router, you must remove the chassis cover panel and expose the chassis interior. To replace some components, you must also remove the power harness cover and the backplane cover, which exposes the backplane power connection. If the power is not shutdown before removing the chassis cover panel, the high current on the fan tray and fan control board becomes a hazard. When the power harness and backplane covers are removed, the high current present in the wiring and on the backplane also becomes a hazard. Removing the cover panel when the system is operating also compromises the EMI integrity of the system. Therefore, always turn off the system power before removing the cover panel, and remove the cover panel only when it is necessary to replace internal components.
The fan tray comprises six individual fans (the fan array) and a fan control printed circuit board mounted on a metal tray; the entire assembly is called the fan tray. The fans draw cooling air through the inlet vents on the left side of the chassis (when viewing the chassis from the nonintegrated processor end) and force the air out through the exhaust vents on the right side of the chassis. The fan control board distributes power to the fans, controls the fan speed, and monitors and reports fan failures to the system through the backplane. To remove the fan tray, you need only remove a single pan-head screw that anchors the tray to the interior chassis frame; an edge connector on the fan control board also snaps into a socket connector on the backplane cover. The fan tray slides into the right side of the chassis (when viewing the chassis from the noninterface processor end).
The power harness cover shields the wiring harness that delivers DC power from the power supply to the backplane. A tab at the bottom of the cover fits into a slot in the chassis floor; a single Phillips screw secures the top of the harness cover to the backplane cover. Because the harness cover straddles both the power supply and backplane cover, you must remove it to access the power supply or the arbiter.
An external modular power cord delivers source power to the external AC receptacle on the interface processor end of the power supply. The power harness, which is part of the power supply, carries DC voltages from the power supply to a polarized connector on the backplane. The backplane distributes the operating voltages to all of the internal chassis components. The power supply rests on the floor of the chassis, under the card cage and backplane. Two Phillips-head screws secure the power supply to the interior chassis frame. To remove the power supply, you need to disconnect the modular AC power cord, remove the power harness cover, disconnect the power harness from the backplane, and remove the two Phillips screws. The noninterface processor end of the power supply has handles for pulling the supply out of the chassis. Before inserting a power supply, remove the cable retention clip (or secure it with tape); otherwise, it will catch on the chassis floor and prevent the chassis from sliding into the power supply bay.
The arbiter mounts directly to the noninterface processor side of the backplane, behind the backplane cover. A bus connector on the arbiter mates with the backplane, and the corners of the arbiter board butt up against four standoffs. When the backplane cover is in place, four long Phillips screws extend through the cover, arbiter, and standoffs to secure the cover and the arbiter to the backplane. To replace the arbiter, you must remove the fan tray, power harness cover, and backplane cover.
You need the following tools to replace any one of the internal components:
| Warning Before accessing the chassis interior, turn OFF the system power and unplug the power cord. When the power is ON, high current is exposed on the fan tray and backplane. |
Follow these steps to remove and replace the chassis cover panel:
Step 2 Pull the top of the panel out about three inches, then grasp the sides of the panel and pull it upward and away from the chassis.
Step 3 To replace the cover panel, hold the sides of the panel with both hands and tilt the top of the panel back slightly (toward you).
Step 4 Slide the guide tabs into the slots in the bottom edge of the chassis. (See Figure 5-24.)
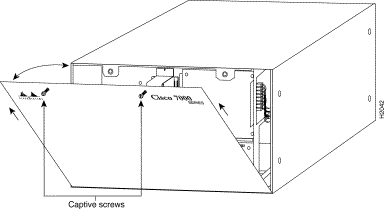
Step 5 Using the guides as a pivot point, push the top half of the panel back toward the chassis opening until the panel is flush with the edges of the chassis.
Step 6 Hold the top front of the panel in place, if necessary, while you tighten the two captive slotted screws with a 3/16-inch flatblade screwdriver.
This completes the chassis cover panel removal and replacement procedure.
The fan tray provides cooling air to the internal system components. If the system detects that a fan has failed, it will display a 2-minute warning, then shutdown the system until all of the fans are operational. You cannot replace individual fans; if a fan fails, you must replace the whole fan tray assembly.
When viewing the chassis from the noninterface processor end, the fan tray is on the far right. (See Figure 5-23.) A cutout in the front of the tray provides a handle for pulling the tray out of the chassis. An M-4 Phillips-head screw anchors a tab on the lower left side of the tray to the interior chassis frame, just below the right power supply ear. When the fan tray is fully inserted in the chassis, an edge connector on the fan control board snaps into the backplane electrical connector. The bottom of the tray is a metal runner that guides the tray along a metal track on the chassis floor. Also, a bracket on the chassis ceiling helps guide the tray into the chassis.
| Warning Before accessing the chassis interior, turn OFF the system power and unplug the power cord. When the power is ON, high current is exposed on the fan tray and backplane. |
Follow these steps to replace the fan tray.
Step 2 Follow Steps 1 and 2 in the section "Removing and Replacing the Chassis Cover Panel."
Step 3 Put on an antistatic strap (your own or the one supplied with the spare fan tray) and connect the equipment end to a power supply handle or any unpainted surface on the chassis body.
Step 4 Locate the fan tray, which is in the far right of the noninterface processor end of the chassis. (See Figure 5-23.) On the lower left side of the fan tray, locate the tab that is anchored to the chassis frame with an M-4 Phillips screw.
Step 5 Use a number 2 Phillips screwdriver to remove the M-4 Phillips screw from the tab on the lower left side of the fan tray.
Step 6 Grasp the cutout handle in the front of the tray and pull the fan tray straight out of the chassis.(See Figure 5-25, top view.) After the fan control board connector frees the backplane socket, the fan tray will slide easily along the track and out of the chassis.
Step 7 Place the removed fan tray in an antistatic bag for storage or return to the factory.
Step 8 Hold the assembly in the position shown in Figure 5-25, lower view. You can hold the handle with either your right or left hand as long as you use both hands to handle the tray. However, when inserting the tray, there is little room between the tray and the right side of the chassis. Keep the tray as straight as possible, or you may have trouble inserting it into the chassis.
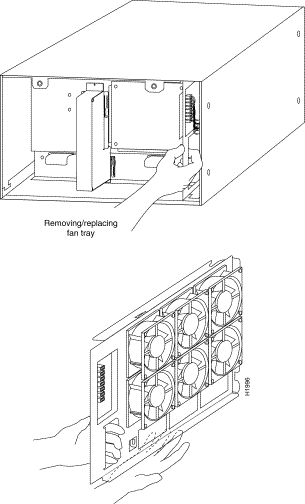
Step 9 Insert the top runner of the fan tray through the notch in the top of the chassis. Continue pushing the tray into the chassis, and ensure that the bottom runner slides into the track on the floor of the chassis. If the tray hangs up, pull it back out a few inches and try pushing it back in again. If the runners seem to be catching on the brackets, push the tray slightly toward the left when inserting it again.
Step 10 Slide the tray back into the chassis, pushing it all the way in until the circuit board snaps into the backplane socket.
Step 11 Replace the M-4 screw in the tab and tighten it with a number 2 Phillips screwdriver.
Step 12 Follow the steps in the section "Removing and Replacing the Chassis Cover Panel" to replace the cover panel.
This completes the fan tray replacement.
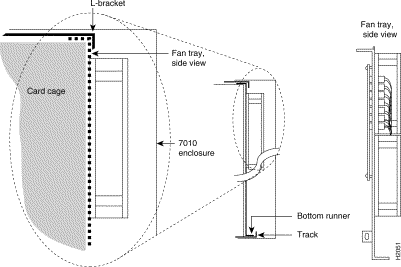
You must remove the power harness cover to access either the power supply or the arbiter. A single M-3 Phillips screw secures the power harness cover to the backplane cover.
| Warning Before accessing the chassis interior, turn OFF the system power and unplug the power cord. When the power is ON, high current is exposed on the fan tray and backplane. |
Follow these steps to remove and replace the power harness cover:
Step 2 Follow Steps 1 and 2 in the section "Removing and Replacing the Chassis Cover Panel" to open the chassis.
Step 3 Use a number 1 Phillips screwdriver to remove the M-3 screw that secures the harness cover to the backplane. (See Figure 5-28.)
Step 4 Holding the cover with one hand, tilt the top of the cover back toward you, then pull it upward slightly so that the tab clears the slot in the chassis floor.
Step 5 When the tab clears the slot, pull the cover straight back off the harness and out of the chassis.
Step 6 To replace the power harness cover, hold the cover with one hand, with the tab on the bottom and the open side facing away from you. Tilt the top of the panel back slightly (toward you).
Step 7 Insert the tab on the bottom of the cover into the slot in the chassis floor. (See Figure 5-27.)
Step 8 While pushing the cover downward slightly to keep the bottom tab in the slot, push the top of the cover back over the harness wires until the sides are flush against the backplane cover. Ensure that all of the harness wires are under the cover.
Step 9 Insert the M-3 screw through the top of the harness cover, and use a number 1 Phillips screwdriver to tighten it.
Step 10 Follow Steps 3 through 6 in the section "Removing and Replacing the Chassis Cover Panel" to replace the chassis cover panel.
This completes the power harness cover removal and replacement procedures.
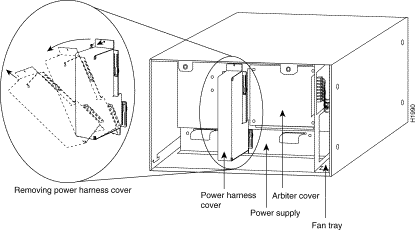
The power supply rests on the floor of the chassis under the card cage and backplane. To remove the power supply, you must remove the chassis access cover at the noninterface processor end of the router, remove the power harness cover, and disconnect the harness from the backplane receptacle. Always pull the harness out by the connector, not by the wires. Before removing the power harness cover, ensure that the system power is turned off; otherwise, the backplane voltages become a hazard.
On the AC receptacle on the interface processor end of the 550W power supply, a cable-retention clip snaps up and around the modular AC power cable connector to prevent the cable from accidentally being pulled out or from falling out. (See Figure 5-28.) When inserting the power supply, this clip can get snagged on the chassis floor. Before inserting the supply, remove the clip or tape it up out of the way.
For the DC-input power cable, for the 600W DC-input power supply, strain relief is provided by a nylon cable tie that fastens the power cable to the terminal block cover. You provide this cable tie.
| Caution To prevent damage, always pull the connector, not the harness wires, to disconnect the power harness. |
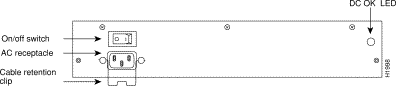
| Warning Before accessing the chassis interior, turn OFF the system power and unplug the power cable. When the power is ON, high current is exposed on the fan tray and backplane. |
Follow these steps to remove the power supply:
Step 2 Follow Steps 1 and 2 in the section "Removing and Replacing the Chassis Cover Panel."
Step 3 Follow Steps 1 through 5 of the section "Removing and Replacing the Power Harness Cover" to remove the power harness cover.
Step 4 Put on an antistatic strap (your own or the one supplied with the spare fan tray) and connect the equipment end to any unpainted surface on the chassis body.
Step 5 Disconnect the power harness plug from the backplane receptacle by pulling the polarized plug out of the receptacle; do not pull on the wires. (Figure 5-29 top view.)
Step 6 Use a number 2 Phillips screwdriver to remove the two M-4 Phillips pan-head screws that secure the power supply ears (one on each side of the power supply) to the chassis frame. (Figure 5-29 middle view.)
Step 7 Using both hands, grasp both of the power supply handles and pull the power supply about halfway out of the bay (Figure 5-29 middle view), then grab the sides of the supply and pull it out of the chassis. (Figure 5-29 lower view.)
This completes the power supply removal procedure.
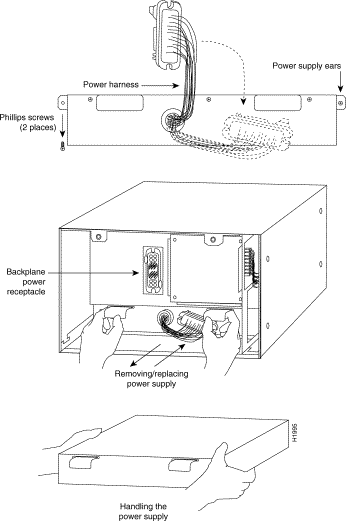
| Warning Before accessing the chassis interior, turn OFF the system power and unplug the power cord. When the power is ON, high current is exposed on the fan tray and backplane. |
Follow these steps to replace the power supply:
Step 2 To replace a power supply, hold the supply as shown in Figure 5-29c and slide it into the bottom of the chassis. Use the handles to push the supply all the way into the chassis until the ears on both sides are flush against the chassis frame. (See Figure 5-29b.)
Step 3 Use a number 2 Phillips screwdriver to replace the two M-4 Phillips pan-head screws to secure the two power supply ears to the chassis frame.
Step 4 Reconnect the power harness plug to the backplane receptacle. The harness plug and backplane receptacle are polarized with notches at the top of both guide tabs (top and bottom) on the plug. Ensure that the plug is fully seated in the receptacle.
Step 5 Follow Steps 6 through 10 in the section "Removing and Replacing the Power Harness Cover" to replace the power harness cover.
Step 6 Follow Steps 3 through 6 in the section "Removing and Replacing the Chassis Cover Panel" to replace the chassis cover panel.
Step 7 On the interface processor side of the AC-input power supply, replace the cable retention clip on the AC-input port by pinching the sides together and letting the ends snap out into holes in the jackscrews. (See Figure 5-28.)
For the DC-input power supply, refer to the section "Connecting Power" in the chapter "Installation" and follow the steps for connecting the DC-input power cable leads.
This completes the power supply replacement procedure.
The arbiter is a printed circuit board mounted to the noninterface processor side of the backplane, behind the backplane cover. (See Figure 5-23.) On the back (backplane side) of the arbiter are four standoffs and a 96-pin connector that plugs directly into the backplane. When the backplane cover is in place, four standoff screws extend through the backplane cover, through each corner of the arbiter, and into the standoffs to keep both the arbiter and cover in place.
You must remove the backplane cover to access the arbiter, and you must remove the power harness cover and the fan tray before you can remove the backplane cover.
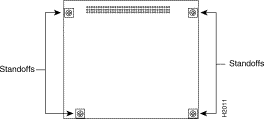
The backplane cover is held in place with the following screws:
Be careful not to disconnect any backplane screws that are near the cover flanges.
Follow these steps to remove the arbiter:
Step 2 Follow Steps 1 and 2 in the section "Removing and Replacing the Chassis Cover Panel" to open the chassis.
Step 3 Follow Steps 1 through 7 in the section "Replacing the Fan Tray" to remove the fan tray.
Step 4 Follow Steps 1 through 5 in the section "Removing and Replacing the Power Harness Cover" to remove the power harness cover.
Step 5 Put on an antistatic strap (your own or the one supplied with the spare fan tray) and connect the equipment end to a power supply handle or any unpainted surface on the chassis body.
Step 6 Disconnect the power harness from the backplane. (See Figure 5-29.)
Step 7 Use a number 1 Phillips screwdriver to remove the sixteen 10-mm M-3 Phillips pan-head screws that secure the backplane cover (2 on each side, 5 along the top, 5 along the bottom, and 2 standoff screws near the center to the left of the backplane power connection). Be careful not to disconnect any backplane screws. (The corners of the backplane extend just beyond the corners of the backplane cover.) Remove only the screws from the aluminum cover. (See Figure 5-31.)
Step 8 Use a number 1 Phillips screwdriver to remove the four longer (20-mm) M-3 standoff screws from the arbiter cover. (See Figure 5-31.) Keep these four longer standoff screws separate so that you can replace all the screws in the proper place.
Step 9 Holding the cover at the edge of each side with your fingertips, pull the cover straight out, away from the backplane (toward you) until it clears the three guide pins at the top and lower right corners. Put the cover aside.
Step 10 Because you already had to remove the four long standoff screws to remove the cover, the arbiter is held in place only by the 96-pin connector that is connected to the backplane. Grasp the edges of the board and pull the board straight out at a 90-degree orientation to the backplane to disconnect the board connector from the backplane socket. If necessary, rock it from side to side very slightly to dislodge the pins from the backplane connector.
Step 11 Place the arbiter in an antistatic bag.
This completes the arbiter removal procedure.
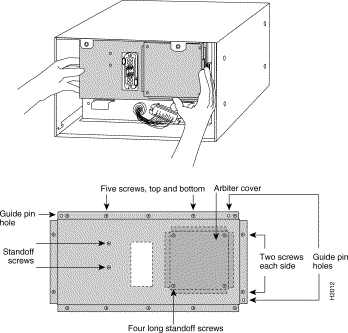
Follow these steps to replace the arbiter:
Step 2 Place your fingers around the top and side edges of the board and push the board straight in toward the backplane until the 96-pin connector is fully seated in the backplane socket.
Step 3 To replace the backplane cover, hold the side edges of the cover with your fingertips and slide the cover over the guide pins. (The guide pins are at the top left, top right, and lower right corners of the cover. See Figure 5-31.)
Step 4 Replace the four longer standoff screws at each corner of the arbiter cover, but do not tighten them until you align the cover and replace the other screws.
Step 5 Replace the sixteen M-3 screws along the cover edges and in the two standoffs. When all screws are in place, tighten them all.
Step 6 Reconnect the power harness plug to the backplane receptacle; the plug and receptacle are polarized with notches on the guide tabs. If you have trouble making the connection, ensure that the notch is at the top on both guide tabs (top and bottom) on the plug.
Step 7 Follow Steps 6 through 10 in the section "Removing and Replacing the Power Harness Cover" to replace the power harness cover.
Step 8 Follow Steps 8 through 11 in the section "Replacing the Fan Tray" to replace the fan tray.
Step 9 Follow Steps 3 through 6 in the section "Removing and Replacing the Chassis Cover Panel" to replace the chassis cover panel.
This completes the arbiter replacement procedure.
![]()
![]()
![]()
![]()
![]()
![]()
![]()
![]()
Posted: Wed Oct 31 18:10:15 PST 2001
All contents are Copyright © 1992--2001 Cisco Systems, Inc. All rights reserved.
Important Notices and Privacy Statement.