|
|

<ET>Line Configuration Mode
The Cisco International Operating System software user interface has several different command modes (see Figure 2-1). Each command mode has a group of related commands. This chapter describes how to access and list the commands available in each command mode.
In addition to actions that can be carried out through commands, the user interface also allows an administrator of an access server to create menus so that users can use access server features without needing to know anything about the underlying access server user interface. This chapter also describes how to create and use menus.
For a complete description of the commands mentioned in this chapter, refer to the "User Interface Commands" chapter in the Access and Communication Servers Command Reference publication. For information about configuring terminal lines refer to the "Configuring Terminal Lines and Modem Support" chapter later in this publication. For information about setting terminal and line parameters for a session, refer to the "Changing Terminal Parameters" chapter of the Cisco Access Connection Guide.
The command interpreter is called the EXEC. The EXEC interprets the commands you type and carries out the corresponding operations. You must log in to the access server before you can enter an EXEC command. For security purposes, the EXEC has two levels of access to commands: user and privileged. The EXEC commands available at the user level are a subset of the EXEC commands available at the privileged level. From the privileged level, you can also access global configuration mode and six specific configuration modes: interface, subinterface, line, router, ipx-router, and route-map configuration.
Almost every system configuration command also has a no form. In general, use the no form to disable a feature or function. Use the command without the keyword no to reenable a disabled feature or enable a feature that is disabled by default. For example, IP routing is enabled by default. Specify the command no ip routing to disable IP routing and specify ip routing to reenable it. The Access and Communication Servers Command Reference publication provides the complete syntax for every command and describes what the no form of a command does.
If your access server does not find a valid system image, or if its configuration file is corrupted at startup, the system might enter read-only memory (ROM) monitor mode. A brief description of the ROM monitor mode is included in this chapter.
The user interface also provides context-sensitive help on command syntax. This chapter describes how to use the help system. It also describes the command editing and command history features that enable you to recall previous command entries and edit command entries.
Entering a question mark (?) at the system prompt allows you to obtain a list of commands available for each command mode.
You can perform the tasks in the following sections to become familiar with the access server's user interface and to create user menus:
This section describes how to access each of the access server's command modes:
Figure 2-1 shows how you move from the login prompt through to specific configuration modes. To access the level you want, enter the command (or a form of the command) shown below the level. For example, to enter Global Configuration mode, enter configure <command>. To quit this mode and go back to Privileged EXEC (denoted by the backward arrow over Global Config), enter exit or ^z. To move forward (denoted by the forward arrow over Global Config) to interface configuration, enter interface <command>. To move backward to Global Config, enter exit or ^z.
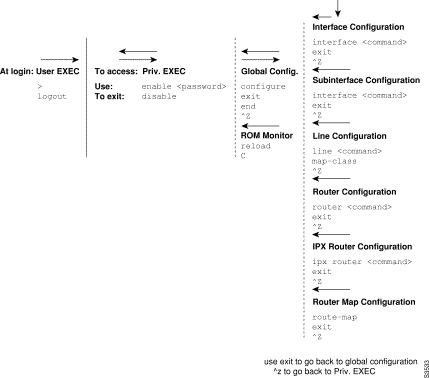
Table 2-1 lists the command modes, how to access each mode, the prompt you will see while you are in mode, and the method to exit a mode. The prompts listed assume the default access server name, router.
After you log in to the access server, you are automatically in user EXEC command mode. The EXEC commands available at the user level are a subset of those available at the privileged level. In general, the user EXEC commands allow you to establish connections, change terminal settings on a temporary basis, perform basic tests, and list system information.
To list the user EXEC commands, complete the following task:
| Task | Command |
|---|---|
| List the user EXEC commands. | ? |
The user-level prompt consists of the access server's host name followed by an angle bracket (>):
Router>
The default host name is Router for access servers, and cs for communication servers, unless the prompt has been changed during initial configuration using the setup command. (Refer to the Access and Communication Servers Getting Started Guide for information on the setup facility.) You can also change the access server name using the hostname global configuration command described in the "Managing the System" chapter, later in this publication, and in the "System Management Commands" chapter in the Access and Communication Servers Command Reference publication.
To list the commands available in user EXEC mode, enter a question mark (?) as shown in the following example:
Router>?Exec commands:<1-99> Session number to resumeconnect Open a terminal connection disconnect Disconnect an existing telnet session enable Turn on privileged commands exit Exit from the EXEC help Description of the interactive help systemlat Open a lat connectionlock Lock the terminal login Log in as a particular user logout Exit from the EXEC menu Start a menu-based user interface mbranch Trace multicast route for branch of tree mrbranch Trace reverse multicast route to branch of tree mtrace Trace multicast route to group name-connection Name an existing telnet connectionpad Open a X.29 PAD connectionping Send echo messages resume Resume an active telnet connection show Show running system information systat Display information about terminal lines telnet Open a telnet connection terminal Set terminal line parameterstn3270 Open a tn3270 connectiontrace Trace route to destinationwhere List active telnet connectionsx3 Set X.3 parameters on PADxremote Enter XRemote mode
The list of commands might vary slightly from this example, depending upon how your access server has been configured.
Because many of the privileged commands set operating parameters, privileged access should be password-protected to prevent unauthorized use. The privileged command set includes those commands contained in user EXEC mode, as well as the configure command through which you can access the remaining command modes. Privileged EXEC mode also includes high-level testing commands, such as debug. For details on the debug command, see the Debug Command Reference publication.
To access and list the privileged EXEC commands, complete the following tasks:
| Task | Command |
|---|---|
| Step 1 Enter the privileged EXEC mode. | enable [password] |
| Step 2 List privileged EXEC commands. | ? |
If the system administrator has set a password, you are prompted to enter it before being allowed access to privileged EXEC mode. The password is not displayed on the screen and is case sensitive. The system administrator uses the enable password global configuration command to set the password that restricts access to privileged mode. This command is described in the "System Management Commands" chapter in the Access and Communication Servers Command Reference publication.
The privileged-level prompt consists of the access server's host name followed by the pound sign (#). (If the access server was named with the hostname command, that name would appear as the prompt instead of "router.")
router#
The following example shows how to access privileged EXEC mode and lists privileged EXEC commands:
Router>enablePassword:Router#?Exec commands: <1-99> Session number to resume bfe For manual emergency modes setting clear Reset functions clock Manage the system clock configure Enter configuration mode connect Open a terminal connection copy Copy a config file to or from a tftp server debug Debugging functions disable Turn off privileged commands disconnect Disconnect an existing telnet session enable Turn on privileged commands exit Exit from the EXEC help Description of the interactive help system lat Open a lat connection llc2 Execute llc2 tests lock Lock the terminal login Log in as a particular user logout Exit from the EXEC menu Start a menu-based user interface name-connection Name an existing telnet connection pad Open a X.29 PAD connection ping Send echo messages reload Halt and perform a cold restart resume Resume an active telnet connection send Send a message to other tty lines setup Run the SETUP command facility show Show running system information systat Display information about terminal lines telnet Open a telnet connection terminal Set terminal line parameters test Test subsystems, memory, and interfaces tn3270 Open a tn3270 connection trace Trace route to destination undebug Disable debugging functions (see also 'debug') where List active telnet connections which-route Do route table lookup and display results x3 Set X.3 parameters on PAD xremote Enter XRemote mode
The list of commands might vary slightly from this example, depending upon how your access server has been configured.
From the privileged level, you can access global configuration mode. For instructions, see "Global Configuration Mode," which follows this section.
To return from privileged EXEC mode to user EXEC mode, perform the following task:
| Task | Command |
|---|---|
| Move from privileged EXEC mode to user EXEC mode. | disable |
Global configuration commands apply to features that affect the system as a whole. Use the configure privileged EXEC command to enter global configuration mode. When you enter this command, the EXEC prompts you for the source of the configuration commands:
Configuring from terminal, memory, or network [terminal]?
You can then specify either the terminal, nonvolatile memory (NVRAM), or a file stored on a network server as the source of configuration commands (see the "System Image and Configuration File Load Commands" chapter in the Access and Communication Servers Command Reference publication). The default is to enter commands from the terminal console. Pressing the Return key begins this configuration method.
To access and list the global configuration commands, complete the following tasks:
| Task | Command |
|---|---|
| Step 1 At the terminal, from the privileged EXEC mode, enter global configuration mode. | configure {terminal | memory | network}1 <CR> |
| Step 2 List the global configuration commands. | ? |
The following example shows how to access global configuration mode and lists global configuration commands:
Router#configureConfiguring from terminal, memory, or network [terminal]?<CR>Enter configuration commands, one per line. End with CNTL/Z.Router(config)#?Configure commands: access-list Add an access list entry arp Set a static ARP entry async-bootp Modify system bootp parameters autonomous-system Specify local AS number to which we belong banner Define a login banner boot Modify system boot parameters buffers Adjust system buffer pool parameters busy-message Display message when connection to host fails chat-script Define a modem chat script clock Configure time-of-day clock default-value Default character-bits values dialer-list Create a dialer list entry dnsix-dmdp Provide DMDP service for DNSIX dnsix-nat Provide DNSIX service for audit trails enable Modify enable password parameters end Exit from configure mode exit Exit from configure mode frame-relay Global frame relay configuration commands help Description of the interactive help system hostname Set system's network name interface Select an interface to configure ip Global IP configuration subcommands ipx Novell/IPX global configuration commands keymap Define a new keymap lat DEC Local Area Transport (LAT) transmission protocol line Configure a terminal line logging Modify message logging facilities login-string Define a host-specific login string menu Define a user-interface menu mop The DEC MOP Server no Negate a command or set its defaults ntp Configure NTP priority-list Build a priority list queue-list Build a custom queue list route-map Create route-map or enter route-map command mode router Enable a routing process scheduler-interval Maximum interval before running lowest priority process service Modify use of network based services smt-queue-threshold Set the max number of unprocessed SMT frames snmp-server Modify SNMP parameters state-machine Define a TCP dispatch state machine tacacs-server Modify TACACS query parameters tftp-server Provide TFTP service for netload requests timezone Configure time zone tn3270 tn3270 configuration command translate Translate global configuration commands ttycap Define a new termcap username Establish User Name Authentication x25 X.25 Level 3 x29 X29 commands xns XNS global configuration commands xremote Configure XRemote
The list of commands might vary slightly from this example, depending upon how your access server has been configured.
To exit global configuration command mode and return to privileged EXEC mode, use one of the following commands:
| Task | Command |
|---|---|
| Exit global configuration mode. | exit end Ctrl-Z |
From global configuration mode you can access seven configuration sublevels: interface, subinterface, line, router, ipx-router, route-map, and ROM monitor configuration commands. These command modes are described in the following sections.
Many features are enabled on a per-interface basis. Interface configuration commands modify the operation of an interface such as an Ethernet or serial port. Interface configuration commands always follow an interface command, which defines the interface type.
For details on interface configuration commands that affect general interface parameters, such as bandwidth, clock rate, and so on, see the "Configuring Interfaces" chapter. For protocol-specific commands, see the appropriate chapter in this guide.
To access and list the interface configuration commands, complete the following tasks:
| Task | Command |
|---|---|
| Step 1 From global configuration mode, enter interface configuration mode. | interface interface-type interface-number1 |
| Step 2 List the interface configuration commands. | ? |
In the following example, serial interface 0 is about to be configured. The new prompt router(config-if)# indicates interface configuration mode. In this example, the user asks for help by requesting a list of commands.
Router(config)#interface serial 0Router(config-if)#?Interface configuration commands: arp Set arp type (arpa, probe, snap) or timeout async Async interface parameters backup Modify dial-backup parameters bandwidth Set bandwidth informational parameter clockrate Configure serial interface clock speed custom-queue-list Assign a custom queue list to an interface delay Specify interface throughput delay description Interface specific description dialer Dial-on-demand routing (DDR) commands dialer-group Assign interface to dialer-list down-when-looped Force looped serial interface down encapsulation Set encapsulation type for an interface exit Exit from interface configuration mode frame-relay Set frame relay parameters hdh Set HDH mode help Description of the interactive help system hold-queue Set hold queue depth ip Interface Internet Protocol config commands ipx Novell interface subcommands keepalive Enable keepalive lapb X.25 Level 2 parameters (Link Access Procedure, Balanced) lat LAT commands llc2 LLC2 Interface Subcommands loopback Configure internal loopback on an interface mac-address Manually set interface MAC address mop DEC MOP server commands mtu Set the interface Maximum Transmission Unit (MTU) no Negate a command or set its defaults ntp Configure NTP ppp Point-to-point protocol priority-group Assign a priority group to an interface pulse-time Enables pulsing of DTR during resets sdlc SDLC commands sdllc Configure SDLC to LLC2 translation shutdown Shutdown the selected interface smds Modify SMDS parameters transmit-interface Assign a transmit interface to a receive-only interface transmitter-delay Set dead-time after transmitting a datagram tunnel protocol-over-protocol tunneling tx-queue-limit Configure card level transmit queue limit xns XNS interface subcommands
The list of commands might vary slightly from this example, depending upon how your access server has been configured.
To exit interface configuration mode and return to global configuration mode, enter the exit command. To exit configuration mode and return to privileged EXEC mode, press Ctrl-Z.
You can configure multiple virtual interfaces (called subinterfaces) on a single physical interface. This feature is supported on serial interfaces with Frame Relay encapsulation.
Subinterfaces appear to be distinct physical interfaces to the various protocols. For example, Frame Relay networks provide multiple point-to-point links called permanent virtual circuits (PVCs). PVCs can be grouped under separate subinterfaces that in turn are configured on a single physical interface.
Subinterfaces also allow multiple encapsulations for a protocol on a single interface. For example, an access server can receive an ARPA-framed IPX packet and forward the packet back out the same physical interface as a SNAP-framed IPX packet.
For detailed information on how to configure subinterfaces, see the "Configuring Interfaces" chapter later in this publication.
To access and list the subinterface configuration commands, complete the following tasks:
| Task | Command |
|---|---|
| Step 1 From interface configuration mode, configure a virtual interface. | See the example that follows. For a list of all interface commands that allow subinterface implementation, see the "Configuring Interfaces" chapter. |
| Step 2 List the subinterface configuration commands. | ? |
In the following example, a subinterface is configured for serial line 2, which is configured for Frame Relay encapsulation. The subinterface is called 2.1 to indicate that it is subinterface 1 of serial interface 2. The new prompt router(config-subif)# indicates subinterface configuration mode. The subinterface can be configured to support one or more Frame Relay PVCs. To list the commands available in subinterface configuration mode, enter a question mark (?).
Router(config)#interface serial 2Router(config-if)#encapsulation frame-relayRouter(config-if)#interface serial 2.1Router(config-subif)#?Interface configuration commands: appletalk Appletalk interface subcommands bandwidth Set bandwidth informational parameter bridge-group Transparent bridging interface parameters clns CLNS interface subcommands decnet Interface DECnet config commands delay Specify interface throughput delay description Interface specific description exit Exit from interface configuration mode frame-relay Set frame relay parameters ip Interface Internet Protocol config commands ipx Novell interface subcommands no Negate a command or set its defaults ntp Configure NTP shutdown Shutdown the selected interface
The list of commands might vary slightly from this example depending upon how your access server has been configured.
To exit subinterface configuration mode and return to global configuration mode, enter the exit command. To exit configuration mode and return to privileged EXEC mode, press Ctrl-Z.
Line Configuration Mode Line configuration commands modify the operation of a serial terminal line. Line configuration commands always follow a line command, which defines a line number. These commands are generally used to establish connections and change terminal parameter settings on a line-by-line basis to support dial-on-demand routing (DDR) (see the "Dial-on-Demand Routing Commands" chapter in the Access and Communication Servers Command Reference publication).
To access and list the auxiliary port, console port, virtual terminal, and tty line configuration commands, complete the following tasks:
| Task | Command |
|---|---|
| Step 1 From global configuration mode, configure an auxiliary, console, virtual terminal or tty line. | line [aux | console | tty | vty] line-number [ending-line-number]1 |
| Step 2 List the line configuration commands. | ? |
The following example shows how to enter line configuration mode for asynchronous line 7 and list the line configuration commands:
Router(config)#line tty 7Router(config-line)#?Line configuration commands: absolute-timeout Set absolute timeout for line disconnection access-class Filter connections based on an IP access list activation-character Define the activation character arap AppleTalk Remote Access Protocol autobaud Set line to autobaud autocommand Automatically execute an EXEC command autohangup Automatically hangup when last connection closes autoselect Set line to autoselect data-character-bits Size of characters being handled databits Set number of data bits per character disconnect-character Define the disconnect character dispatch-character Define the dispatch character dispatch-machine Reference a TCP dispatch state machine dispatch-timeout Set the dispatch timer editing Enable command line editing escape-character Change the current line's escape character exec Start an EXEC process exec-banner Enable the display of the EXEC banner exec-character-bits Size of characters to the command exec exec-timeout Set the EXEC timeout exit Exit from line configuration mode flowcontrol Set the flow control full-help Provide help to unprivileged user help Description of the interactive help system history Set the size of the command history buffer hold-character Define the hold character insecure Mark line as 'insecure' for LAT keymap-type Specify a keymap entry to use lat DEC Local Area Transport (LAT) protocol-specific configuration length Set number of lines on a screen location Enter terminal location description lockable Allow users to lock a line logging Modify message logging facilities login Enable password checking logout-warning Set warning countdown for absolute timeout of line modem Configure the Modem Control Lines monitor Copy debug output to the current terminal line no Negate a command or set its defaults notify Inform users of output from concurrent sessions padding Set padding for a specified output character parity Set terminal parity password Set a password private Configuration options that user can set will remain in effect between terminal sessions refuse-message Define a refuse banner rotary Add line to a rotary group rxspeed Set the receive speed script Specify event-related chat scripts to run on the line session-limit Set maximum number of sessions session-timeout Set interval for closing connection when there is no input traffic special-character-bits Size of the escape (and other special) characters speed Set the transmit and receive speeds start-character Define the start character stop-character Define the stop character stopbits Set async line stop bits telnet Telnet protocol-specific configuration telnet-transparent Send a CR as a CR followed by a NULL instead of a CR followed by a LF terminal-type Set the terminal type transport Define transport protocols for line txspeed Set the transmit speeds vacant-message Define a vacant banner width Set width of the display terminal
The list of commands might vary from this example, depending upon how your access server has been configured.
To exit line configuration mode and return to global configuration mode, use the exit command. To exit configuration mode and return to privileged EXEC mode, press Ctrl-Z.
Router configuration commands configure a routing protocol and always follow a router command. To access and list the router configuration commands, complete the following tasks:
| Task | Command |
|---|---|
| Step 1 From global configuration mode, enter router configuration mode. | router [keyword]1 See the list in the example for keywords. |
| Step 2 List the router configuration commands. | ? |
To list the available router configuration keywords, enter the router command followed by a space and a question mark (?) at the global configuration prompt:
Router(config)#router ?bgp Border Gateway Protocol (BGP) egp Exterior Gateway Protocol (EGP) igrp Interior Gateway Routing Protocol (IGRP) eigrp Enhanced Interior Gateway Routing Protocol (EIGRP) isis ISO IS-IS iso-igrp IGRP for OSI networks ospf Open Shortest Path First (OSPF) rip Routing Information Protocol (RIP) static Static CLNS Routing
In the following example, the access server is configured to support the Routing Information Protocol (RIP). The new prompt is router(config-router)#. Enter a question mark (?) to list router configuration commands.
Router(config)#router ripRouter(config-router)#?Router configuration commands: default-metric Set metric of redistributed routes distance Define an administrative distance distribute-list Filter networks in routing updates exit Exit from routing protocol configuration mode help Description of the interactive help system neighbor Specify a neighbor router network Enable routing on an IP network no Negate or set default values of a command offset-list Add or subtract offset from IGRP or RIP metrics passive-interface Suppress routing updates on an interface redistribute Redistribute information from another routing protocol timers Adjust routing timers validate-update-source Perform sanity checks against source address of routing updates
The list of commands might vary slightly from this example, depending upon how your access server has been configured.
To exit router configuration mode and return to global configuration mode, enter the exit command. To exit configuration mode and return to privileged EXEC mode, press Ctrl-Z.
Internet Packet Exchange (IPX) is a Novell network-layer protocol. To access and list the IPX routing configuration commands, complete the following tasks:
| Task | Command |
|---|---|
| Step 1 From global configuration mode, enter ipx-router configuration mode. | ipx router [keyword]1 |
| Step 2 List the ipx-router configuration commands. | ? |
In the following example, IPX RIP routing is configured. The new prompt is Router(config-ipx-router):
Router(config)#ipx router ripRouter(config-ipx-router)#?
To exit IPX-router configuration mode and return to global configuration mode, enter the exit command. To exit configuration mode and return to privileged EXEC mode, press Ctrl-Z.
Use the route-map configuration mode to configure routing table and source and destination information. To access and list the route-map configuration commands, complete the following tasks:
| Task | Command |
|---|---|
| Step 1 From global configuration mode, enter route-map configuration mode. | route-map map-tag [[permit | deny] | [sequence-number]]1 |
| Step 2 List the route-map configuration commands. | ? |
In the following example, a route map named arizona1 is configured. The new prompt isRouter(config-route-map). Enter a question mark (?) to list route-map configuration commands.
Router(config)#route-map arizona1Router(config-route-map)#?Route Map configuration commands: exit Exit from route-map configuration mode help Description of the interactive help system match Match values from routing table no Negate or set default values of a command set Set values in destination routing protocol
To exit route-map configuration mode and return to global configuration mode, enter the exit command. To exit configuration mode and return to privileged EXEC mode, press Ctrl-Z.
If your access server does not find a valid system image, or if its configuration file is corrupted at startup, the system might enter read-only memory (ROM) monitor mode. From ROM monitor mode, you can boot the router or perform diagnostic tests.
On the Cisco 2500 Series access server, you can also enter ROM monitor mode by entering the reload EXEC command and then pressing the Break key during the first 60 seconds of startup. To save changes to the configuration file before reloading, use the copy running-config startup-config command before issuing the reload command.
To access and list the ROM monitor configuration commands, complete the following tasks:
| Task | Command |
|---|---|
| Step 1 Enter ROM monitor mode from privileged EXEC mode. | reload1 Press Break during the first 60 seconds while the system is booting. |
| Step 2 List the ROM monitor commands. | ? |
The ROM monitor prompt is an angle bracket (>). The following example shows how to list the ROM monitor commands.
> ?
$ state      Toggle cache state (? for help)
B [filename] [TFTP Server IP address | TFTP Server Name]
             Load and execute system image from ROM or from TFTP server
C [address]  Continue execution [optional address]
D /S M L V   Deposit value V of size S into location L with modifier M
E /S M L     Examine location L with size S with modifier M
G [address]  Begin execution
H            Help for commands
I            Initialize
K            Stack trace
L [filename] [TFTP Server IP address | TFTP Server Name]
             Load system image from ROM or from TFTP server, but do not
             begin execution
O            Show configuration register option settings
P            Set the break point
S            Single step next instruction
T function   Test device (? for help)
Deposit and Examine sizes may be B (byte), L (long) or S (short).
Modifiers may be R (register) or S (byte swap).
Register names are: D0-D7, A0-A6, SS, US, SR, and PC
To return to user EXEC mode, enter c to continue. To boot the system image file, use the b command (described in the "System Image and Configuration File Load Commands" chapter in the Access and Communication Servers Command Reference publication). For details on other ROM monitor commands, refer to the appropriate hardware installation guide.
The previous sections described the first level of help available with the user interface. Entering a question mark (?) at the system prompt displays a list of commands available for each command mode. You can also get a list of any command's associated keywords and arguments with the context-sensitive help feature.
To get help specific to a command mode, a command, a keyword, or arguments, perform one of the following tasks:
When using context-sensitive help, the space (or lack of a space) before the question mark (?) is significant. To obtain a list of commands that begin with a particular character sequence, enter those characters followed immediately by the question mark (?). Do not include a space. This form of help is called word help, because it completes a word for you.
To list keywords or arguments, enter a question mark (?) in place of a keyword or argument. Include a space before the question mark (?). This form of help is called command syntax help, because it reminds you which keywords or arguments are applicable based on the command, keywords, and arguments you already have entered.
You can abbreviate commands and keywords to the number of characters that allow a unique abbreviation. For example, you can abbreviate the show command to sh.
Enter the help command (which is available in any command mode) for a brief description of the help system:
Router> helpHelp may be requested at any point in a command by enteringa question mark '?'. If nothing matches, the help list willbe empty and you must back up until entering a '?' shows theavailable options.Two styles of help are provided:1. Full help is available when you are ready to enter acommand argument (e.g. 'show ?') and describes each possibleargument.2. Partial help is provided when an abbreviated argument is enteredand you want to know what arguments match the input(e.g. 'show pr?'.)
As described in the help command output, you can enter a partial command name and a question mark (?) to obtain a list of commands beginning with a particular character set. See the section "Complete a Partial Command Name" later in this chapter for more details.
The following example illustrates how the context-sensitive help feature enables you to create an access list from configuration mode. First enter the letters co at the system prompt followed by a question mark (?). Do not leave a space between the last letter and the (?). The system provides the commands that begin with co.
Router# co?
configure  connect  copy
Enter the configure command followed by a space and a question mark (?) to list the command's keywords and a brief explanation.
Router# configure ?
  memory    Configure from NV memory
  network   Configure from a TFTP network host
  terminal  Configure from the terminal
  <cr>
Enter the terminal keyword to enter configuration mode from the terminal:
Router# configure terminal
Enter configuration commands, one per line. End with CNTL/Z.
router(config)#
Enter the access-list command followed by a space and a question mark (?) to list the command's keywords:
Router(config)# access-list ?
  <1-99>       IP standard access list
  <100-199>    IP extended access list
  <1000-1099>  IPX SAP access list
  <1100-1199>  Extended 48-bit MAC address access list
  <200-299>    Protocol type-code access list
  <700-799>    48-bit MAC address access list
  <800-899>    IPX standard access list
  <900-999>    IPX extended access list
Enter the access list number 99 and then enter another question mark (?) to see the arguments that apply to the keyword and brief explanations:
Router(config)# access-list 99 ?
  deny    Specify packets to reject
  permit  Specify packets to forward
Enter the deny keyword followed by a question mark (?) to list additional options:
Router(config)# access-list 99 deny ?
  A.B.C.D  Address to match
Enter the IP address followed by a question mark (?) to list additional options:
Router(config)# access-list 99 deny 172.16.134.0 ?
  A.B.C.D  Mask of bits to ignore
  <cr>
The <cr> symbol appears in the list, indicating that one of your options is to press Return to execute the command. The other option is to add a wildcard mask. Enter the wildcard mask followed by a question mark (?) to list further options.
Router(config)# access-list 99 deny 172.16.134.0 0.0.0.255 ?
<cr>
Router(config)# access-list 99 deny 172.16.134.0 0.0.0.255
When you enter a question mark and there are no further options, only the <cr> symbol appears, indicating that there are no more keywords or arguments. Press Return to execute the command. The system adds an entry to access list 99 that denies access to all hosts on subnet 131.108.134.0.
The user interface provides syntax checking in the form of an error location indicator (^). The ^ character appears at the point in the command string where you have entered an incorrect command, keyword, or argument. The error location indicator and interactive help system allow you to easily find and correct syntax errors.
In the following example, suppose you want to set the router clock. First, use context-sensitive help to check the syntax for setting the clock.
Router# clock ?
  set  Set the time and date
Router# clock
The help output shows that the set keyword is required. Next, check the syntax for entering the time:
Router# clock set ?
hh:mm:ss   Current time
Router# clock set
Enter the current time:
Router# clock set 13:32:00
% Incomplete command.
The system indicates that you need to provide additional arguments to complete the command. Press Ctrl-P (see the next section, "Use the Command History Features") to automatically repeat the previous command entry. Then add a space and question mark (?) to reveal the additional arguments:
Router# clock set 13:32:00 ?
  <1-31>     Day of the month
  January    Month of the year
  February
  March
  April
  May
  June
  July
  August
  September
  October
  November
  December
Now you can complete the command entry:
Router#clock set 13:32:00 23 February 93^ % Invalid input detected at '^' marker.
The caret symbol (^) and help response indicate an error at 93. To list the correct syntax, enter the command up to the point where the error occurred and then enter a question mark (?):
Router# clock set 13:32:00 23 February ?
  <1993-2035> Year
Router# clock set 13:32:00 23 February
Enter the year using the correct syntax and press Return to execute the command.
Router# clock set 13:32:00 23 February 1993
With the current software release, the user interface provides a history or record of commands you have entered. This feature is particularly useful for recalling long or complex commands or entries, including access lists. With the command history feature, you can complete the tasks in the following sections:
By default, the system records ten command lines in its history buffer. To set the number of command lines the system will record during the current terminal session, complete the following task in EXEC mode:
| Task | Command |
|---|---|
| Enable the command history feature for the current terminal session. | terminal history size number-of-lines |
The terminal history no size command resets the buffer size to the default of 10 command lines.
To configure the number of command lines the system will record, complete the following task in line configuration mode:
| Task | Command |
|---|---|
| Enable the command history feature and specify the number of lines. | history size number-of-lines |
The no history size command resets the buffer size to the default of 10 command lines.
To recall commands from the history buffer, perform one of the following tasks:
| Task | Key Sequence/Command |
|---|---|
| Recall commands in the history buffer, beginning with the most recent command. Repeat the key sequence to recall successively older commands. | Press Ctrl-P or the up arrow key.1 |
| Return to more recent commands in the history buffer after recalling commands with Ctrl-P or the up arrow key. Repeat the key sequence to recall successively more recent commands. | Press Ctrl-N or the down arrow key. 1 |
| While in EXEC mode, list the commands you have just entered. | show history |
The command history feature is automatically enabled. To disable it during the current terminal session, complete the following task in EXEC mode:
| Task | Command |
|---|---|
| Disable the command history feature for the current terminal session. | terminal no history |
To configure a specific line so that the command history feature is disabled, complete the following task in line configuration mode:
| Task | Command |
|---|---|
| Configure the line so that the command history feature is disabled. | no history
|
The current software release includes an enhanced editing mode that provides a set of editing key functions similar to those of the Emacs editor.
You can enter commands in uppercase, lowercase, or a mix of both. Only passwords are case sensitive. You can abbreviate commands and keywords to the number of characters that allow a unique abbreviation. For example, you can abbreviate the show command to sh. After entering the command line at the system prompt, press the Return key to execute the command.
The following subsections are included in this section:
Although enhanced editing mode is automatically enabled with the current software release, you can disable it and revert to the editing mode of previous software releases. See the section "Disable Enhanced Editing Mode" later in this chapter.
To reenable the enhanced editing mode for the current terminal session, complete the following task in EXEC mode:
| Task | Command |
|---|---|
| Enable the enhanced editing features for the current terminal session. | terminal editing |
To reconfigure a specific line to have enhanced editing mode, complete the following task in line configuration mode:
| Task | Command |
|---|---|
| Enable the enhanced editing features. | editing |
Perform the following tasks to move the cursor around on the command line for corrections or changes:
| Task | Keystrokes |
| Move the cursor back one character. | Press Ctrl-B or press the left arrow key.1 |
| Move the cursor forward one character. | Press Ctrl-F or press the right arrow key.1 |
| Move the cursor to the beginning of the command line. | Press Ctrl-A. |
| Move the cursor to the end of the command line. | Press Ctrl-E. |
| Task | Keystrokes |
| Move the cursor back one word. | Press Esc-B. |
| Move the cursor forward one word. | Press Esc-F. |
If you cannot remember a complete command name, you can use the Tab key to allow the system to complete a partial entry. To do so, perform the following task:
| Task | Keystrokes |
|---|---|
| Recall a complete command name. | Enter the first few letters and press the Tab key. |
If your keyboard does not have a Tab key, press Ctrl-I instead.
In the following example, when you enter the letters conf and press the Tab key, the system provides the complete command:
Router#conf<Tab>Router#configure
If you enter a set of characters that could indicate more than one command, the system beeps to indicate an error. Enter a question mark (?) to obtain a list of commands that begin with that set of characters. Do not leave a space between the last letter and the question mark (?).
For example, there are three commands in privileged mode that start with "co." To see what they are, enter co? at the privileged EXEC prompt:
Router# co?
configure  connect  copy
Router# co
The system provides a buffer that contains the last ten items you deleted. You can recall these items and paste them in the command line by performing the following tasks:
| Task | Keystrokes |
|---|---|
| Step 1 Recall the most recent entry in the buffer. | Press Ctrl-Y. |
| Step 2 Recall the next buffer entry. | Press Esc-Y. |
The buffer contains only the last ten items you have deleted or cut. If you press Esc-Y more than ten times, you will cycle back to the first buffer entry.
The editing command set provides a wraparound feature for commands that extend beyond a single line on the screen. When the cursor reaches the right margin, the command line shifts ten spaces to the left. You cannot see the first ten characters of the line, but you can scroll back and check the syntax at the beginning of the command. To scroll back, perform the following task:
| Task | Keystrokes |
|---|---|
| Return to the beginning of a command line to verify that you have entered a lengthy command correctly. | Press Ctrl-B or the left arrow key repeatedly until you scroll back to the beginning of the command entry, or press Ctrl-A to return directly to the beginning of the line.1 |
In the following example, the access-list command entry extends beyond one line. When the cursor first reaches the end of the line, the line is shifted ten spaces to the left and redisplayed. The dollar sign ($) indicates that the line has been scrolled to the left. Each time the cursor reaches the end of the line, the line is again shifted ten spaces to the left.
Router(config)#access-list 101 permit tcp 172.16.2.5 255.255.255.0 131.108.1Router(config)#$ 101 permit tcp 172.16.2.5 255.255.255.0 172.255.1.20 255.25Router(config)#$t tcp 172.16.2.5 255.255.255.0 172.132.1.20 255.255.255.0 eqRouter(config)#$108.2.5 255.255.255.0 131.108.1.20 255.255.255.0 eq 45
When you have completed the entry, press Ctrl-A to check the complete syntax before pressing the Return key to execute the command. The dollar sign ($) appears at the end of the line to indicate that the line has been scrolled to the right:
router(config)# access-list 101 permit tcp 172.16.2.5 255.255.255.0 131.108.1$
The access server assumes you have a terminal screen that is 80 columns wide. If you have a different width, use the terminal width command to tell the router the correct width of your terminal.
Use line wrapping with the command history feature to recall and modify previous complex command entries. See the section "Recall Commands" earlier in this chapter for information about recalling previous command entries.
Perform any of the following tasks to delete command entries if you make a mistake or change your mind:
| Task | Keystrokes |
|---|---|
| Erase the character to the left of the cursor. | Press the Delete or Backspace key. |
| Delete the character at the cursor. | Press Ctrl-D. |
| Delete all characters from the cursor to the end of the command line. | Press Ctrl-K. |
| Delete all characters from the cursor to the beginning of the command line. | Press Ctrl-U or Ctrl-X. |
| Delete the word to the left of the cursor. | Press Ctrl-W. |
| Delete from the cursor to the end of the word. | Press Esc-D. |
When you use the help facility to list the commands available in a particular mode, the list is often longer than the terminal screen can display. In such cases, a ---More--- prompt is displayed at the bottom of the screen. To view the next line or screen, complete either of the following tasks:
| Task | Keystrokes |
|---|---|
| Scroll down one line. | Press the Return key. |
| Scroll down one screen. | Press the Space bar. |
---More--- prompt is used for any output that has more lines than can be displayed on the terminal screen, including show command output. You can use the keystrokes listed in the previous table whenever you see the ---More--- prompt.
If you are entering a command and the system suddenly sends a message to your screen, you can easily recall your current command line entry. To do so, perform the following task:
| Task | Keystrokes |
|---|---|
| Redisplay the current command line. | Press Ctrl-L or Ctrl-R. |
If you have mistyped a command entry, you can transpose the mistyped characters by performing the following task:
| Task | Keystrokes |
|---|---|
| Transpose the character to the left of the cursor with the character located at the cursor. | Press Ctrl-T. |
You can capitalize or lowercase words or capitalize a set of letters with simple keystroke sequences. To do so, perform any of the following tasks:
| Task | Keystrokes |
|---|---|
| Capitalize the word at the cursor. | Press Esc-C. |
| Change the word at the cursor to lowercase. | Press Esc-L. |
| Capitalize letters from the cursor to the end of the word. | Press Esc-U. |
Sometimes you might want to use a particular keystroke as an executable command, perhaps as a shortcut. Complete the following task to insert a system code for this purpose:
| Task | Keystrokes |
|---|---|
| Insert a code to indicate to the system that the keystroke immediately following should be treated as a command entry, not an editing key. | Press Ctrl-V or Esc-Q. |
To disable enhanced editing mode and revert to the editing mode of software releases before 9.21, perform the following task in EXEC mode:
| Task | Command |
|---|---|
| Disable the enhanced editing features for the local line. | terminal no editing |
You might want to disable enhanced editing if you have prebuilt scripts; for example, scripts that do not interact well when enhanced editing is enabled. You can reenable enhanced editing mode with the terminal editing command.
The editing keys and functions of software releases before 9.21 are listed in Table 2-2.
| Key | Function |
|---|---|
| Delete or Backspace | Erases the character to the left of the cursor. |
| Ctrl-W | Erases a word. |
| Ctrl-U | Erases a line. |
| Ctrl-R | Redisplays a line. |
| Ctrl-Z | Ends configuration mode and returns to the EXEC prompt. |
| Return | Executes single-line commands. |
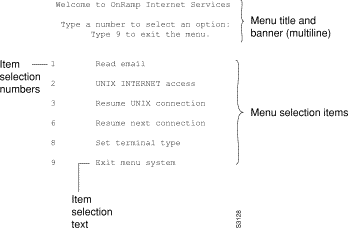
A menu is a displayed list of actions from which a user can select without having to know anything about the underlying command-level details. A menu system is also a good way to control what functions a user can access. Figure 2-2 illustrates the parts that make up a typical menu:
Anyone who can enter configuration mode can create these menus. Keep the following guidelines in mind when you create menus:
To create menus, perform the tasks in the following sections:
You can specify an identifying title for the menu. To specify the menu title, perform the following task in global configuration mode:
| Task | Command |
|---|---|
| Specify the title for the menu. | menu name title delimiter title delimiter |
The following example specifies the title that will be displayed when the OnRamp menu is invoked. Four main elements create the title:
The following example shows the command used to create the title for the example of a typical menu shown at the beginning of this section:
Router(config)#menu OnRamp title /^[[H^[[JWelcome to OnRamp Internet ServicesType a number to select an option;Type 9 to exit the menu./
You can position the title of the menu horizontally by preceding the title text with blank characters. You can also add lines of space above and below the title by pressing Return.
In this example, the title text consists of a one-line title, a space, and a two-line menu instruction banner. Title text must be enclosed within text delimiter characters--in this example, the slash character (/). Title text delimiters are characters that do not ordinarily appear within the text of a title, such as slash (/), double quote ("), or tilde (~). You can use any character that is not likely to be used within the text of the title. Ctrl-C is reserved for special use and should not be used in the text of the title.
This title text example also includes an escape character sequence to clear the screen before displaying the menu. In this case, the string ^[[H^[[J is an escape string used by many VT100-compatible terminals to clear the screen. To enter it, you must type Ctrl-V before each escape character.
Instead of embedding a terminal-specific string in the menu title to clear the screen before displaying menus and submenus, use the clear-screen option of the menu command. This option uses a terminal-independent mechanism based upon termcap entries defined in the access server and the terminal type configured for the user's terminal. This approach allows the same menu to be used on multiple types of terminals instead of having terminal-specific strings embedded within menu titles. If the termcap entry does not contain a clear string, the menu system inserts 24 newlines, causing all existing text to scroll off the top of the terminal screen.
To add the clear-screen option to a menu, perform the following task in global configuration mode:
| Task | Command |
|---|---|
| Specify screen clearing before displaying menus and submenus. | menu name clear-screen |
The following example specifies the clear-screen option for the OnRamp menu:
Router(config)# menu OnRamp clear-screen
The terminal screen will be cleared before each menu or submenu is displayed.
The menu item text the user sees displayed on the screen. Each displayed menu entry consists of the selection number for that line and the text describing the action to be performed. You can specify descriptive text for a maximum of 18 menu items. Because each menu entry represents a single user interface command, you must specify the menu item text one entry at a time. To specify the menu item text, perform the following task in global configuration mode:
| Task | Command |
|---|---|
| Specify the text for the menu item. | menu name text number text |
The following example specifies the text that will be displayed for the three entries in the OnRamp menu:
Router(config)#menu OnRamp text 1 Read emailRouter(config)#menu OnRamp text 2 UNIX Internet AccessRouter(config)#menu OnRamp text 9 Exit menu system
You can provide access to context-sensitive help by creating a "help server" host and use a menu entry to make a connection to that host.
Menu selection numbers need not be contiguous. You can provide consistency across menus by assigning a particular number to a special function--such as Help or Exit--regardless of the number of menu entries in a given menu. For example, menu entry 1 could be reserved for help across all menus, while the last menu entry (for example, 9) could be reserved as the exit.
When more than nine menu items are defined in a menu, the line-mode and single-space options to the menu command are invoked automatically, but may also be configured explicitly for menus of nine or fewer items. For more information on these commands, refer to "Specify Menu Display Configuration Options" later in this chapter.
Each displayed menu entry is backed up by a user interface command that is executed when the user enters the number for one of the menu entries. Each menu entry can have only a single command associated with it. To specify the menu item command, perform the following task in global configuration mode:
| Task | Command |
|---|---|
| Specify the command to be performed when the menu item is selected. | menu name command number command |
The following example specifies the commands that are associated with the three entries in the OnRamp menu:
Router(config)#menu OnRamp command 1 rlogin mailsysRouter(config)#menu OnRamp command 2 rlogin unix.cisco.comRouter(config)#menu OnRamp command 9 menu-exit
The menu-exit command is a special command that is available only from within menus. It provides a way to return to a higher-level menu or to exit the menu system.
When a menu allows connections (their normal use), the menu should contain entries that can be used to resume connections; otherwise, when a user escapes from a connection and returns to the menu, there will be no way to resume the session and it will sit idle until the user logs off.
You can build the resume connection EXEC command into a menu entry so the user can resume a connection, or you can configure the line using the command escape-char none to prevent users from escaping their sessions.
To specify connection resumption as part of the menu item command, perform the following task in global configuration mode:
| Task | Command |
|---|---|
| Specify the command to be performed when the menu item is selected. | menu name command number resume [connection] /connect [connect string] |
Embedding the resume command within the menu command as the action to be performed when the menu entry is selected permits a user to resume the named connection or--if there is no active connection by that name--connect to it using the specified name. As an option, you can also supply the connect string needed to connect initially. When you do not supply this connect string, the command uses the specified connection name.
You can use the resume command in a menu in the following ways:
In the following example, the resume command is embedded in the menu command so that selecting that entry either starts the specified connection session (if one is not already open) or resumes the session (if one is already open):
Router(config)#menu Duluth text 1 Read emailRouter(config)#menu Duluth command 1 resume mailsys /connect rlogin mailsys
In the following example, the resume command is used in a separate menu entry--entry 3--used to resume a specific connection:
Router(config)#menu Duluth text 3 Resume UNIX Internet AccessRouter(config)#menu Duluth command 3 resume unix.cisco.com
You can also use the resume /next command, which resumes the next open connection in the user's list of connections. This allows you to create a single menu entry that steps through all of the user's connections. To specify resume /next connection resumption as part of the menu item command, perform the following task in global configuration mode:
| Task | Command |
|---|---|
| Specify resume /next connection resumption. | menu name command number resume /next |
The following example shows a menu entry--entry 6--created to step through all of the user's connections:
Router(config)#menu Duluth text 6 Resume next connectionRouter(config)#menu Duluth command 6 resume /next
You can create submenus that are opened by selecting a higher-level menu entry. You do this by using the command to invoke a menu as the command in a line specifying a higher-level menu entry. To specify a submenu item command, perform the following task in global configuration mode:
| Task | Command |
|---|---|
| Step 1 Specify the menu item that invokes the submenu. | menu name text number [text] |
| Step 2 Specify the command to be performed when the menu item is selected. | menu name command number command |
| Step 3 Specify the title for the submenu. | menu name title delimiter title delimiter |
| Step 4 Specify the submenu item. | menu name text number [text] |
| Step 5 Specify the commands to be performed when the submenu item is selected. | menu name command number [command] |
The following example specifies the menu item--entry 8--that invokes the submenu in the OnRamp menu:
Router(config)# menu OnRamp text 8 Set terminal type
The following example specifies the command to be performed when the menu item is selected in the OnRamp menu:
Router(config)# menu OnRamp command 8 menu Terminals
The following example specifies the title for the Terminals submenu:
Router(config)#menu Terminals title /Supported Terminal TypesType a number to select an option;Type 9 to return to the previous menu./
The following example specifies the submenu items for the Terminals submenu:
Router(config)#menu Terminals text 1 DEC VT420 or similarRouter(config)#menu Terminals text 2 Heath H-19Router(config)#menu Terminals text 3 IBM 3051 or equivalentRouter(config)#menu Terminals text 4 Macintosh with gterm emulatorRouter(config)#menu Terminals text 9 Return to previous menu
The following example specifies the commands to be performed for the items in the Terminals submenu:
Router(config)#menu Terminals command 1 term terminal-type vt420Router(config)#menu Terminals command 2 term terminal-type h19Router(config)#menu Terminals command 3 term terminal-type ibm3051Router(config)#menu Terminals command 4 term terminal-type gtermRouter(config)#menu Terminals command 9 menu-exit
When you select entry 8 on the main menu, the Terminals submenu appears:
      Supported Terminal Types
  Type a number to select an option;
Type 9 to return to the previous menu.
1     DEC VT420 or similar
2     Heath H-19
3     IBM 3051 or equivalent
4     Macintosh with gterm emulator
9     Return to previous menu
A hidden menu entry is a menu item containing a selection number but no associated text describing the action to be performed. Include this type of menu entry in menus to aid system administrators when helping users. The normal procedure is to specify a menu command, but omit specifying any text for the item. To specify a hidden menu item, perform the following task in global configuration mode:
| Task | Command |
|---|---|
| Specify the command to be performed when the hidden menu entry is selected. | menu name command number command |
The following example shows the command associated with the submenu entry in the OnRamp menu:
Router(config)# menu OnRamp command 7 show whoami
The show whoami command displays information about the current user's terminal line, including hostname, line number, line speed, and location. This command can be included in menus to aid system administrators when helping users. To display line information, perform the following task at the EXEC prompt:
| Task | Command |
|---|---|
| Display line information. | show whoami text |
If text is included as an argument in the command, that text is displayed as part of the additional data about the line. This is useful in identifying exactly which menu or submenu the user is using. Because the show whoami command is hidden inside the menu entry, this information might not be otherwise available. For example, the hidden menu entry
show whoami Terminals submenu of OnRamp Internet Access menu
might display information similar to the following:
show whoami Terminals submenu of OnRamp Internet Access menu
Comm Server "cs101", Line 0 at 0 bps. Location "Second floor, West"
Additional data: Terminals submenu of OnRamp Internet Access menu
This command always displays a ---More--- prompt before returning, to prevent the information from being lost if the menu display clears the screen.
In addition to the clear-screen option to the menu command, described in the section "Specify the Menu Title," there are three other menu command options that define menu behavior:
In a menu of nine or fewer items, you ordinarily select a menu item by just typing the item number. In line mode, you select a menu entry by typing the item number and pressing Return. Line mode allows you to backspace over the selected number and type another before pressing Return to perform the command. This provides you the opportunity to change the selection number before performing the command.
To invoke the line-mode option, perform the following task in global configuration mode:
| Task | Command |
|---|---|
| Specify line-mode operation. | menu name line-mode |
This option is invoked automatically when more than nine menu items are defined, but may also be configured explicitly for menus of nine or fewer items.
In a menu of nine or fewer items, menu items are ordinarily displayed single-spaced rather than double-spaced. In a menu of more than nine items, the single-space option is invoked automatically to fit the menu into a normal 24-line terminal screen.
To invoke the single-space option, perform the following task in global configuration mode:
| Task | Command |
|---|---|
| Specify single-space operation. | menu name single-space |
This option may also be configured explicitly for menus of nine or fewer items.
The status-line option displays a line of status information about the current user at the top of the terminal screen before the menu title is displayed. This status line includes the access server host name, the user's line number, and the current terminal type and keymap type (if any).
To invoke the status-line option, perform the following task in global configuration mode:
| Task | Command |
|---|---|
| Display a status line when using a menu. | menu name status-line |
To invoke the menu, perform the following task at the EXEC prompt:
| Task | Command |
|---|---|
| Invoke the menu by specifying the name of the menu. | menu name |
You can define menus containing privileged EXEC commands, but they will not be usable unless the user has privileged access when they start up the menu.
To ensure that a menu is automatically invoked on a line, define a menu that has no exit paths that will leave the user in an interface they cannot operate, then configure that line with the command autocommand menu menu_name.
Menus can also be invoked on a per-user basis by defining an autocommand for that local username.
The following example invokes the OnRamp menu:
Router> menu OnRampWelcome to OnRamp Internet ServicesType a number to select an option;Type 9 to exit the menu.1 Read email 2 UNIX Internet access 3 Resume UNIX connection 6 Resume next connection 9 Exit menu system
To delete the menu from the configuration, perform the following task in global configuration mode:
| Task | Command |
|---|---|
| Delete the menu by specifying the menu name. | no menu name |
The following example deletes the OnRamp menu from the configuration:
Router(config)# no menu OnRamp
|
|