|
|

This chapter describes tasks that are required to get an Integrated Services Digital Network (ISDN) line and interface up, and describes features involved in configuring ISDN in a circuit-switched internetworking environment.
This chapter does not address routing issues, dialer configuration, and dial backup. For information about those topics, see the "Configuring DDR" chapter.
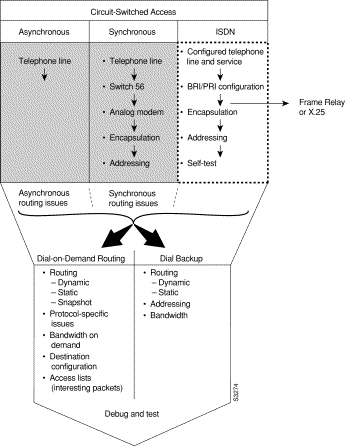
Figure 10-1 represents the general relationships between circuit-switched access methods (asynchronous, synchronous, and ISDN) and DDR and dial backup. It also represents the general steps you use to get the appropriate line up and working; however, this chapter describes only ISDN.
The ISDN specifications describe a planned digital network that will provide a wide and evolving variety of services and use digital transmission and switching technologies to provide worldwide, integrated access. ISDN is an effort to standardize user services, user/network interfaces, and network and internetwork capabilities. Among the services ISDN is planned to support are integrated text, voice, graphics, music, video, and data communications.
ISDN standards define services, common procedures, and a single set of interface rules so that any device can gain access to an ISDN network. ISDN standards describe a three-layer protocol architecture, similar but not identical to the OSI reference model's physical, data link, and network layers.
This chapter describes the tasks for configuring ISDN on the routers that support ISDN interfaces. For a complete description of the commands mentioned in this chapter, refer to the "ISDN Commands" chapter in the Router Products Command Reference publication.
Cisco implements the physical layer protocols for the ISDN Basic Rate Interface (BRI) and the ISDN Primary Rate Interface (PRI) on the following routers:
For detailed technical information about Cisco's implementation, see the description of the Cisco ISDN MIB in the Cisco Management Information Base (MIB) User Quick Reference publication.
The Data or D-channel is used for call setup control and network connection teardown. Call setup involves the data link and network connection. D-channel communication is from the router to the ISDN switch.
The Bearer or B-channels contain user data. The B-channels are treated as 64 kbps serial lines and support HDLC and PPP encapsulation. The interface configuration is propagated to each of the B-channels. Although each channel is treated as a separate line, the B-channels cannot be configured separately.
In North America and Japan, the PRI is a rotary group of 23 B-channels (T1) at the combined rate of 1.544 Mbps. Elsewhere, PRI is a rotary group of 30 B-channels (E1) at a combined rate of 2.048 Mbps. On the MBRI and PRI, it is possible to create a rotary group from a number of BRI or PRI interfaces.
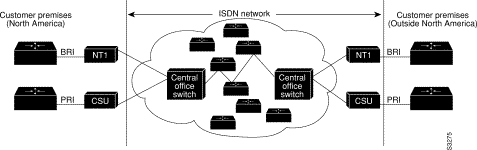
In North America, the boundary between the ISDN network and the BRI on Cisco 2500, Cisco 3000, or Cisco 4000 series routers is represented by customer premises equipment known as network termination type 1 equipment (NT1). In North America, an NT1 is required for each BRI. Outside North America, the NT1 is supplied as part of the telecommunications services.
In North America, the boundary between the ISDN network and the PRI on Cisco 7000 series routers is represented by customer premises equipment known as a channel service unit (CSU). In North America, a CSU is required for each PRI. Outside North America, the CSU is supplied as part of the telecommunications services. Figure 10-2 illustrates the boundary between customer premises and the ISDN network in North America and in other locations.
ISDN data link layer interface (used for call setup) provided by the router conforms to the specification defined by the ITU-T recommendation Q.921. The ISDN network layer interface (used for call control) provided by the router conforms to the specifications for specific switch types defined by the ITU-T recommendation Q.931.
For a list of ISDN switch types that the ISDN interface supports, see the section "Select the ISDN Switch Type" later in this chapter.
Perform the tasks in the following sections to configure ISDN lines and interfaces. You must configure the ISDN interface (BRI, MBRI, or PRI) and the network addressing. Perform the encapsulation task only if the traffic sent over the ISDN interface will cross a Frame Relay or X.25 network. The remaining tasks are optional.
You can also optionally configure snapshot routing for ISDN interfaces. Snapshot routing is a method of learning remote routes dynamically and keeping the routes available for a specified period of time, even though routing updates are not exchanged during that period. See the "Configuring DDR" chapter of this publication for detailed information about snapshot routing.
To place calls on the ISDN interface, you must configure it with dial-on-demand routing (DDR). For configuration information about ISDN using DDR, see the "Configuring DDR" chapter. For command information, refer to the chapter entitled "DDR Commands" in the Router Products Command Reference publication.
To configure bandwidth on demand and dial backup, see the "Configuring DDR" chapter.
Before configuring the ISDN interfaces on your Cisco router, it is necessary to order a correctly configured ISDN line (BRI or PRI) from your telecommunications service provider.
This process varies dramatically from provider to provider on a national and international basis. However, some general guidelines follow:
This section describes how to configure a BRI, whether it is the only BRI in a router or is one of many in an MBRI. Each of the BRIs in an MBRI can be configured separately and is configured in the same way as a BRI.
Perform the tasks in the following sections to configure an ISDN BRI. The switch type selection and BRI specification tasks are required; the remaining are optional.
When configuring a BRI interface, after the system comes up, make sure enough buffers are in the free list of the buffer pool that matches the MTU of your BRI interface. If not, you must reconfigure buffers in order for the BRI interfaces to function properly.
To check the MTU size and the buffers and, if necessary, to configure the buffers and the MTU size, complete the following tasks beginning in EXEC mode:
| Task | Command |
|---|---|
| Check the MTU size. | show interfaces bri number |
| Check the free buffers. | show buffers 1 |
| Configure the buffers. | configure terminal 2
buffers big permanent number |
| Specify the interface and enter interface configuration mode. | interface bri number |
| Set the MTU size. | mtu 15003 |
ISDN supports a variety of service provider switches. Table 10-1 lists, by geographic areas, the ISDN switch types supported by the ISDN interface. If you configure an interface with the interface bri command, you must also select a switch. Perform the following task in global configuration mode:
| Task | Command |
|---|---|
| Select the service provider switch type. | isdn switch-type switch-type |
| Keywords by Area | Switch Type |
|---|---|
| none | No switch defined |
| Australia | |
| basic-ts013 | Australian TS013 switches |
| Europe | |
| basic-1tr6 | German 1TR6 ISDN switches |
| basic-nwnet3 | Norway NET3 switches (phase 1) |
| basic-net3 | NET3 ISDN switches (UK and others) |
| primary-net5 | European ISDN PRI switches |
| vn2 | French VN2 ISDN switches |
| vn3 | French VN3 ISDN switches |
| Japan | |
| ntt | Japanese NTT ISDN switches |
| primary-ntt | Japanese ISDN PRI switches |
| North America | |
| basic-5ess | AT&T basic rate switches |
| basic-dms100 | NT DMS-100 basic rate switches |
| basic-ni1 | National ISDN-1 switches |
| primary-4ess | AT&T 4ESS switch type for the U.S. (ISDN PRI only) |
| primary-5ess | AT&T 5ESS switch type for the U.S. (ISDN PRI only) |
| primary-dms100 | NT DMS-100 switch type for the U.S. (ISDN PRI only) |
| New Zealand | |
| basic-nznet3 | New Zealand Net3 switches |
Table 10-2 lists switch configuration information for Cisco routers with BRIs.
| Switch Type | Configuration |
|---|---|
| 5ESS Custom BRI | For Data Only:
2 B channels for data For Voice and Data: (Use these values only if you have an ISDN telephone connected.) |
| 5ESS National ISDN (NI-1) BRI | Terminal type = A 2 B channels for voice and data 2 directory numbers assigned by service provider 2 SPIDs required; assigned by service provider Set speed for ISDN calls to 56 K outside local exchange Directory number 1 can hunt to directory number 2 |
| DMS-100 BRI | 2 B channels for voice and data 2 directory numbers assigned by service provider 2 SPIDs required; assigned by service provider Functional signaling Dynamic terminal endpoint identifier (TEI) assignment Maximum number of keys = 64 Release key = no, or key number = no Ringing indicator = no EKTS = no PVC = 2 Request delivery of calling line ID on Centrex lines Set speed for ISDN calls to 56 K outside local exchange Directory number 1 can hunt to directory number 2 |
| Primary Rate Lines | Line format = extended superframe format (ESF) Line coding = binary 8-zero substitution (B8ZS) Call type = 23 incoming channels and 23 outgoing channels Speed = 64 K Call-by-call capability 23 B+D Trunk selection sequence = descending from 23 to 1 Set B+D glare to yield Only 1 directory number assigned by service provider Set speed of ISDN calls to 56 K outside local exchange. No SPIDs required |
This section applies to ISDN BRI only. You can determine when Layer 2 ISDN Terminal Endpoint Identifier (TEI) negotiation occurs. The default is for negotiation to occur when the router is powered on. TEI negotiation is useful in Europe and also useful for switches that might deactivate Layer 2 when no calls are active.
To define when TEI negotiation will occur, perform the following task in global configuration mode:
| Task | Command |
|---|---|
| Determine when ISDN TEI negotiation occurs. | isdn tei [first-call | powerup] |
To specify an ISDN Basic Rate Interface (BRI) and enter interface configuration mode, perform the following task in global configuration mode:
| Task | Command |
|---|---|
| Begin BRI configuration. | interface bri number |
This section applies to ISDN BRI only. All ISDN devices subscribe to services provided by an ISDN service provider, usually a telephone company. However, only some service providers use Service Profile Identifiers (SPIDs) to define the services subscribed to by the ISDN device that is accessing the ISDN service provider. The service provider assigns the ISDN device one or more SPIDs when you first subscribe to the service. If you are using a service provider that requires SPIDs, your ISDN device cannot place or receive calls until it sends a valid, assigned SPID to the service provider when accessing the switch to initialize the connection.
Currently, only the DMS-100 and NI-1 switch types require SPIDs. The AT&T 5ESS switch type may support a SPID, but it is recommended that you set up that ISDN service without SPIDs. In addition, SPIDs only have significance at the local access ISDN interface. Remote routers are never sent the SPID.
A SPID is usually a seven-digit telephone number with some optional numbers. However, service providers may use different numbering schemes. For the DMS-100 switch type, two SPIDs are assigned, one for each B-channel. Once your service provider has assigned you SPIDs, you must define these SPIDs on the router so that when access to the switch is attempted, the router has the valid information available.
To define the SPIDs and the local directory number (LDN) on the router, perform the following tasks in interface configuration mode (after specifying interface bri):
| Task | Command |
|---|---|
| Define a SPID and local directory number for the B1-channel. | isdn spid1 spid-number [ldn] |
| Define a SPID and local directory number for the B2-channel. | isdn spid2 spid-number [ldn] |
The LDN is optional but might be necessary if the router is to answer calls made to the second directory number.
See the "Configuring DDR" chapter for information about configuring dial-on-demand routing (DDR). Refer to the "DDR Commands" chapter in the Router Products Command Reference publication for specific DDR commands.
When multiple devices are attached to an ISDN BRI, you can ensure that only a single device answers an incoming call by verifying the number or subaddress in the incoming call against the device's configured number or subaddress or both.
You can specify that the router verify a called-party number or subaddress number in the incoming setup message for ISDN BRI calls, if the number is delivered by the switch. You can do so by configuring the number that is allowed. To configure verification, perform the following task in interface configuration mode:
| Task | Command |
|---|---|
| Specify that the router verify a called-party number or subaddress number in the incoming setup message. | isdn answer1 [called-party-number][:subaddress] |
Verifying the called-party number ensures that only the desired router responds to an incoming call. If you want to allow an additional number for the router, you can configure it, too.
To configure a second number to be allowed, perform the following task in interface configuration mode:
| Task | Command |
|---|---|
| Specify that the router verify a second called-party number or subaddress number in the incoming setup message. | isdn answer2 [called-party-number][:subaddress] |
This feature applies only to routers used in Australia. A router with a basic-ts013 ISDN BRI interface might need to supply the network with a billing number for outgoing calls. The Australian network offers a better pricing on calls in which the number is presented.
To configure the interface to identify the billing number, perform the following task in interface configuration mode:
| Task | Command |
|---|---|
| Specify the calling party number. | isdn calling-number calling-number |
When calls are made at 56 kbps but delivered by the ISDN network at 64 kbps, the incoming data can be corrupted.
However, on ISDN calls, if the receiving side is informed that the call is not ISDN end-to-end, it can set the line speed for the incoming call.
To set the speed for incoming calls recognized as not ISDN end-to-end, complete the following task in interface configuration mode:
| Task | Command |
|---|---|
| Set the speed to be used for incoming calls recognized as not ISDN end-to-end. | isdn not-end-to-end {56 | 64} |
To configure a Basic Rate Interface (BRI) interface to use the ISDN physical connection as a leased-line service, use the isdn leased-line command.
This service is offered in Japan and Germany and there is no call set up or tear down involved. Data is placed on the ISDN interface similar to the way a leased line is connected to a serial port.
To configure the BRI to use the ISDN connection as a leased-line service, complete the following task in interface configuration mode:
| Task | Command |
|---|---|
| Specify the BRI interface number. | isdn leased-line bri number |
When you configure this feature on a router, make sure that an ISDN switch type is also configured.
For example:
!
isdn switch-type basic-net3
isdn leased-line BRI0
!
The type of switch is not important. Pick the switch type you normally use in your country.
ISDN Primary Rate Interface (PRI) is supported on the Cisco 4000, the Cisco 4500, and the Cisco 7000 series routers using T1 or E1 versions of the Multichannel Interface Processor (MIP) card in conjunction with PRI signaling software. Channelized T1 ISDN PRI offers 23 B-channels and 1 D-channel. Channelized E1 ISDN PRI offers 30 B-channels and 1 D-channel.
Channelized T1 and channelized E1 are supported by corresponding controllers. A T1 or E1 controller has one physical network termination. However, it can have many virtual interfaces depending on the configuration.
Perform the tasks in the following sections as appropriate for the T1 controller or the E1 controller:
To configure ISDN PRI on a channelized T1 controller, perform the following tasks beginning in global configuration mode.
| Task | Command |
|---|---|
| Select a service provider switch type that accommodates PRI. (See Table 10-1, earlier in this chapter, for a list of supported switch types.) | isdn switch-type switch-type |
| Specify a T1 controller interface on a Cisco 7000 or Specify a T1 controller interface on a Cisco 4000. | controller t1 slot/port1 or controller t1 number |
| Define the framing characteristics as extended super frame (ESF). | framing esf1 |
| Define the line code as bipolar 8 zero substitution (B8ZS). | linecode b8zs |
| Configure ISDN PRI. | pri-group [timeslots range] |
If you do not specify the time slots, the specified controller is configured for 23 B-channels and 1 D-channel.
To configure ISDN PRI on a channelized E1 controller, perform the following tasks, beginning in global configuration mode.
| Task | Command |
|---|---|
| Select a service provider switch type that accommodates PRI. (See Table 10-1, earlier in this chapter, for a list of supported switch types.) | isdn switch-type switch-type1 |
| Define the controller location in the Cisco 7000 series by slot and port number. or Define the controller location in the Cisco 4000 series by unit number, ranging from 0 through 2. | controller e1 slot/port1 controller e1 number |
| Define the framing characteristics as CRC4. | framing crc41 |
| Define the line code as high-density bipolar 3 (HDB3). | linecode hdb31 |
| Configure ISDN PRI. | pri-group [timeslots range] |
If you do not specify the time slots, the specified controller is configured for 30 B-channels and one D-channel.
Network-Specific Facilities (NSF) are used to request a particular service from the network or to provide an indication of the service being provided. Call-by-call support means that a B channel can be used for any service; its use is not restricted to a certain preconfigured service, such as incoming 800 calls or an outgoing 800 calls. This specific NSF call-by-call service supports outgoing calls configured as voice calls.
This NSF call-by-call support feature is vendor-specific; only routers connected to AT&T Primary-4ESS switches need to configure this feature. This feature is supported on channelized T1.
To enable the router to for NSF call-by-call support and, optionally, to place outgoing voice calls, complete the following steps:
Step 1 Configure the controller for ISDN PRI.
Step 2 Configure the D channel interface to place outgoing calls, using the dialer map command with a dialing-plan keyword. You can enter a dialer map command for each dialing plan to be supported.
Step 3 Define the dialer map class for that dialing plan.
To define the dialer map class for the dialing plan, complete the following tasks beginning in global configuration mode:
| Task | Command |
|---|---|
| Step 1 Specify the dialer map class, using the dialing-plan keyword as the classname. | map-class dialer classname |
| Step 2 (Optional) Enable voice calls. | dialer voice-call |
| Step 3 Configure the specific dialer map class to make outgoing calls. | dialer outgoing classname |
Table 1 lists the NSF dialing plans and supported services offered on AT&T Primary-4ESS switches.
| NSF Dialing Plan | Data | Voice | International |
|---|---|---|---|
| Software Defined Network (SDN)1 | Yes | Yes | GSDN (Global SDN) |
| MEGACOMM | No | Yes | Yes |
| ACCUNET | Yes | Yes | Yes |
This task applies to any Cisco router that has one or more BRI or PRI interfaces. Calling line identification (CLI) (also called caller ID) screening adds a level of security by allowing you to screen incoming calls. You can verify that the calling line ID is from an expected origin. CLI screening requires a local switch that is capable of delivering the CLI to the router.
To configure caller ID screening, perform the following task in interface configuration mode:
| Task | Command |
|---|---|
| Configure caller ID screening. | isdn caller number |
Each of the ISDN B-channels is treated as a serial line and supports HDLC and PPP encapsulation. The default serial encapsulation is HDLC.
However, if traffic sent from this ISDN interface will cross a Frame Relay network or an X.25 network, the appropriate addressing and encapsulation tasks must be completed, as required for Frame Relay or X.25 networks.
See the "Configuring Frame Relay" chapter or "Configuring X.25 and LAPB" chapter for more information about addressing, encapsulation, and other tasks.
The steps in this section support the primary goals of network addressing:
Intermediate steps that use shared argument values tie the host identification and dial string to the interesting packets to be transmitted to that host.
You must configure the switch type before you configure network addressing.
To configure network addressing, complete the following tasks beginning in interface configuration mode:
| Task | Command |
|---|---|
| Step 1 Define the remote recipient's protocol address, host name, and dialing string; optionally, provide the ISDN subaddress; set the dialer speed to 56 or 64 kbps, as needed. | dialer map protocol address name name speed speed dial-string[:isdn-subaddress]1 |
| Step 2 Assign the interface to a dialer group to control access to the interface. | dialer-group dialer-group-number1 |
| Step 3 Associate the dialer group number with an access list number. | dialer-list dialer-group-number list access-list-number1 |
| Step 4 Define an access list, permitting or denying access to specified protocols, sources, or destinations. | access-list access-list-number {deny | permit} protocol source address source-mask destination destination-mask2 |
Packets that are permitted by the access list specified in Step 4 are considered "interesting" and will cause the router to place a call to the destination protocol address identified in both Steps 1 and 4.
For more information about defining outgoing call numbers, see the "Configuring DDR" chapter.
German networks allow semipermanent connections between customer routers with BRIs and the 1TR6 basic rate switches in the exchange. Semipermanent connections are offered at better pricing than leased lines.
Configuring BRIs for semipermanent connection requires only that you use a keyword that indicates semipermanent connections when you are setting up network addressing as described in the previous section of this chapter.
To configure a BRI for semipermanent connections, use the following form of the dialer map command when you set up network addressing:
| Task | Command |
|---|---|
| Define the remote recipient's protocol address, host name, and dialing string; indicate semipermanent connections; optionally, provide the ISDN subaddress; set the dialer speed to 56 or 64 kbps, as needed. | dialer map protocol next-hop-address name hostname spc [speed 56 | 64] [broadcast] dial-string[:isdn-subaddress]1 |
To test the router's ISDN configuration, the following tasks are suggested:
| Task | Command |
|---|---|
| Check Layer 1 (physical layer) of the BRI. | show controllers bri number1 |
| Check Layer 1 (physical layer) of the PRI over T1. | show controllers t1 slot/port1 |
| Check Layer 1 (physical layer) of the PRI over E1. | show controllers e1 slot/port1 |
| Check Layer 2 (data link layer). | debug q921 |
| Check Layer 3 (network layer). | debug isdn events
debug q931 debug dialer show dialer 2 |
See the Debug Command Reference for information about the debug commands.
Use the following commands to monitor and maintain ISDN interfaces:
| Task | Command |
|---|---|
| Display information about the physical attributes of the ISDN BRI B- and D-channels. | show interfaces bri number |
| Display information about the physical attributes of the ISDN PRI over T1 B- and D-channels. (The number argument takes values between 1 and 23.) | show interfaces serial slot/port bchannel number1 |
| Display information about the physical attributes of the ISDN PRI over E1 B- and D-channels. (The number argument takes values between 1 and 31.) | show interfaces serial slot/port bchannel number |
| Display protocol information about the ISDN B- and D-channels. | show controllers bri number |
| Display information about memory, Layer 2 or Layer 3 timers, or status of PRI channels. (The service keyword is available for PRI only.) | show isdn {memory | timers | service} |
| Obtain general diagnostic information about the specified interface. | show dialer [interface type number] 2 |
This section provides the following ISDN BRI configuration examples:
The following example provides a simple partial configuration of a BRI interface that is connected to a PBX. This interface is connected to a switch that uses SPID numbers.
interface BRI0
 description connected to pbx line 61885
 ip address 7.1.1.3 255.255.255.0
 encapsulation ppp
 isdn spid1 123
 dialer map ip 7.1.1.1 name oldie 61886
 dialer map ip 7.1.1.2 name rudder 61884
 dialer map ip 7.1.1.4 name seinfeld 61888
 dialer-group 1
 no fair-queue
 ppp authentication chap
The following example configures BRI interfaces to connect into a rotary group (dialer-group) and then configures a dialer interface for that dialer-group. This configuration permits IP packets to trigger calls.
interface BRI 0
 description connected into a rotary group
 encapsulation ppp
 dialer rotary-group 1
interface BRI 1
 no ip address
 encapsulation ppp
 dialer rotary-group 1
interface BRI 2
 encapsulation ppp
 dialer rotary-group 1

interface BRI 3
 no ip address
 encapsulation ppp
 dialer rotary-group 1

interface BRI 4
 encapsulation ppp
 dialer rotary-group 1

interface Dialer 0
 description Dialer group controlling the BRIs
 ip address 8.1.1.1 255.255.255.0
 encapsulation ppp
 dialer map ip 8.1.1.2 name angus 14802616900
 dialer-group 1
 ppp authentication chap
dialer-list 1 protocol ip permit
The following example shows a BRI interface configured for Frame Relay and for IP, IPX, and AppleTalk routing. No static maps are defined because this setup relies on Frame Relay local management interface (LMI) signaling and Inverse ARP to determine the network addresses-to-DLCI mappings dynamically. (Because Frame Relay Inverse ARP is enabled by default, no command is required.)
interface BRI0
ip address 1.1.1.1 255.255.255.0
ipx network 100
appletalk cable-range 100-100 100.1
appletalk zone ISDN
no appletalk send-rtmps
encapsulation frame-relay IETF
dialer map ip 1.1.1.2 broadcast 4155551212
dialer map apple 100.2 broadcast 4155551212
dialer map ipx 100.0000.0c05.33ed broadcast 4085551234
dialer-group 1
!
access-list 101 deny igrp any host 255.255.255.255
access-list 101 permit ip any any
access-list 901 deny -1 FFFFFFFF 452
access-list 901 deny -1 FFFFFFFF 453
access-list 901 deny -1 FFFFFFFF 457
access-list 901 deny -1 FFFFFFFF 0 FFFFFFFF 452
access-list 901 deny -1 FFFFFFFF 0 FFFFFFFF 453
access-list 901 deny -1 FFFFFFFF 0 FFFFFFFF 457
access-list 901 permit -1
access-list 601 permit cable-range 100-100 broadcast-deny
access-list 601 deny other-access
!
dialer-list 1 protocol ip list 101
dialer-list 1 protocol novell list 901
dialer-list 1 protocol apple list 601
This section provides the following examples:
In the following example, the ISDN switch type is set to Primary-4ESS, ISDN PRI is configured on T1 controller 1/0, and the D channel is configured for dialer map classes that reference the NSF dialing plans. Finally, the map-class dialer command uses a dialing plan keyword and the dialer outgoing command refers to the same plan. This example supports a service offered only by AT&T on Primary-4ESS switches.
This example shows both the controller and interface commands required to make the ISDN interface operational and the DDR commands, such as the dialer map, dialer-group, and map-class dialer commands, that are needed to configure the ISDN interface to make outgoing calls.
! The following lines configure the channelized T1 controller; all timeslots are
! configured for ISDN PRI.
!
controller t1 1/1
 framing esf
 linecode b8zs
 pri-group timeslots 1-23
 isdn switchtype primary-4ess
!
! The following lines configure the D channel for DDR. This configuration applies
! to all B channels on the ISDN PRI interface.
!
interface serial1/1:23
 description Will mark outgoing calls from AT&T type calls.
 ip address 7.1.1.1 255.255.255.0
 encapsulation ppp
 dialer map ip 7.1.1.2 name tommyjohn class sdnplan 14193460913
 dialer map ip 7.1.1.3 name angus class megaplan 14182616900
 dialer map ip 7.1.1.4 name angus class accuplan 14193453730
dialer-group 1
 ppp authentication chap
map-class dialer sdnplan
 dialer outgoing sdn
map-class dialer megaplan
 dialer voice-call
 dialer outgoing mega
map-class dialer accuplan
 dialer outgoing accu
The following example shows a channelized T1 controller configured for PRI groups and for channel groups.The pri-group command and the channel-group command cannot have overlapping timeslots; note the correct timeslot configuration in this example.
controller t1 0
channel-group 0 timeslot 1-6
channel-group 1 timeslot 7
channel-group 2 timeslot 8
channel-group 3 timeslot 9-11
pri-group timeslot 12-24
The same type of configuration applies to channelized E1, also.
|
|