|
|

The Banyan Virtual Network System (VINES) protocol is a networking system for personal computers. This proprietary protocol was developed by Banyan Systems, Inc. and is derived from the Xerox Network System (XNS) protocol. Our implementation of VINES has been designed in conjunction with Banyan.
This chapter describes how to configure VINES and provides configuration examples. For a complete description of the commands mentioned in this chapter, refer to the "Banyan VINES Commands" chapter in the Router Products Command Reference publication.
Cisco's implementation of Banyan VINES provides routing of VINES packets on all media types. Although the software automatically determines a metric value that it uses for routing updates based on the delay set for the interface, this software implementation allows you to customize the metric. Cisco's implementation also offers address resolution to respond to address requests and broadcast address propagation. Media Access Control (MAC)-level echo support is also available for Ethernet, IEEE 802.2, Token Ring, and Fiber Distributed Data Interface (FDDI) media. Name-to-address mapping for VINES host names also is supported, as are access lists to filter packets to or from a specific network.
VINES network-layer addresses are 48-bit addresses that consist of a network number (better described as a server number) and a subnetwork number (better described as a host number). In this manual, VINES addresses are expressed in the format network:host.
The network number identifies a VINES logical network, which consists of a single server and a group of client nodes. The network number is 32 bits (4 bytes) long and is the serial number of the service node. Figure 16-1 shows two logical networks: network 1 and network 2.
The subnetwork number is 16 bits (2 bytes) long. For service nodes, the subnetwork number is always 1. For client nodes, it can have a value from 0x8001 through 0xFFFE.
The following is an example of a VINES network address:
3000577A:0001
In this address, the server number, or more specifically, the serial number of the service node, is 3000577A and the host number is 0001, indicating that this is a service node. Both portions of the address are expressed in hexadecimal.
To configure VINES routing, complete the tasks in the following sections. At a minimum, you must complete the tasks described in the section "Configure VINES Routing."
See the end of this chapter for configuration examples.
To configure VINES routing, first enable it on the router, then enable it on each interface. These are the only two tasks you must perform.
If you are configuring a VINES serverless network, you must also configure the router to respond to Address Resolution Protocol (ARP) address requests. You probably also will want to configure it for serverless support.
To enable VINES routing on the router, perform the following task in global configuration mode:
| Task | Command |
|---|---|
| Enable VINES RTP routing on the router. | vines routing [address] |
Enabling VINES routing on the router starts the VINES Routing Table Protocol (RTP) by default.
To enable Sequenced Routing Update Protocol (SRTP), you must perform the following tasks in global configuration mode:
| Task | Command |
|---|---|
| Step 1 Enable VINES RTP routing on the router. | vines routing [address] |
| Step 2 Enable VINES SRTP routing on the router. | vines srtp-enabled |
For an example of how to enable VINES routing, see the section "Typical VINES Network Configuration Example" later in this chapter.
After you have enabled VINES on the router, enable it on each interface that will handle VINES traffic. When you enable VINES processing on a specified interface, you can optionally set the metric for that interface. The metric sets the distance to another router or client accessible through that interface. The routing table uses metrics to determine which interface provides the best routing path. If you do not specify a metric, the system automatically chooses a reasonable value that is based on the interface type. The metrics are chosen to match as closely as possible the numbers that a Banyan server would choose for the same type and speed of interface.
To enable VINES routing on an interface other than a serial interface, perform the following task starting in EXEC mode:
| Task | Command |
|---|---|
| Enable VINES routing on an interface. | vines metric [whole [fractional]] |
To enable VINES routing on a serial interface, perform the following tasks in interface configuration mode:
| Task | Command |
|---|---|
| Step 1 Determine the bandwidth of the interface. | show interfaces1 |
| Step 2 Enable VINES routing, explicitly setting the metric. | vines metric [whole [fractional]] |
For a list of metric values, refer to the "Banyan VINES Commands" chapter in the Router Products Command Reference publication.
You can route VINES on some interfaces and transparently bridge it on other interfaces simultaneously. To do this, you must enable concurrent routing and bridging. To enable concurrent routing and bridging for the router, perform the following task in global configuration mode:
| Task | Command |
|---|---|
| Enable concurrent routing and bridging for the router. | bridge crb1 |
No special configuration is necessary for serverless Banyan VINES networks, such as separate networks of clients and servers connected by routers. On serverless networks, the router provides special processing for certain broadcast packets and certain packets directed at the router. This allows clients on the serverless network to find the services that are provided by a server on another network. This special processing is especially important when two networks, one with a server and one without a server, are connected to the same router.
Client systems on VINES networks are assigned network addresses dynamically. When a VINES client boots, it has no knowledge of its address or preferred server. Immediately after it initializes its hardware interface, the client sends a broadcast request asking a server to provide it with a network-layer address. One of our routers will respond to this broadcast request if there are no VINES servers on the physical network segment. The router then assigns an address to the network client. (In previous releases, the router would not respond by default.) The router generates a unique network number for the client based on its own VINES address. If the router assigns an address to a client, the router then acts as a network communication service provider for that client. A VINES file server must still be present somewhere on the network in order for the client to connect to all other network services.
For an example of how to configure VINES routing for various network topologies that include serverless networks, see the section "Serverless Network Configuration Example" later in this chapter.
To control access to VINES networks, you create access lists and then apply them to filters on individual interfaces. An access list is a list of VINES network numbers that is maintained by the router. The list controls access to or from a particular interface. Access lists are useful for providing network security.
There are two types of VINES access lists that you can use to filter routed traffic:
VINES has a third type of access list, called a simple access list, that restricts traffic based on source address and source address mask. This type of access list is used to decide which stations to accept time updates from, not to filter traffic. Simple access lists have numbers from 201 to 300.
You can define two types of filters on VINES networks:
Keep the following points in mind when configuring VINES network access control:
To control access to VINES network, perform the following tasks:
Step 1 Create an access list.
Step 2 Apply an access list to an interface.
To create a VINES access list, perform one or more of the following tasks in global configuration mode:
To apply an access list to an interface, perform the following task in interface configuration mode. Remember that you can apply only one access list to each interface.
| Task | Command |
|---|---|
| Apply a VINES access list to an interface. | vines access-group access-list-number |
For an example of how to create a VINES access list, see the section "Access List Example" later in this chapter.
To configure VINES network parameters, perform one or more of the tasks in the following sections:
You can choose a MAC-level encapsulation type for each Ethernet, Token Ring, and IEEE 802.2 interface. This controls the type of encapsulation used by the router when sending broadcast packets.
To select an encapsulation type, perform the following task in interface configuration mode:
| Task | Command |
|---|---|
| Set the MAC-level encapsulation type. | vines encapsulation [arpa | snap | vines-tr] |
By default, you enter VINES addresses as numerical values. Also, addresses are displayed numerically in the output of the show, ping, and trace commands. You can assign a host name to each VINES address. Names are easier to remember and type. Assigning a host name allows you to enter the name instead of the address, and it means that the name instead of the numeric address is displayed in output.
To assign a host name to a VINES network address, perform the following task in global configuration mode:
| Task | Command |
|---|---|
| Assign a host name to an address. | vines host name address |
By default, VINES addresses are represented as hexadecimal numbers. This applies to both the input of addresses and the representation of addresses in output from the router. You can configure the router to display addresses in decimal for consistency with Banyan network management displays.
Names are always preferred when printing addresses. If a name is not available, the address will be printed as a number in the base specified.
To display VINES addresses as decimal numbers, perform the following task in global configuration mode:
| Task | Command |
|---|---|
| Interpret VINES addresses in decimal. | vines decimal |
You can control the routing updates sent by the router in the following ways:
To control routing update frequency and propagation, perform one or both of the following tasks in interface configuration mode:
| Task | Command |
|---|---|
| Change the frequency of sending routing updates. | vines update interval seconds |
| Change how routing information is propagated. | vines update deltas |
To control the content of transmitted or received routing updates, or to control the source address of received routing updates, perform one or more of the following tasks in interface configuration mode:
To disable split horizon when generating regular periodic routing updates and to disable flash updates to indicate topology change for a changed route, perform the following tasks in global configuration mode:
| Task | Command |
|---|---|
| Disable split horizon and flash updates. | no vines enhancements |
To disable split horizon on networks that are not fully connected mesh interfaces like X.25 and Frame Relay, perform the following task in interface configuration mode:
| Task | Command |
|---|---|
| Disable split horizon when sending routing updates. | no vines split-horizon |
The VINES Routing Table Protocol (RTP) sends several types of messages, including redirect messages. If the router detects that a suboptimal path between two nodes is being used, it sends redirect messages to the nodes to indicate the better path.
To control the frequency of redirect messages on a specified interface, perform the following task in interface configuration mode:
| Task | Command |
|---|---|
| Set the frequency of RTP and SRTP redirect messages. | vines redirect [seconds] |
Fast switching allows higher throughput by switching packets using a cache created by previous packets. Fast switching also provides load sharing on a per-packet basis. Fast switching is enabled by default on all interfaces on which it is supported. Fast switching is not supported on serial interfaces using encapsulations other than High-Level Data Link Control (HDLC).
Packet transfer performance is generally better when fast switching is enabled. However, you might want to disable fast switching in order to save memory space on interface cards and to help avoid congestion when high-bandwidth interfaces are writing large amounts of information to low-bandwidth interfaces.
To disable fast switching on an interface, perform the following task in interface configuration mode:
| Task | Command |
|---|---|
| Disable fast switching. | no vines route-cache |
Banyan VINES servers synchronize time across the entire network by sending zero-hop and two-hop broadcast messages. The router software can process and generate time-synchronization messages. It can also retrieve the local time and place it into the VINES time system (which is most useful when running NTP locally) and can use the VINES time system to set a local clock. It is also possible to provide the router with a list of up to 20 destinations for time messages.
To set the VINES network time, perform one or more of the following tasks in global configuration mode:
For an example of how to set VINES time, see the section "Time-of-Day Service Example" later in this chapter.
VINES single route maintains a single route to the router. VINES single route can be enabled at any time after VINES routing has been enabled. If a VINES connection experiences slow performances due to low window size or cannot handle out-of-sequence packets, enable VINES single route. To set VINES single route on the router, perform the following task in global configuration mode:
| Task | Command |
|---|---|
| Enable VINES single route to maintain a single route to the server. | vines single-route |
VINES uses the Routing Table Protocol (RTP) to determine the best path when several paths to a destination exist. RTP then dynamically updates the routing table. However, you might want to add static routes to the routing table to explicitly specify paths to certain destinations.
The decision to use a static route or a dynamic route is always determined by the relative metric numbers. Be careful when assigning static routes. If a static route is assigned with a better metric than the dynamic routes and the links associated with the static routes are lost, traffic may stop being forwarded, even though an alternative route might be available.
To add a static route to the routing table, perform the following task in global configuration mode:
| Task | Command |
|---|---|
| Add a static route to the routing table. | vines route number address [whole [fractional]] |
You can configure static routes that can be overridden by dynamically learned routes. These are referred to as floating static routes. You can use a floating static route to create a path of last resort that is used only when no dynamic routing information is available.
To avoid the possibility of a routing loop occurring, by default floating static routes are not redistributed into other dynamic protocols. Floating static routes must not be advertised on interfaces that are paths to the destination. To configure a floating static route, assign a metric to the static route that is worse (higher) than all dynamic routes.
To add a floating static route to the routing table, perform the following task in global configuration mode:
| Task | Command |
|---|---|
| Add a floating static route to the routing table. | vines route number address [whole [fractional]] |
You can specify static paths to neighbor stations on the network. This is useful for testing VINES networks with test equipment that does not generate hello packets.
To add a static path to a neighbor station, perform the following task in interface configuration mode:
| Task | Command |
|---|---|
| Add a static path to the neighbor station. | vines neighbor address mac-address encapsulation [whole [fractional]] |
Normally, the router decides whether to forward a broadcast packet on an interface based on the presence of local servers and on the settings of both the "hop count" and "class" fields of the VINES IP header. If there are any local servers present, the router follows the normal rules of VINES IP and forwards the broadcast after examining both the "hop count" and "class" fields. If there are no local servers present, then the "class" field is ignored when making the forwarding decision. You can override this default behavior in either of two ways. The first override is to have the router always ignore the "class" field and make the broadcast forwarding decision solely based on hop count. The second override is to have the router never ignore the "class" field and always make the broadcast forwarding decision based upon both the "class" and "hop count" fields.
To have the router modify how it forwards broadcast packets, perform the following task in interface configuration mode:
You can configure VINES over X.25, Frame Relay, and SMDS networks. To do this, configure the address mappings as described in the appropriate chapter of this publication. You can also configure VINES over HDLC and PPP; address maps are not necessary for these two protocols. You can fast switch VINES over serial interfaces configured for HDLC, Frame Relay, PPP, SMDS, and ATM.
To monitor and maintain a VINES network, perform one or more of the following tasks at the EXEC prompt:
| Task | Command |
|---|---|
| Delete entries from the VINES fast-switching cache table. | clear vines cache [interface interface | neighbor address | server network] |
| Delete VINES IPC connection blocks from the router. | clear vines ipc number |
| Delete entries from the neighbor table. | clear vines neighbor {network | *} |
| Delete network addresses from the routing table. | clear vines route {network | *} |
| Zero the VINES-related traffic statistics displayed by the show vines traffic command. | clear vines traffic |
| Send datagrams to a host to determine network connectivity. | ping vines [address] |
| Display the VINES access lists currently defined. | show vines access [access-list-number] |
| Display the contents of the VINES fast-switching cache table. | show vines cache [address | interface type number | neighbor address | server network] |
| Display the entries in the VINES host name table. | show vines host [name] |
| Display VINES-related interface settings. | show vines interface [type number] |
| Display information about any currently active IPC connections. | show vines ipc |
| Display the contents of the VINES neighbor table. | show vines neighbor [address | interface type number | server number] |
| Display the contents of the VINES routing table. | show vines route [number | neighbor address] |
| Display information about the router's application layer support. | show vines service [fs | nsm | ss | vs] |
| Display the statistics about VINES protocol traffic. | show vines traffic [type number] |
| Determine the path a packet takes when traversing a VINES network. | trace [vines | oldvines] [address] |
If you find that two routers have the same VINES network address, you can have the routers dynamically recompute their addresses. To do this, perform the following task in global configuration mode on each of the two routers:
| Task | Command |
|---|---|
| Dynamically redetermine the router's address. | vines routing recompute |
Use the configuration examples in the following sections to help in configuring VINES routing on your network:
Figure 16-2 illustrates how to configure a simple VINES network.
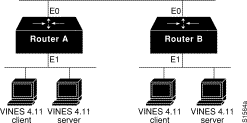
The following is an example configuration for Routers A and B:
vines routing
!
interface ethernet 0
 vines metric 2
!
interface ethernet 1
 vines metric 2
The following examples illustrate how to configure VINES routing for various network topologies that include serverless networks. The first example illustrates how to configure a simple serverless network (see Figure 16-3). Note that this is no longer any different from the configuration of a network that has servers.
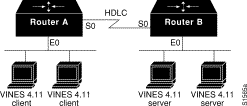
vines routing
!
interface ethernet 0
 vines metric 2
!
interface serial 0
 vines metric 45
vines routing
!
interface ethernet 0
 vines metric 2
!
interface serial 0
 vines metric 45
The configuration in Figure 16-4 has an X.25 interface instead of an HDLC serial line, and it also has multiple versions of VINES software running at the same time. Again, note that there is no longer any difference from the configuration of a network that has servers.

vines routing
!
interface ethernet 0
 vines metric 2
!
interface serial 0
 vines metric 55
vines routing
!
interface ethernet 0
 vines metric 2
!
interface serial 0
 vines metric 55
The configuration in Figure 16-5 has an FDDI interface instead of a serial line. It also has the servers for the different VINES versions on different physical networks and has a requirement that the clients to be able to run any VINES version. The best way to configure this topology would be the following configuration.
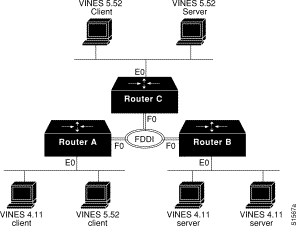
vines routing
!
interface ethernet 0
 vines metric 2
 vines serverless broadcast
!
interface fddi 0
 vines metric 1
vines routing
!
interface ethernet 0
 vines metric 2
!
interface fddi 0
 vines metric 1
The broadcast keyword on the vines serverless command on server A causes it to forward packets onto the FDDI ring as broadcasts instead of sending them to either Router B or Router C. This allows the default serverless processing on both routers to forward the frame from the FDDI ring to the Ethernet network.
Figure 16-6 illustrates how to configure an access list that filters all packets between two VINES servers. For this example, the servers in the upper left and lower right corners are configured.
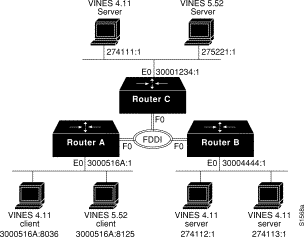
On Router B, you would set up the following configuration:
vines routing
vines access-list 1 deny IP 274113:1 0:0 274111:1 0:0
vines access-list 1 permit IP 0:0 FFFFFFFF:FFFF 0:0 FFFFFFFF:FFFF
!
interface ethernet 0
 vines metric 2
 vines access-group 1
!
interface fddi 0
 vines metric 1
The first line in the access list prohibits any communication between the two servers, while the second line allows all other communication to pass through the router.
If you wanted to allow only mail traffic between these two servers, you would need the following configuration. Port 4 is the VINES Mail port.
vines routing
vines access-list 101 permit IPC 274113:1 0:0 0 FFFF 274111:1 0:0 4 0
vines access-list 101 permit IPC 274111:1 0:0 4 0 274113:1 0:0 0 FFFF
vines access-list 101 deny IP 274111:1 0:0 274113:1 0:0
vines access-list 101 permit IP 0:0 FFFFFFFF:FFFF 0:0 FFFFFFFF:FFFF
!
interface ethernet 0
 vines metric 2
 vines access-group 101
!
interface fddi 0
 vines metric 1
The first line in the access list allows mail messages being sent from the server in the lower right to the server in the upper left. The second line allows mail messages in the other direction. The third line prohibits all other communication between these two servers. The last line allows all other communication to pass through the router.
The following example, using the configuration shown in Figure 16-6, illustrates how to configure the "Time of Day" support in a VINES network. Router C also is configured as a NTP server and will provide time to the VINES network.
vines routing
!
interface ethernet 0
 vines metric 2
!
interface fddi 0
 vines metric 1
!
vines access-list 201 permit 30001234:1 0:0
vines access-list 201 deny 0:0 FFFFFFFF:FFFF
vines time access-group 201
vines time participate
vines time set-system
vines routing
!
interface ethernet 0
 vines metric 2
!
interface fddi 0
 vines metric 1
!
ntp peer 128.9.2.129
vines time participate
vines time use-system
The access list on Routers A and B is not absolutely necessary. It prevents the routers from learning the time from anyone other than Router C. The reason this is not very important is that each time message from Router C will override any time that has been previously learned (because of the vines time use-system command).
|
|