|
|

This chapter describes how to connect devices across telephone lines using SLIP, PPP, or XRemote (the NCD X Windows terminal protocol). Specifically, this chapter contains the following sections:
You can make a serial connection to a remote host using the Serial Line Internet Protocol (SLIP). Your system administrator can configure SLIP to expect a specific address or to provide one for you. It is also possible to set up SLIP in a mode that compresses packets for more efficient use of the line.
To make a SLIP connection, enter the following command at the EXEC prompt:
slip {/default | {remote-ip-address | remote-name} [@tacacs-server] [/routing]} [/compressed]| /default | (Optional) Makes a SLIP connection when a default address has been configured. |
| remote-ip-address | IP address of the client workstation or PC. |
| remote-name | Name of the client workstation or PC. |
| @tacacs-server | (Optional) The IP address or IP host name of the TACACS server product to which your TACACS authentication request is sent. |
| /routing | (Optional) Indicates that the remote system is a router. Line must be configured for asynchronous routing using SLIP encapsulation. |
| /compressed | (Optional) Indicates that IP header compression should be negotiated. Your system administrator must have configured the system with the ip tcp header-compression passive command for this command to be valid in EXEC mode. The command ip tcp header-compression forces header compression on or off. The default is to not compress the packets. The configuration file must have header compression on and the slip /compressed EXEC command must be entered for header compression to occur. |
If you specify an address for the TACACS server product using default or tacacs-server, the address must be the first parameter in the command after you type slip. If you do not specify an address or enter default, you are prompted for an IP address or host name. You can enter default at this point.
If you do not use the tacacs-server argument to specify a TACACS server product for SLIP address authentication, the TACACS server specified at login (if any) is used for the SLIP address query.
To optimize bandwidth on a line, SLIP allows compression of the SLIP packets using Van Jacobson TCP header compression as defined in RFC 1144.
The following example illustrates how to make a connection when a default IP address is assigned. Once a correct password is entered, you are placed in SLIP mode, and the IP address is displayed.
Router> slip
Password:
Entering SLIP mode.
Your IP address is 192.31.7.28, MTU is 1524 bytes
The following example illustrates the prompts displayed and the response required when dynamic addressing is used to assign the SLIP address:
Router>slipIP address or hostname?192.31.6.15Password: Entering SLIP mode Your IP address is 192.31.6.15, MTU is 1524 bytes
In the preceding example, the address 192.31.6.15 has been assigned as the default. Password verification is still required before SLIP mode can be enabled.
Router> slip default
Password:
Entering SLIP mode
Your IP address is 192.31.6.15, MTU is 1524 bytes
The following example illustrates the implementation of header compression on the interface with the IP address 128.66.2.1:
Router> slip 128.66.2.1 /compressed
Password:
Entering SLIP mode.
Interface IP address is 128.66.2.1, MTU is 1500 bytes.
Header compression will match your system.
In the preceding example, the interface is configured for ip tcp header-compression passive, which permitted the user to enter the /compressed keyword at the EXEC mode prompt. The message "Header compression will match your system" indicates that the user specified compression. If the line was configured for ip tcp header-compression on, this line would read "Header compression is On."
The following example specifies a TACACS server product named "parlance" for address authentication:
Router> slip 1.0.0.1@parlance
Password:
Entering SLIP mode.
Interface IP address is 1.0.0.1, MTU is 1500 bytes
Header compression will match your system.
You can make asynchronous connections using the Point-to-Point Protocol (PPP). To start a PPP connection, enter the following command at the EXEC prompt:
ppp {/default | {remote-ip-address | remote-name} [@tacacs-server]} [/routing]| /default | (Optional) Makes a PPP connection when a default address has been configured. |
| remote-ip-address | IP address of the client workstation or PC. This parameter can only be specified if the line is set for dynamic addresses using the line configuration command async address dynamic. |
| remote-name | Name of the client workstation or PC. This parameter can only be specified if the line is set for dynamic addresses using the line configuration command async address dynamic. |
| @tacacs-server | (Optional) Specifies an IP address or IP host name of the TACACS server to which the user's TACACS authentication request is sent. |
| /routing | (Optional) Indicates that the remote system is a router and that routing messages should be exchanged over the link. The line must be configured for asynchronous routing using PPP encapsulation. |
If you specify an address for the TACACS server product, either default or tacacs-server, the address must be the first parameter in the command after you type ppp. If you do not specify an address or enter default, you will be prompted for an IP address or host name. You can enter default at this point.
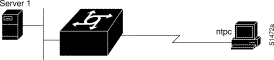
The following example shows a line that is in asynchronous mode using PPP encapsulation (see Figure 4-1). The PC's name is "ntpc" (assuming that the name "ntpc" is in the domain name system [DNS] so that it can be resolved to a real IP address). The PC must be running a terminal emulator program.
Router> ppp ntpc@server1
You use the XRemote protocol with an X display station and a modem to connect to remote hosts via TCP/IP and LAT. You make connections in one of the following ways:
The following sections outline the steps for starting up XRemote in several typical environments. When possible, use the automated processes. Make sure your system administrator has already configured a path for loading fonts.
If your host computer supports a server product for XDMCP (such as the xdm program included in X11R4 or later), you can use automatic session startup to make an XRemote session connection. To do so, enter the following command:
xremote xdm [hostname]| hostname | (Optional) Host computer name. |
This command sends an XDMCP session startup request to the host computer. If you do not specify a host name, a broadcast message is sent to all hosts. The first host to respond by starting up a session is used.
The server and X terminal stay in XRemote mode until either the display manager terminates the session or a reset request is received from the X terminal.
The following example starts a session with a remote host named "star":
Router>xremote xdm star
If your host computer supports DECwindows login sessions, you can use automatic session startup to make an XRemote session connection. Once the system administrator at the remote host configures support for DECwindows over LAT, you can use the EXEC command xremote lat to initiate the connection. The command has the following syntax:
xremote lat service| service | Name of the desired LAT service. |
After you issue this command, expect the following to occur:
Log on to the system. Upon completion of login, more fonts are loaded, and the remote session begins.
The following example begins connection with a LAT service named "WHIRL":
Router> xremote lat WHIRL
If you do not use a host computer that supports XDMCP or LAT, you must use manual session startup. Manual session startup involves several steps:
The following sections describe these tasks.
To prepare the server product for manual startup, enter the xremote EXEC command at the system prompt.
xremoteThis command begins the instructions that prompt you through the connection.
The following example illustrates how a successful manual XRemote session begins:
dialup> xremote
XRemote enabled; your display is dialup:2006
Start your clients and type XRemote again
The system replies with a message informing you of your X display location. You will use this information to tell the host the location of your X display server product.
If no clients are found, you see the following message:
No X clients waiting - check that your display is darkstar:2006
Check your hosts to determine whether an error has occurred when the session started. The most likely cause is that there is an improperly specified display location or the host computer did not recognize the name of your server product.
You can connect to a host using one of the following connection commands, and log on as usual:
telnetAt this point, you are logged in to the remote host.
Inform the host computer of your X display location, which the server product provided when you enabled XRemote manually.
For most versions of the UNIX operating system, the X display location is set by using the setenv command to set the DISPLAY environment variable . Refer to your UNIX system's online X(1) manual page for more information.
On VAX/VMS systems, use the SET DISPLAY command to set the X display location. For more information, refer to the VMS DCL Dictionary.
Now you start your client applications for your host operating system.
The server product accepts the X connection attempt from the client application and places the client in a dormant state.
If it is possible to log off the host computer and keep your X clients running in the background, you can do so now. This conserves resources on both the host and the server product that would otherwise be inaccessible until you exited from XRemote state.
If you cannot log off the host computer and keep your clients running, escape back to the server product prompt using the escape sequence (Ctrl-^ X by default).
Begin a manual remote session again (refer to the "Enable XRemote Manually" section earlier in this chapter). If the X clients connected successfully, the session is put into XRemote mode, and the clients complete their startup.
If no clients are found, you see the following message:
No X clients waiting - check that your display is darkstar:2018
Check your hosts to determine whether an error has occurred when the session started. The most likely cause is an improperly specified display location. Or the host computer did not recognize the name of your server product.
In manual operation, the server product and X terminal remain in XRemote mode until all clients disconnect or a reset request is received from the X terminal.
A session might terminate during startup because you invoked transient X clients that set some parameters and then disconnected (such as xset or xmodmap). There must always be one session open or the connection will be reset.
A user on an X display server product that does not support XRemote can run the XRemote protocols. An X display server product (such as a PCX, MacX or UNIX workstation) connected to an Ethernet network can dial out through a server product on a conventional modem to access an X client program on a host residing on another network. The server product provides the server-side helper process.
To run XRemote, connect to one of the XRemote ports.
Find out from your administrator whether the connection from your X display terminal is configured as an individual line or a rotary connection.
For information about how to configure individual lines and rotary connections, refer to the publications Access and Communication Servers Configuration Guide and the Access and Communication Servers Command Reference.
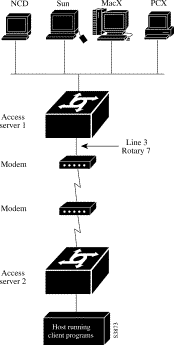
Figure 4-2 illustrates a configuration in which a display server product is not running XRemote. In this configuration, the server-side XRemote helper is running on Access Server 1, and the client-side XRemote helper is running on Access Server 2.
You can issue any of the following commands to terminate a terminal session:
exitUse the examples in this section to understand how to make XRemote connections.
The following example shows a connection from an X display terminal through a server product to a host running client programs.
dialup> xremote
XRemote enabled; your display is dialup:2006
Start your clients and type XRemote again
dialup> telnet eureka
Trying EUREKA.NOWHERE.COM (252.122.1.55)... Open
SunOS UNIX (eureka)
login: deal
Password:
Last login: Fri Apr 1 17:17:46 from dialup.nowhere.com
SunOS Release (SERVER+FDDI+DBE.patched) #14: Fri Apr 8 10:37:29 PDT 1994
eureka%setenv DISPLAY dialup:2006eureka%xterm &[1] 15439
eureka% logout
[Connection to EUREKA closed by foreign host]
dialup> xremote
Entering XRemote
The server product and X terminal stay in XRemote mode until either the display manager terminates the session or a reset request is received from the X terminal:
Connection closed by foreign host.
eureka%
This section provides two examples of XRemote connections between server products.
The following steps show how an XRemote connection is established for a configuration like the one shown in Figure 4-2. These steps assume that the administrator has set the user's display environment variable to identify the user's X display terminal.
The following example shows the steps to make an XRemote connection between server products. The number 9016 in the first line of the display indicates a connection to individual line 16. If the administrator had configured a rotary connection, the user would enter 10000 plus the number of the rotary instead of 9016.
space% telnet golden-road 9016
Trying 192.31.7.84 ...
Connected to golden-road.cisco.com.
Escape character is '^]'.
User Access Verification
Password:
Password OK
 --- Outbound XRemote service ---
Enter X server name or IP address: innerspace
Enter display number [0]:
 Connecting to tty16... please start up XRemote on the remote system
atdt 13125554141DIALING RING CONNECT 14400 User Access Verification Username:dealPassword: Welcome to the cisco dial-up remote access server.
dialup> xremote
XRemote enabled; your display is dialup:2006
Start your clients and type XRemote again
dialup>telnet sparksTrying SPARKS.NOWHERE.COM (252.122.1.55)... Open SunOS UNIX (sparks) login:dealPassword: Last login: Fri Apr 1 17:17:46 from dialup.nowhere.com SunOS Release (SERVER+FDDI+DBE.patched) #14: Fri Apr 8 10:37:29 PDT 1994
sparks%setenv DISPLAY dialup:2006sparks%xterm &[1] 15439
sparks% logout
[Connection to SPARKS closed by foreign host]
dialup> xremote
Entering XRemote
Once the connection is closed by the foreign host, the Xterm window appears on the local workstation screen:
Connection closed by foreign host.
sparks%
|
|