|
|

This chapter includes procedures for rack-mounting and installing the Cisco 7000.
To rack-mount the Cisco 7000, which is an option, refer to the configuration note Cisco 7000 and Cisco 7507 Rack-Mount Kit Installation Instructions (Document Number 78-1058-xx, where xx is the latest version of the document), which accompanied the rack-mount kit, and which is available on UniverCD or as a printed copy.
For translated versions of this warning, refer to the appendix "Translated Safety Warnings."
When installing the chassis on a table or the floor, ensure that you have planned a clean, safe location for the router and have considered the following:
On the rear of the chassis, do the following:
Step 2 Check the captive installation screws on the RP, SP (or SSP), and each interface processor, and tighten any that are loose.
Step 3 Ensure that both power supply bays are empty.
Step 4 Two people are required to perform this step. With a person positioned at either side of the chassis, grasp the bottom edge of the chassis with one hand near the front and the other near the back. Slowly lift the chassis in unison. Avoid sudden twists or moves to prevent injury.
Step 5 Place the chassis in a location where the air intake vent on the front of the chassis (the bottom front panel) is not drawing in exhaust air from other equipment.
Step 6 Ensure that you have at least three or four feet of clearance around the rear of the chassis. You will need this space to install the power supplies, perform maintenance on the chassis, and observe LED indications.
Step 7 After you correctly position the chassis, proceed to the next section "Installing the Power Supplies."
To install the power supplies, refer to the following documentation:
After you install the power supplies, refer to the section "Setting the Boot Jumper on the RP."
The RP hardware configuration register boot field is shown in Figure 3-1.
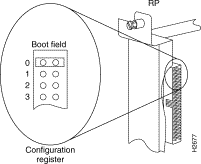
When the boot field is set to 0, you must boot the operating system manually by giving a b (or boot) command to the system bootstrap program or ROM monitor. You can enter the boot command only, or include additional boot instructions with the command such as the name of a file stored in Flash memory or a file that you specify for booting from a network server.
To form the filename, the system starts with cisco and links the octal equivalent of the boot field value (jumper setting) and the processor type in the following format: cisco<jumpervalue>-<processorname>. The system uses that filename to invoke the system image from ROM or by booting from a network server.
However, if the configuration file contains any boot instructions, the system uses those boot instructions instead of the filename it computed from the jumper settings. You must set the boot field on your RP for the boot functions you require.
For more detailed information on the hardware configuration register or the software configuration register feature, which is available in Cisco Internetwork Operating System (Cisco IOS) Release 10.0 or later, refer to the section "Software Configuration Register Settings at Startup," in the chapter "Performing a Basic Configuration of the Cisco 7000," or to the Cisco 7000 Hardware Installation and Maintenance publication, which is available on UniverCD or as a printed copy.
![]()
![]()
![]()
![]()
![]()
![]()
![]()
![]()
Posted: Fri Oct 19 16:42:49 PDT 2001
All contents are Copyright © 1992--2001 Cisco Systems, Inc. All rights reserved.
Important Notices and Privacy Statement.
